Sometimes when you repair your local area connection from the local area connection status window, you find out that your DNS cache could not be cleared and whatever you do, the cache will not clear up. So here’s the cool way of doing it..
Open your command prompt and type the following command:
C:\>net stop dnscache
If it says that the dnscache is not started then type the following command:
C:\>net start dnscache
It will start your local dns cache. Now try flushing your dns cache by issuing the following command:
C:\>ipconfig /flushdns
It will most probably clear your dns cache and display the results for you.
If you want to see what is in your local dns cache at this time, issue this command to find out:
C:\>ipconfig /displaydns
This can also be done as:
Go to run and type services.msc
select DNS Client, select automatic from drop down menu and start the service.
Tuesday, June 29, 2010


Thursday, June 24, 2010
Your account does not have access to the vault containing this item' is generated when trying to open an archived item
Exact Error Message
Your account does not have access to the vault containing this item. Try using the same logon details you would use to log on to Microsoft Exchange Server. Alternatively you may ask your administrator to grant you access to the vault."
Details:Your account does not have access to the vault containing this item. Try using the same logon details you would use to log on to Microsoft Exchange Server. Alternatively you may ask your administrator to grant you access to the vault."
"Enterprise Vault is retrieving your item...Your password may be required..." when trying to open an archived email. (Figure 1)
Figure 1

Additionally,another window appears with the following information "Your account does not have access to the vault containing this item." (Figure 2)
Figure 2

This error can be generated by multiple issues and the following items should be checked:
- Verify using the same logon details used to log on to the Microsoft Exchange Server.
- The account used needs to have access to the vault containing the item.
- May be an issue with the Enterprise Vault add-in. See Related Documents regarding the ResetEVClient utility to resolve this issue.
- Add the Enterprise Vault server names to the Exchange Mailbox Policy. On the Advanced tab, select Outlook and modify the Add server to Intranet Zone setting.
Monday, June 21, 2010
there was problem connecting to microsoft office outlook
Office Communicator 2007 and Outlook 2007 Integration Error
After installing the Office Communicator 2007 client you may have two errors indicating that there is a problem with Communicator’s integration with Outlook.The first error refers to a required hotfix that you can download directly from the link provided in the “Information” dropdown in the Communicator client. Simply select the link in the dropdown and install the patch.

The second possible error is a bit more cryptic.
“There was a problem connecting to Microsoft Office Outlook. The e-mail address used in your default Outlook profile is different from the sign-in address used in Communicator. Change your default Outlook profile to match the sign-in address you are using in Communicator, and then sign out and sign back in to Communicator.”
This occurs because your Outlook profile was created with an address that is different from the default sip address used when activating the Communicator settings for your user profile in Active Directory. For example: If your AD login is jsmith@fuzzy.net, Communicator will use that address as your default sip login. However, if your default SMTP address is something different, such as john.smith@fuzzy.net, Outlook will default to that address when creating your mail profile. To correct this issue, you need to delete your Outlook profile and recreated it using the jsmith@fuzzy.net SMTP address.
To accomplish this, open your Outlook client and go to “Tools/Account Settings..” and select “Microsoft Exchange Server” from the “E-mail” tab and press the “Remove” icon to delete the profile. Once, deleted, you can now re-create the account by selecting the “New…” icon and then the “Microsoft Exchange, POP3, IMAP, or HTTP” service and filling out the “Add New E-mail Account” using the SMTP address that matches your sip address.
WARNING: Removing and adding an Outlook profile should not cause any loss of mail, however, anytime you alter configurations on a production system, make sure to get a complete backup first!
If the preceding fails to fix your integration issue, you may have a problem with your mapi32.dll. The mapi32.dll file controls the sending and receiving of messages between Outlook and other applications. If an application install replaced a newer version of mapi32.dll with an older version, Outlook integration could fail. To replace mapi32.dll with the most recent version available on your PC, run the command fixmapi.exe and reboot your PC. Note that if mapi32.dll is marked read-only, this command will fail.
Friday, June 18, 2010
C:\WINDOWS\Installer\fbf6b0f.msp was rejected by digital signature policy.
When you try to install a large Microsoft Windows Installer (.msi) package or a large Microsoft Windows Installer patch (.msp) package on a computer that is running Windows Server 2003 Service Pack 2, you receive the following error message: Additionally, the following event may be logged in the Application log:
Error 1718. File FileName was rejected by digital signature policy.
Type: Error
Source: MsiInstaller
Category: None
Event ID: 1008
Date: Date
Time: Time
User: N/A
Computer: ComputerName
Description:
The installation of FileName is not permitted due to an error in software restriction policy processing. The object cannot be trusted.
Source: MsiInstaller
Category: None
Event ID: 1008
Date: Date
Time: Time
User: N/A
Computer: ComputerName
Description:
The installation of FileName is not permitted due to an error in software restriction policy processing. The object cannot be trusted.
 Back to the top
CAUSEThis problem occurs if the Windows Installer process has insufficient contiguous...
This problem occurs if the Windows Installer process has insufficient contiguous virtual memory to verify that the .msi package or the .msp package is correctly signed.
RESOLUTIONUpdate download information The following files are available for download from...
Update download information
The following files are available for download from the Microsoft Download Center:Collapse this image

Collapse this image
Collapse this image
For more information about how to download Microsoft support files, click the following article number to view the article in the Microsoft Knowledge Base:
119591 (http://support.microsoft.com/kb/119591/ ) How to obtain Microsoft support files from online services
Microsoft scanned this file for viruses. Microsoft used the most current virus-detection software that was available on the date that the file was posted. The file is stored on security-enhanced servers that help prevent any unauthorized changes to the file. Prerequisites
You must have Windows Server 2003 Service Pack 2 installed to apply this update.Restart requirement
You must restart your computer after you apply the update.Update replacement information
This update does not replace any other updates.File information
The English version of this update has the file attributes (or later file attributes) that are listed in the following table. The dates and times for these files are listed in Coordinated Universal Time (UTC). When you view the file information, it is converted to local time. To find the difference between UTC and local time, use the Time Zone tab in the Date and Time item in Control Panel.Update for Windows Server 2003 (KB973825)
Collapse this table
| File name | File version | File size | Date | Time | Platform | SP requirement | Service branch |
|---|---|---|---|---|---|---|---|
| Advapi32.dll | 5.2.3790.4555 | 619,008 | 18-Jul-2009 | 15:58 | x86 | SP2 | SP2GDR |
| Advapi32.dll | 5.2.3790.4555 | 619,008 | 18-Jul-2009 | 16:19 | x86 | SP2 | SP2QFE |
Update for Windows Server 2003, x64 Edition (KB973825)
Collapse this table
| File name | File version | File size | Date | Time | Platform | SP requirement | Service branch |
|---|---|---|---|---|---|---|---|
| Advapi32.dll | 5.2.3790.4555 | 1,052,160 | 18-Jul-2009 | 21:45 | x64 | SP2 | SP2GDR |
| Wadvapi32.dll | 5.2.3790.4555 | 619,008 | 18-Jul-2009 | 21:45 | x86 | SP2 | WOW |
| Advapi32.dll | 5.2.3790.4555 | 1,065,984 | 18-Jul-2009 | 16:32 | x64 | SP2 | SP2QFE |
| Wadvapi32.dll | 5.2.3790.4555 | 619,008 | 18-Jul-2009 | 16:32 | x86 | SP2 | WOW |
Update for Windows Server 2003 for Itanium-based Systems (KB973825)
Collapse this table
| File name | File version | File size | Date | Time | Platform | SP requirement | Service branch |
|---|---|---|---|---|---|---|---|
| Advapi32.dll | 5.2.3790.4555 | 1,482,752 | 18-Jul-2009 | 21:44 | IA-64 | SP2 | SP2GDR |
| Wadvapi32.dll | 5.2.3790.4555 | 619,008 | 18-Jul-2009 | 21:44 | x86 | SP2 | WOW |
| Advapi32.dll | 5.2.3790.4555 | 1,483,776 | 18-Jul-2009 | 16:32 | IA-64 | SP2 | SP2QFE |
| Wadvapi32.dll | 5.2.3790.4555 | 619,008 | 18-Jul-2009 | 16:32 | x86 | SP2 | WOW |
WORKAROUNDImportant This section, method, or task contains steps that tell you how to modi...
Important This section, method, or task contains steps that tell you how to modify the registry. However, serious problems might occur if you modify the registry incorrectly. Therefore, make sure that you follow these steps carefully. For added protection, back up the registry before you modify it. Then, you can restore the registry if a problem occurs. For more information about how to back up and restore the registry, click the following article number to view the article in the Microsoft Knowledge Base:
Note If the computer is joined to a domain, a domain policy update may override the registry changes that you make. We strongly recommend that you disconnect the computer from the domain before you follow these steps.
Notes
322756 (http://support.microsoft.com/kb/322756/ ) How to back up and restore the registry in Windows
To work around this problem, change the PolicyScope registry value to 1 before you try to install the package. To do this, follow these steps. Note If the computer is joined to a domain, a domain policy update may override the registry changes that you make. We strongly recommend that you disconnect the computer from the domain before you follow these steps.
- Click Start, click Run, type regedit, and then click OK.
- In Registry Editor, locate and then click the following registry key: HKEY_LOCAL_MACHINE\Software\Policies\Microsoft\Windows\Safer\CodeIdentifiersNote Before you modify this key, we recommend that you back up this key. To do this, right-click CodeIdentifiers, and then click Export. Save the file to a location where you can find it on the computer.
- Change the PolicyScope registry value. To do this, double-click PolicyScope, and then change the setting from 0 to 1.
- Close Registry Editor.
- Click Start, click Run, type cmd, and then click OK to open a Command Prompt window.
- At the command prompt, type the following command, and then press ENTER:net stop msiserverThis command stops the Windows Installer service if the service is currently running in the background. When the service has stopped, close the Command Prompt window, and then go to step 7.
Note If you receive the following message at the command prompt, close the Command Prompt window, and then go to step 7: - Install the package that you were trying to install when you received the error message that is mentioned in the "Symptoms" section.
- After you install the package, repeat steps 1 and 2. Then, change the PolicyScope registry value back to 0.
- If you disconnected the computer from a domain, rejoin the domain, and then restart the computer.
Note If you did not disconnect the computer from a domain, you do not have to restart the computer.
- Click Start, click Run, type control admintools, and then click OK.
- Double-click Local Security Policy.
- Click Software Restriction Policies.
Note If no software restrictions are listed, right-click Software Restriction Policies, and then click Create New Policy. - Under Object Type, double-click Enforcement.
- Click All users except local administrators, and then click OK.
- Restart the computer.
Notes
- The workaround may not work in an Active Directory domain environment. In an Active Directory domain environment, a domain policy refresh operation will overwrite the local Software Restriction Policies.
- Adding more RAM to the computer will not resolve the problem.
MORE INFORMATIONStarting with Windows XP, a security policy that is named Software Restriction P...
Starting with Windows XP, a security policy that is named Software Restriction Policies (also known as SAFER) was introduced to help users avoid running unsafe files. Windows Installer uses software restriction policies to verify the signatures of signed .msi package files and signed .msp package files. Windows Installer does this to make sure that the files were not tampered with before they are installed on the computer. Windows XP and Windows Server 2003 require that the whole .msi package file or the whole .msp package file to be loaded into one contiguous piece of memory in the address space of the Windows Installer process. If an .msi package file or an .msp package file is too large to fit into a contiguous piece of virtual memory, Windows Installer cannot verify that the package is correct. In this scenario, you experience the symptoms that are described in the “Symptoms” section. The fix that is described in this article enables software restriction policies to use less virtual memory to perform the signature verification. Therefore, Windows Installer can verify any size files.
Wednesday, June 16, 2010
How to change listening port on webbserver IIS 7?
Right click on your site in the left pane, and go to Bindings. click Edit There you can add and remove ports which are bound to your site (ports it will respond on):

Monday, June 14, 2010
unable to install printer. the print processor does not exist
Ok obviously you are recieving this error upon the installation of a new or exisiting printer on your local area network, or heck it maybe connected directly to the PC. Well to fix this problem simply uninstall the driver, and then reinstall. You may be prompted during the hardware installation wizard to Use the Existing Driver (recommended) or reinstall the driver. Well, just reinstall it. This will remove, and reinstall the print processor associated with the service / printer.
To recap go to:
To recap go to:
Should you have any issues feel free to collaborate and post them here. Hope this helps! |
STOP 0x0000007B Error Messages
STOP 0x0000007B Error Messages
The STOP 0x0000007B error will always appear on a STOP message, more commonly called a Blue Screen of Death (BSOD). One of the errors below or a combination of both errors may display on the STOP message:- "STOP: 0x0000007B"
- "INACCESSIBLE_BOOT_DEVICE"
Cause of STOP 0x0000007B Errors
STOP 0x0000007B errors are caused by device driver issues (especially those related to hard drive and other storage controllers), viruses, data corruption, and sometimes even hardware failures.If STOP 0x0000007B isn't the exact STOP code you're seeing or INACCESSIBLE_BOOT_DEVICE isn't the exact message, please check my Complete List of STOP Error Codes and reference the troubleshooting information for the STOP message that you are seeing.
Resolution
Note: Some of these steps may require you to access Windows via Safe Mode. If that's not possible then skip those steps.- Restart your computer if you haven't already done so. The STOP 0x0000007B blue screen error might be a fluke.
- Did you just install or make a change to a hard drive controller? If so, there's a good chance that the change you made caused the STOP 0x0000007B error.
Undo the change and test for the 0x7B blue screen error.
Depending on what changes you made, some solutions might include:
- Remove or reconfigure the newly installed hard drive controller.
- Startup with Last Known Good Configuration to undo related registry and driver changes.
- Use System Restore to undo recent changes.
- Rollback hard drive controller device driver to version prior to your driver update.
- Verify that the SCSI chain is correctly terminated, assuming you're using SCSI hard drives in your computer. Incorrect SCSI termination has been known to cause STOP 0x0000007B errors.
Note: Most home computers don't utilize SCSI hard drives.
- Verify that the hard drive is properly installed. An improperly installed hard drive could cause STOP 0x0000007B errors and other issues.
- Verify that the hard drive is configured properly in BIOS. The STOP 0x0000007B error could occur if the hard drive settings in BIOS are incorrect.
- Scan your computer for viruses. Certain viruses that infect the master boot record (MBR) or boot sector can cause STOP 0x0000007B errors.
Important: Make sure your virus scanning software is updated and configured to scan the MBR and boot sector.
- Update the drivers for your hard drive controller. If the drivers to your hard drive controller are outdated, incorrect, or corrupted then the STOP 0x0000007B error will likely occur.
Note: If the STOP 0x0000007B error occurs during the Windows setup process and you suspect that the reason is driver related, be sure to install the latest hard drive controller driver from the manufacturer for use during the installation of the operating system.
Note: This is a likely solution if the second hexadecimal number after the STOP code is 0xC0000034.
- Change the SATA mode in BIOS to IDE mode. Disabling some of the advanced features of SATA drives in BIOS could stop the STOP 0x0000007B error from showing up, especially if you're seeing it during a Windows installation.
Note: Depending on your BIOS make and version, SATA mode may be referred to as AHCI mode and IDE mode may be referred to as either Legacy, ATA, or Compatibility mode.
- Run chkdsk on your hard drive. If the boot volume is corrupted, the chkdsk command might repair the corruption.
Important: You'll likely have to run chkdsk from the Recovery Console.
Note: This will likely be the solution if the second hexadecimal number after the STOP code is 0xC0000032.
- Perform an extensive test of your hard drive. If your hard drive has a physical problem, one very likely situation is the STOP 0x0000007B error you're seeing.
Replace the hard drive if the diagnostics you complete suggest that there is a hardware problem with the drive.
- Run the fixmbr command to create a new master boot record. A corrupted master boot record might be causing your STOP 0x0000007B error.
Note: This will likely be the solution if the second hexadecimal number after the STOP code is 0xC000000E.
- Clear the CMOS. Sometimes the STOP 0x0000007B error is caused by a BIOS memory issue. Clearing the CMOS could solve that problem.
- Update your BIOS. In some situations, an outdated BIOS could cause a STOP 0x0000007B error due to incompatibilities with a hard drive controller.
- Update the hard drive controller's firmware if possible. Just as with the BIOS in the previous step, an incompatibility could be causing the 0x7B error and a firmware update from the manufacturer may correct the problem.
- Repair your Windows installation. If you've just replaced the motherboard in a computer without reinstalling Windows then this will likely fix your problem.
Note: Sometimes a Windows repair will not fix a STOP 0x0000007B error. In those cases, a clean installation of Windows should do the trick.
If you haven't just replaced your motherboard, a Windows reinstall probably will not fix your STOP 0x7B issue.
- Perform basic STOP error troubleshooting. If none of the specific steps above help fix the STOP 0x0000007B error you're seeing, take a look at this general STOP error troubleshooting guide. Since most STOP errors are similarly caused, some of the suggestions might help.
Applies To
Any of Microsoft's Windows NT based operating systems could experience the STOP 0x0000007B error. This includes Windows 7, Windows Vista, Windows XP, Windows 2000, and Windows NT.Still Having STOP 0x0000007B Issues?
Post the details of your STOP error in the PC Support Forums. Be sure to let us know the that you're seeing the 0x0000007B STOP code and also what steps, if any, you've already taken to resolve it.Friday, June 11, 2010
How to change default gateway on windows by command line.
To display the entire contents of the IP routing table, type:
route print
To display the routes in the IP routing table that begin with 10., type:
route print 10.*
To add a default route with the default gateway address of 192.168.12.1, type:
route add 0.0.0.0 mask 0.0.0.0 192.168.12.1
To add a route to the destination 10.41.0.0 with the subnet mask of 255.255.0.0 and the next hop address of 10.27.0.1, type:
route add 10.41.0.0 mask 255.255.0.0 10.27.0.1
To add a persistent route to the destination 10.41.0.0 with the subnet mask of 255.255.0.0 and the next hop address of 10.27.0.1, type:
route -p add 10.41.0.0 mask 255.255.0.0 10.27.0.1
To add a route to the destination 10.41.0.0 with the subnet mask of 255.255.0.0, the next hop address of 10.27.0.1, and the cost metric of 7, type:
route add 10.41.0.0 mask 255.255.0.0 10.27.0.1 metric 7
To add a route to the destination 10.41.0.0 with the subnet mask of 255.255.0.0, the next hop address of 10.27.0.1, and using the interface index 0×3, type:
route add 10.41.0.0 mask 255.255.0.0 10.27.0.1 if 0×3
To delete the route to the destination 10.41.0.0 with the subnet mask of 255.255.0.0, type:
route delete 10.41.0.0 mask 255.255.0.0
To delete all routes in the IP routing table that begin with 10., type:
route delete 10.*
To change the next hop address of the route with the destination of 10.41.0.0 and the subnet mask of 255.255.0.0 from 10.27.0.1 to 10.27.0.25, type:
route change 10.41.0.0 mask 255.255.0.0 10.27.0.25
route print
To display the routes in the IP routing table that begin with 10., type:
route print 10.*
To add a default route with the default gateway address of 192.168.12.1, type:
route add 0.0.0.0 mask 0.0.0.0 192.168.12.1
To add a route to the destination 10.41.0.0 with the subnet mask of 255.255.0.0 and the next hop address of 10.27.0.1, type:
route add 10.41.0.0 mask 255.255.0.0 10.27.0.1
To add a persistent route to the destination 10.41.0.0 with the subnet mask of 255.255.0.0 and the next hop address of 10.27.0.1, type:
route -p add 10.41.0.0 mask 255.255.0.0 10.27.0.1
To add a route to the destination 10.41.0.0 with the subnet mask of 255.255.0.0, the next hop address of 10.27.0.1, and the cost metric of 7, type:
route add 10.41.0.0 mask 255.255.0.0 10.27.0.1 metric 7
To add a route to the destination 10.41.0.0 with the subnet mask of 255.255.0.0, the next hop address of 10.27.0.1, and using the interface index 0×3, type:
route add 10.41.0.0 mask 255.255.0.0 10.27.0.1 if 0×3
To delete the route to the destination 10.41.0.0 with the subnet mask of 255.255.0.0, type:
route delete 10.41.0.0 mask 255.255.0.0
To delete all routes in the IP routing table that begin with 10., type:
route delete 10.*
To change the next hop address of the route with the destination of 10.41.0.0 and the subnet mask of 255.255.0.0 from 10.27.0.1 to 10.27.0.25, type:
route change 10.41.0.0 mask 255.255.0.0 10.27.0.25
Thursday, June 10, 2010
How can I clear the contents of the DNS resolution cache in Windows 2000 and later?
To clear the DNS cache, perform the following steps:
1. Start the Microsoft Management Console (MMC) DNS snap-in (Go to Start, Programs, Administrative Tools, and click DNS).
2. From the View menu, select Advanced.
3. Select and right-click the Cached Lookups tree node from the left-hand pane.
4. Select Clear Cache from the context menu.
You can also use the Dnscmd command in Windows Server 2003 to clear the cache. From the command prompt
, type
dnscmd /clearcache
1. Start the Microsoft Management Console (MMC) DNS snap-in (Go to Start, Programs, Administrative Tools, and click DNS).
2. From the View menu, select Advanced.
3. Select and right-click the Cached Lookups tree node from the left-hand pane.
4. Select Clear Cache from the context menu.
You can also use the Dnscmd command in Windows Server 2003 to clear the cache. From the command prompt
, type
dnscmd /clearcache
Monday, June 7, 2010
how to monitor 802.1Q packets through wireshark
NIC: intel(R)82566DM
=========================================
Microsoft Windows* ---
To allow tagged frames to be passed to your packet capture software you must go into the registry and either add a registry dword and value or change the value of the registry key. Depending on the bus type of your network adapter you will either create the keyword "MonitorModeEnabled" for PCI/PCI-X Network Adapters, or "MonitorMode" for PCI-e based Network Adapters.
The new key (dword) should be placed at:
The new key (dword) should be placed at:
HKEY_LOCAL_MACHINE\SYSTEM\ControlSet001\Control\Class\{4D36E972-E325-11CE-BFC1-08002BE10318}\00xx
where xx is the instance of the network adapter that you need to see tags on. (Check by opening and viewing the name of the adapter).
where xx is the instance of the network adapter that you need to see tags on. (Check by opening and viewing the name of the adapter).
|
If you are using a PCI or PCI-X Network Adapter the registry dword is: MonitorModeEnabled
Set the dword value to either:
0 - disabled (Do not store bad packets, Do not store CRCs, Strip 802.1Q vlan tags)
1 - enabled (Store bad packets. Store CRCs. Do not strip 802.1Q vlan tags)
If you are using a PCI-Express Network Adapter the registry dword is: MonitorMode
Set the dword value to either:
0 - disabled (Do not store bad packets, Do not store CRCs, Strip 802.1Q vlan tags)
1 - enabled (Store bad packets. Store CRCs. Do not strip 802.1Q vlan btag)
2 - enabled strip vlan (Store bad packets. Store CRCs. Strip 802.1Q vlan tag as normal)
In most cases you should set MonitorMode=1 or MonitorModeEnabled=1.
Warning: This modification should be made very carefully and only by skilled technicians since changes to the registry may disable your machine. This change should only be made for promiscuous mode/sniffing use.
Warning: This modification should be made very carefully and only by skilled technicians since changes to the registry may disable your machine. This change should only be made for promiscuous mode/sniffing use.
Wednesday, June 2, 2010
the operation has been cancelled due to restrictions in effect on this computer outlook 2007
INTERNET Options.
3. Click the Advanced tab.
4. Click Reset.
5. Click the Programs tab.
6. Click Set programs.
7. Click Set Default Programs.
8. Select Microsoft Outlook.
9. Select Set this program as default.
10. Click OK.
11. Close the Default Programs box.
12. Under Internet Options, click the Programs tab.
13. Click Make default under Default web browser.
3. Click the Advanced tab.
4. Click Reset.
5. Click the Programs tab.
6. Click Set programs.
7. Click Set Default Programs.
8. Select Microsoft Outlook.
9. Select Set this program as default.
10. Click OK.
11. Close the Default Programs box.
12. Under Internet Options, click the Programs tab.
13. Click Make default under Default web browser.
Monday, May 17, 2010
windows update
Try this from Microsoft: Number 4 and number six worked for me
Please try the steps below to resolve your issue.
SUGGESTION 1:
==============
We have found that this issue can occur if any third party software is conflicting
with the Windows Update Site. If you have Norton, McAfee or other Antivirus or
firewall software installed on your system, the third party software can conflict
with the Windows Update Site hence I would sincerely request you to kindly disable
these software while accessing the site, this should resolve the issue for you. Please remember to enable the Windows XP firewall on your internet connection (if it is not already) before going online in case of Virus problems.
If the issue persists, let's go to the second suggestion.
SUGGESTION 2:
==============
This issue can be caused if one or more of the following services are disabled or
unavailable. We will therefore RESET Background Intelligent Transfer Service and
the Automatic Updates service. For this, please follow the steps given below:
1. Click Start --> select Run. In the Run box, type services.msc Click OK
2. Find the Background Intelligent Transfer Service. Right-click on it and select
Properties
3. Click on Stop and then again click on Start. In the Startup Type list, make sure
that "Automatic" is selected. Click OK
4. Similarly find Automatic Updates service. Right-click on it and select
Properties
5. Click on Stop and then again click on Start. In the Startup Type list, make sure
that "Automatic" is selected. Click OK
6. Close the Services window
[Please note that if the service is already started the "Start" button will be
grayed out. In this case "Stop" the service and then "Start" it again. On the other
hand if the service is not running, the "Stop" button will be grayed out. In this
case "Start" the service]
Once you have reset the two services, please access Windows Update site and check
whether the issue is resolved.
If the issue still remains, then please go through the information given below.
SUGGESTION 3:
=============
This issue can also occur due to some corrupt ActiveX Control files. Let us
register the following files using the Regsvr32 command and check whether the issue
is resolved. Please note, there is a space between Regsvr32 and the file name.
1. Close all instances of Internet Explorer.
2. Click Start and Run, type Regsvr32 wuapi.dll in the Open box and click OK.
3. Click Start and Run, type Regsvr32 wuaueng.dll, in the Open box and click OK.
4. Click Start and Run, type Regsvr32 wuaueng1.dll in the Open box and click OK.
5. Click Start and Run, type Regsvr32 wucltui.dll, in the Open box and click OK.
6. Click Start and Run, type Regsvr32 wups.dll in the Open box and click OK.
7. Click Start and Run, type Regsvr32 wuweb.dll in the Open box and click OK.
8. Click Start and Run, type Regsvr32 jscript.dll in the Open box and click OK.
9. Click Start and Run, type Regsvr32 atl.dll in the Open box and click OK.
10. Click Start and Run, type Regsvr32 msxml3.dll in the Open box and click OK.
11. Click Start and Run, type Regsvr32 softpub.dll in the Open box and click OK.
12. Click Start and Run, type Regsvr32 Initpki.dll in the Open box and click OK.
13. Click Start and Run, type Regsvr32 Mssip32.dll in the Open box and click OK.
SUGGESTION 4:
=============
Delete the following folders if they exist:
1. "WUTemp" in all partition's root folder: for example C:\WUTemp or D:\WUTemp
2. "Catroot2" in "C:\Windows\System32"
3. "WindowsUpdate" in "C:\Program Files" (This is a hidden folder.)
SUGGESTION 5:
==============
Enable "Use HTTP 1.1 through proxy connections".
1. Click Start, click Run, input "INETCPL.CPL" (without quotation marks) and press Enter.
2. On the the Advanced Tab, check "Use HTTP 1.1 through proxy connections" and uncheck "Use HTTP 1.1", and then click OK.
SUGGESTION 6:
==============
Add the Windows Update sites into "Trusted sites":
1. Click Start, click Run, input "INETCPL.CPL" (without quotation marks) and press Enter.
2. On the Security tab, click the "Trusted sites" icon, and then click the "Default Level" button.
3. Click the "Sites" button, and then uncheck "Require server verification (https:) for all sites in this zone."
4. Type each of the following lines, click "Add", and then repeat until they are all shown in the low box:(Note: The first line starts with HTTPS while others start with HTTP.)
https://v5.Windowsupdate.microsoft.com
http://Windowsupdate.microsoft.com
http://v5.windowsupdate.microsoft.com
http://Download.Windowsupdate.com
5. Click OK, and then check to make sure no sites are listed in "Sites" of "Restricted sites".
6. Click OK to Save the settings.
SUGGESTION 7:
==============
Configure Internet Explorer proxy settings:
1. Click Start, click Run, input "INETCPL.CPL" (without quotation marks) and press Enter.
2. On the Connections tab, click LAN Settings.
3. Uncheck "Automatically Detect Settings" and "Use Automatic configuration script".
4. If the "Advanced" button is not grey, click it, input or copy and paste the following string into the Exceptions box:
*.microsoft.com;*.windowsupdate.com
5. Click OK three times to save the settings.
I do hope that this resolves your issue.
Please try the steps below to resolve your issue.
SUGGESTION 1:
==============
We have found that this issue can occur if any third party software is conflicting
with the Windows Update Site. If you have Norton, McAfee or other Antivirus or
firewall software installed on your system, the third party software can conflict
with the Windows Update Site hence I would sincerely request you to kindly disable
these software while accessing the site, this should resolve the issue for you. Please remember to enable the Windows XP firewall on your internet connection (if it is not already) before going online in case of Virus problems.
If the issue persists, let's go to the second suggestion.
SUGGESTION 2:
==============
This issue can be caused if one or more of the following services are disabled or
unavailable. We will therefore RESET Background Intelligent Transfer Service and
the Automatic Updates service. For this, please follow the steps given below:
1. Click Start --> select Run. In the Run box, type services.msc Click OK
2. Find the Background Intelligent Transfer Service. Right-click on it and select
Properties
3. Click on Stop and then again click on Start. In the Startup Type list, make sure
that "Automatic" is selected. Click OK
4. Similarly find Automatic Updates service. Right-click on it and select
Properties
5. Click on Stop and then again click on Start. In the Startup Type list, make sure
that "Automatic" is selected. Click OK
6. Close the Services window
[Please note that if the service is already started the "Start" button will be
grayed out. In this case "Stop" the service and then "Start" it again. On the other
hand if the service is not running, the "Stop" button will be grayed out. In this
case "Start" the service]
Once you have reset the two services, please access Windows Update site and check
whether the issue is resolved.
If the issue still remains, then please go through the information given below.
SUGGESTION 3:
=============
This issue can also occur due to some corrupt ActiveX Control files. Let us
register the following files using the Regsvr32 command and check whether the issue
is resolved. Please note, there is a space between Regsvr32 and the file name.
1. Close all instances of Internet Explorer.
2. Click Start and Run, type Regsvr32 wuapi.dll in the Open box and click OK.
3. Click Start and Run, type Regsvr32 wuaueng.dll, in the Open box and click OK.
4. Click Start and Run, type Regsvr32 wuaueng1.dll in the Open box and click OK.
5. Click Start and Run, type Regsvr32 wucltui.dll, in the Open box and click OK.
6. Click Start and Run, type Regsvr32 wups.dll in the Open box and click OK.
7. Click Start and Run, type Regsvr32 wuweb.dll in the Open box and click OK.
8. Click Start and Run, type Regsvr32 jscript.dll in the Open box and click OK.
9. Click Start and Run, type Regsvr32 atl.dll in the Open box and click OK.
10. Click Start and Run, type Regsvr32 msxml3.dll in the Open box and click OK.
11. Click Start and Run, type Regsvr32 softpub.dll in the Open box and click OK.
12. Click Start and Run, type Regsvr32 Initpki.dll in the Open box and click OK.
13. Click Start and Run, type Regsvr32 Mssip32.dll in the Open box and click OK.
SUGGESTION 4:
=============
Delete the following folders if they exist:
1. "WUTemp" in all partition's root folder: for example C:\WUTemp or D:\WUTemp
2. "Catroot2" in "C:\Windows\System32"
3. "WindowsUpdate" in "C:\Program Files" (This is a hidden folder.)
SUGGESTION 5:
==============
Enable "Use HTTP 1.1 through proxy connections".
1. Click Start, click Run, input "INETCPL.CPL" (without quotation marks) and press Enter.
2. On the the Advanced Tab, check "Use HTTP 1.1 through proxy connections" and uncheck "Use HTTP 1.1", and then click OK.
SUGGESTION 6:
==============
Add the Windows Update sites into "Trusted sites":
1. Click Start, click Run, input "INETCPL.CPL" (without quotation marks) and press Enter.
2. On the Security tab, click the "Trusted sites" icon, and then click the "Default Level" button.
3. Click the "Sites" button, and then uncheck "Require server verification (https:) for all sites in this zone."
4. Type each of the following lines, click "Add", and then repeat until they are all shown in the low box:(Note: The first line starts with HTTPS while others start with HTTP.)
https://v5.Windowsupdate.microsoft.com
http://Windowsupdate.microsoft.com
http://v5.windowsupdate.microsoft.com
http://Download.Windowsupdate.com
5. Click OK, and then check to make sure no sites are listed in "Sites" of "Restricted sites".
6. Click OK to Save the settings.
SUGGESTION 7:
==============
Configure Internet Explorer proxy settings:
1. Click Start, click Run, input "INETCPL.CPL" (without quotation marks) and press Enter.
2. On the Connections tab, click LAN Settings.
3. Uncheck "Automatically Detect Settings" and "Use Automatic configuration script".
4. If the "Advanced" button is not grey, click it, input or copy and paste the following string into the Exceptions box:
*.microsoft.com;*.windowsupdate.com
5. Click OK three times to save the settings.
I do hope that this resolves your issue.
Friday, May 14, 2010
How to Schedule an Email in Outlook 2007
- Open a new email and enter the email address and type your email as usual.
- Step 2
Click the expand button for OPTIONS.
- Step 3
Or...
Click OPTIONS in the Ribbon > and then click DELAY DELIVERY
- Step 4
Click the check box for "Do not deliver before is selected"
- Step 5Set your date and time.
Click Close.
- Step 6The email will sit in your out box until the scheduled date and time.


Thursday, May 13, 2010
Understanding Auto Accept Agent
This topic defines what Auto Accept Agent does, and explains how Auto Accept Agent processes meeting requests.
Auto Accept Agent is an asynchronous store event sink that provides automatic server-side processing of meeting requests that are sent to resource mailboxes. Auto Accept Agent raises the OnSave event when an e-mail message is delivered to the Inbox of a registered resource mailbox. Meeting requests, updates, and cancellations are processed in a first-in, first-out order. If the e-mail message is not a calendar item, Auto Accept Agent may delete it, based on the setting for the DeleteNonCalendarItems parameter, to keep the Inbox clear of read e-mail messages. If the request is a cancellation, the meeting is removed from the calendar.
 Auto Accept Agent Processing
 When a meeting request is delivered to an Inbox folder in the Exchange store, an OnSave event occurs. If Auto Accept Agent has been registered for that mailbox, the occurrence of the OnSave event triggers the agent (an ExOLEDB event sink). The following figure shows the basic process flow, starting when an e-mail message is delivered to an Inbox.
Auto Accept Agent process flow

Scheduling and Updating
When Auto Accept Agent processes meeting requests, it checks the availability of the resource's calendar (not the resource's published free/busy data) and then sends an accept or decline message to the meeting organizer. The agent evaluates only meetings that occur within a specified booking window for conflicts. The agent does not place any meeting instances that occur beyond the booking window in the resource's calendar. After it processes the request, Auto Accept Agent saves a copy of the response to the Sent Items folder and then moves the original request from the Inbox to the Deleted Items folder. The following figure shows the logic that Auto Accept Agent follows when it processes a calendar request.
Calendar request process flow

Auto Accept Agent uses the following scheduling logic for scheduling single and recurring meeting requests.Single Meeting Requests
Auto Accept Agent accepts or declines new or updated meeting requests for single meetings based on the following criteria:
- If the entire span of time between the start and end times of the meeting request is marked as free on the resource calendar, the meeting request is accepted.
- If any part of the span of time between the start and end times on the meeting request is marked as busy or tentative on the resource calendar, the meeting request is declined.
- If a meeting update is requested that overlaps the time of the original meeting, Auto Accept Agent does not consider the time of the original meeting as busy and allows the update to be processed. For example, if you schedule a meeting from 15:00 to 16:00 on Friday and then send an update to reschedule this meeting from 15:30 to 16:00 on Friday, Auto Accept Agent accepts the update even though the resource appeared as busy.
Recurring Meeting Requests
Auto Accept Agent expands, accepts, and declines recurring meeting requests according to the following parameters:
- If a recurring meeting request does not contain an end date or contains an end date beyond the specified booking window, by default Auto Accept Agent declines the request. If you set the EnforceRecurringMeetingEndDate parameter to False, Auto Accept Agent expands and schedules meeting instances up to the maximum allowed number of months that are contained in the BookingWindowInMonths parameter. However, because the recurrence will be truncated to the limit set by BookingWindowInMonths, the end date on the organizer's calendar could be different from the end date on the resource mailbox's calendar.
- The RecurringMeetingConflictPercentageAllowed parameter sets a threshold for the amount of rescheduling required by the organizer when individual instances are declined because of a conflict. It does not enable double-booking.
- The RecurringMeetingMaximumConflictInstances parameter sets a threshold for the number of conflicts allowed for a recurring meeting before the agent declines the request. This parameter works together with the RecurringMeetingConflictPercentageAllowed parameter, with the lower of the two thresholds determining whether the meeting request is accepted or declined. For example, if you set the RecurringMeetingConflictPercentage parameter to 25 percent and set the RecurringMeetingMaximumConflictInstances parameter to two, and then send a meeting request with four instances of a meeting, a maximum of one instance could conflict for the meeting request to be accepted. In this case, the 25 percent threshold for four instances allows only one conflict, even though you have set the maximum number of conflicts that are allowed to two.
The default value for both RecurringMeetingConflictPercentageAllowed and RecurringMeetingMaximumConflictInstances is zero. To allow for conflicts, you must change both of these parameters.
windows cannot access the specified path or file
while installing the software sometimes you will get this error. so you need to install the software other way .
start--controlpanel--add or remove programs --- add new programs--cd or floppy--
then browse the software location and install the software
start--controlpanel--add or remove programs --- add new programs--cd or floppy--
then browse the software location and install the software
Tuesday, May 4, 2010
Monday, May 3, 2010
cannot find script file antivirus.vbs
The clean.vbs file is installed and used by Aphex Trojan, JudgeETrojan and Judge.E Trojan.
Your computer's security and privacy may be at risk.
1.Open task manager and kill process wscript.exe.
2.Delete VirusRemoval.vbs and Autorun.inf files from all usb drives if u have the virus in them.
3.Go to c:\Windows\System32 and delete the file VirusRemoval.vbs. It is super hidden so first go to Folder Options and check show hidden and check boxes. Also required for the above files.
4.go to start>run and type regedit and enter
Go to HKLM\Software\Microsoft\Windows NT\CurrentVersion\Winlogon
On the right side look for Shell which should have value of just explorer.exe.
delete anything at right side of explorer.exe if there is anything.
5.Under same key Winlogon also look for Userinit which should have value of
c:\WINDOWS\system32\userinit.exe,
Delete all after the comma.
6.Go to HKCU\Software\Microsoft\Internet Explorer\Main
On the right side locate Window Title and delete its value i.e. Sujin.com.np
7.Under the same key locate Start Page and delete its value i.e. http://sujin.com.np/
Please let us know if you were successful
Your computer's security and privacy may be at risk.
1.Open task manager and kill process wscript.exe.
2.Delete VirusRemoval.vbs and Autorun.inf files from all usb drives if u have the virus in them.
3.Go to c:\Windows\System32 and delete the file VirusRemoval.vbs. It is super hidden so first go to Folder Options and check show hidden and check boxes. Also required for the above files.
4.go to start>run and type regedit and enter
Go to HKLM\Software\Microsoft\Windows NT\CurrentVersion\Winlogon
On the right side look for Shell which should have value of just explorer.exe.
delete anything at right side of explorer.exe if there is anything.
5.Under same key Winlogon also look for Userinit which should have value of
c:\WINDOWS\system32\userinit.exe,
Delete all after the comma.
6.Go to HKCU\Software\Microsoft\Internet Explorer\Main
On the right side locate Window Title and delete its value i.e. Sujin.com.np
7.Under the same key locate Start Page and delete its value i.e. http://sujin.com.np/
Please let us know if you were successful
Saturday, May 1, 2010
Remove Windows cannot find regsvr.exe message at startup
“Windows cannot find regsvr.exe” as shown below. You may face similar problems like “Windows cannot find explorer.exe” etc. This is because the virus had assigned a registry value to execute itself during the startup. As you have removed the virus, the system can no longer find this virus file and hence the error message.

This problem has a very easy solution. Just follow the steps below:
Step 1: Press Start+R and type regedit. It will open registry editor. But if you get an error like Registry editor has been disabled by the administrator then you need to enable the registry editor. To enable registry editor click: How to enable Registry Editor (REGEDIT).
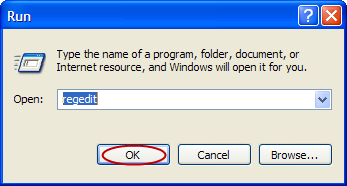
Step 2: Now after opening the registry editor, follow the registry path as follows:
HKEY_LOCAL_MACHINE\SOFTWARE\Microsoft\WindowsNT\CurrentVersion\Winlogon
This path is also shown in the images below:


 Step 3: After opening Winlogon look for Shell in the right pane of the registry editor as shown.

Step 4: Double Click the Shell registry value. You can find “Explorer.exe regsvr.exe” in the Value data field.

Step 5: Delete regsvr.exe alone and click OK.

Step 6: Now the registry has been changed. Closed all programs and restart.

After restart you can find that the message is no longer shown.
N.B.: Make sure that you don’t delete Explorer.exe from the Shell registry.

This problem has a very easy solution. Just follow the steps below:
Step 1: Press Start+R and type regedit. It will open registry editor. But if you get an error like Registry editor has been disabled by the administrator then you need to enable the registry editor. To enable registry editor click: How to enable Registry Editor (REGEDIT).

Step 2: Now after opening the registry editor, follow the registry path as follows:
HKEY_LOCAL_MACHINE\SOFTWARE\Microsoft\WindowsNT\CurrentVersion\Winlogon
This path is also shown in the images below:


Step 4: Double Click the Shell registry value. You can find “Explorer.exe regsvr.exe” in the Value data field.

Step 5: Delete regsvr.exe alone and click OK.

Step 6: Now the registry has been changed. Closed all programs and restart.

After restart you can find that the message is no longer shown.
N.B.: Make sure that you don’t delete Explorer.exe from the Shell registry.
Task Manager has been disabled by your administrator
REG add HKCU\Software\Microsoft\Windows\CurrentVersion\Policies\System /v DisableTaskMgr /t REG_DWORD /d 0 /f
Subscribe to:
Posts (Atom)