Wednesday, October 13, 2010

How to Install IIS on Windows 7 or Vista

If you are a developer using ASP.NET, one of the first things you’ll want to install on Windows 7 or Vista is IIS (internet information server). Keep in mind that your version of Windows may not come with IIS. I’m using Windows 7 Ultimate edition.
First, go to Control Panel, and then click on Programs. You’ll see a link for “Turn Windows features on or off”

If you expand the Internet Information Services tree node, you can see that there are a lot of options beneath it. You will probably want to explore these options, because even if you click on IIS, some of the necessary options for doing development aren’t checked.

Once you’ve gone ahead and checked the items you want, and clicked OK, you’ll see this dialog for a while….

Now when you navigate in your browser to localhost, you’ll see the new default page… slick!
 

If you are a developer using ASP.NET, one of the first things you’ll want to install on Windows 7 or Vista is IIS (internet information server). Keep in mind that your version of Windows may not come with IIS. I’m using Windows 7 Ultimate edition. First, go to Control Panel, and then click on Programs. You’ll see a link for “Turn Windows features on or off” If you expand the Internet Information Services tree node, you can see that there are a lot of options beneath it. You will probably want to explore these options, because even if you click on IIS, some of the necessary options for doing development aren’t checked. Once you’ve gone ahead and checked the items you want, and clicked OK, you’ll see this dialog for a while…. Now when you navigate in your browser to localhost, you’ll see the new default page… slick!

If you are a developer using ASP.NET, one of the first things you’ll want to install on Windows 7 or Vista is IIS (internet information server). Keep in mind that your version of Windows may not come with IIS. I’m using Windows 7 Ultimate edition.


First, go to Control Panel, and then click on Programs. You’ll see a link for “Turn Windows features on or off”


If you expand the Internet Information Services tree node, you can see that there are a lot of options beneath it. You will probably want to explore these options, because even if you click on IIS, some of the necessary options for doing development aren’t checked.


Once you’ve gone ahead and checked the items you want, and clicked OK, you’ll see this dialog for a while….


Now when you navigate in your browser to localhost, you’ll see the new default page… slick!

Local Area Connection Status windows showing ridiculous number of Sent Packets

1) This is likely just a bug in the network card driver. See if the
manufacturer has a newer
driver.

Friday, October 1, 2010

"IE8 running with add-ons disabled"

Problems when upgrading to Internet Explorer 8 from Internet Explorer 7
If you receive a message that all add-ons are disabled every time you start Internet Explorer, follow these steps to help resolve the problem:

1. In Internet Explorer, click Tools, and then click Internet Options.
2. Click the Advanced tab, and then click Reset. Follow any on-screen directions.
3. Close and re-open Internet Explorer.

If Internet Explorer 8 flashes and closes immediately when you try to start it, there may be some settings in Internet Explorer 7 that were not working correctly. To resolve the problem, follow these steps:

1. Uninstall Internet Explorer 8 (see instructions elsewhere in this document).
2. Restart your computer, and then open Internet Explorer 7.
3. In Internet Explorer, click Tools, and then click Internet Options.
4. Click the Advanced tab, and then click Reset. Follow any on-screen directions.
5. Close Internet Explorer 7.
6. Reinstall Internet Explorer 8.

The Internet Explorer icon does not appear on your desktop. When you try to use the Desktop Items dialog box in Windows XP or the Desktop Icon Settings dialog box in Windows Vista to add the Internet Explorer icon, there is no Internet Explorer check box.

Fix it for me
To resolve this problem automatically, click the Fix this problem link. Then, cl...

To resolve this problem automatically, click the Fix this problem link. Then, click Run in the File Download dialog box. Follow the steps in the Show Internet Explorer Desktop Icon Wizard to create an Internet Explorer icon on your desktop.
Fix this problem
Microsoft Fix it 50228


Note this wizard may be in English only; however, the automatic fix also works for other language versions of Windows.

Note If you are not on the computer that has the problem, save the automatic fix to a flash drive or to a CD so that you can run it on the computer that has the problem. If you do not want to use the automatic fix, you can try to do it yourself.

Important Windows 7 no longer supports the ability to modify the registry to get the special Internet Explorer icon to appear on your desktop. This change was made to ensure Internet Explorer could be removed easily for compliance reasons. The only way to add the Internet Explorer icon to the desktop in Windows 7 is to create a shortcut as shown in Method 1.

Next steps
  • To verify that the automatic fix worked, look for the Internet Explorer icon on your desktop. If the icon does not appear, either restart your computer or right-click a blank area on the desktop, and then click Refresh. If the icon still does not appear on the desktop, make sure Show Desktop Icons is turned on. For the steps to do this, see other things to check.
  • If the problem is not resolved, you can also contact support (http://support.microsoft.com/contactus) .

Let me fix it myself
To add an Internet Explorer icon yourself, you can use either of the following m...

To add an Internet Explorer icon yourself, you can use either of the following methods. If you only want to create an Internet Explorer icon on your desktop that opens your home page, use Method 1 to create a shortcut. Use Method 2 if you want to add a special Internet Explorer icon on your desktop that performs one of the following tasks:
  • Opens the Internet Properties dialog box
  • Starts Internet Explorer without add-ons (such as toolbars)

Method 1: Create a shortcut to Internet Explorer on your desktop

Important Windows 7 no longer supports the ability to modify the registry to get the special Internet Explorer icon to appear on your desktop. This change was made to ensure Internet Explorer could be removed easily for compliance reasons. The only way to add the Internet Explorer icon to the desktop in Windows 7 is to create a shortcut. To create a shortcut to Internet Explorer on your desktop, follow these steps:
  1. Click Start, and then locate the Internet Explorer icon on the Start menu. If you do not see the Internet Explorer icon on the Start menu, look in the Programs or the All Programs folders on the Start menu.

    Note If you cannot locate the Internet Explorer icon on the Start menu, follow these alternative steps or, if you are not using Windows 7, use Method 2.
  2. Right-click and drag the Internet Explorer icon from the Start menu to your desktop, and then click Create Shortcuts Here, or click Copy Here.
A shortcut to Internet Explorer is created on your desktop. You can double-click this icon to open your home page in Internet Explorer.

Next steps
  • To verify that you fixed the problem, look for the Internet Explorer icon on your desktop. If the icon does not appear, either restart your computer, or right-click a blank area on the desktop and then click Refresh. If the icon still does not appear on the desktop, there are a few other things to check.
  • If the problem is not resolved, you can also contact support (http://support.microsoft.com/contactus) .


Note To create a desktop shortcut to Internet Explorer for other users, log on to your computer as another user, and then repeat this method for each user.

Method 2: Add the special Internet Explorer icon to your desktop

Important Windows 7 no longer supports the ability to modify the registry to get the special Internet Explorer icon to appear on your desktop. This change was made to ensure Internet Explorer could be removed easily for compliance reasons. The only way to add the Internet Explorer icon to the desktop in Windows 7 is to create a shortcut as shown in Method 1.

To add the special Internet Explorer icon to your desktop, follow these steps:
  1. Click Start, and then click Run. Or, click Start Search if it is available.
  2. In the Open box or in the Start Search box, type Notepad, and then press ENTER.
  3. Carefully copy and paste the following text into Notepad.
    Windows Registry Editor Version 5.00
    [HKEY_CURRENT_USER\Software\Microsoft\Windows\CurrentVersion\Explorer\HideDesktopIcons\NewStartPanel]
    "{871C5380-42A0-1069-A2EA-08002B30309D}"=dword:00000000
     
    [HKEY_CURRENT_USER\Software\Microsoft\Windows\CurrentVersion\Explorer\HideDesktopIcons\ClassicStartMenu]
    "{871C5380-42A0-1069-A2EA-08002B30309D}"=dword:00000000
    
  4. On the File menu, click Save As.
  5. In the File name box, type Ie.reg, and then save the file to your desktop.
  6. Exit Notepad.
  7. Double-click the Ie.reg file on the desktop.

    Collapse this imageExpand this image
    User Access Control permission
    If you are prompted for an administrator password or for confirmation, type the password, or click Allow.
  8. In the Registry Editor dialog box that appears, click Yes, and then click OK.

    The special Internet Explorer icon is added to your desktop. You can double-click this icon to open your home page in Internet Explorer.

    To open Internet Options, right-click this icon, and then click Properties. To start Internet Explorer without add-ons, right-click this icon, and then click Start Without Add-ons.
Next steps
  • To verify that you fixed the problem, look for the Internet Explorer icon on your desktop. If the icon does not appear, either restart your computer or right-click a blank area on the desktop and then click Refresh. If the icon still does not appear on the desktop, there are a few other things to check.
  • If the problem is not resolved, you can also contact support (http://support.microsoft.com/contactus) .
Note To create the special Internet Explorer icon on the desktop for other users, log on to the computer as another user, and then repeat this method for each user.

Alternative steps to create a shortcut to Internet Explorer (Method 1)

  1. Carefully select and then copy the following command:
    "%programfiles%\internet explorer\iexplore.exe"
    Important Make sure that you select the quotation marks (“) at the beginning and end of this command.
  2. Right-click a blank space on your desktop, point to New, and then click Shortcut.
  3. In the Create Shortcut Wizard, right-click the Type the location of the item box, and then click Paste to paste the command that you copied in step 1.
  4. Click Next.
  5. In the Type a name for this shortcut box, type Internet Explorer.
  6. Click Finish.

    A shortcut to Internet Explorer is created on your desktop. You can double-click this icon to open your home page in Internet Explorer.
Next steps
  • To verify that you fixed the problem, look for the Internet Explorer icon on your desktop. If the icon does not appear, either restart your computer or right-click a blank area on the desktop and then click Refresh. If the icon still does not appear on the desktop, there are a few other things to check.
  • If the problem is not resolved, you can also contact support (http://support.microsoft.com/contactus) .

removing filter in outlook2007

Filtering is different than sorting. When you sort items, you rearrange the current items in a view. For example, when you view the Inbox in single-line view, if you click the name Joanna Fuller and then click the From column header, all the messages in the Inbox will appear in alphabetical order with all the messages from Joanna Fuller at the top of your view. However, all the other messages are still viewable in the Inbox; they are now listed before and after Joanna Fuller in alphabetical order. If you scroll, you will see them all.
When you filter items, you selectively choose what items will appear in a view. The Filter dialog box offers you a variety of ways to select and organize your criteria. To open the Filter dialog box, point to Current View on the View menu, click Customize Current View, and then click Filter.
Filter dialog box
For example, you can filter the Inbox to only show only items with "Joanna Fuller" in the From box. All of the other items in the Inbox are hidden from view and can be seen by removing the view filter.
Before and after a filter is applied
When a view filter is applied to a selected folder, the status bar (status bar: A horizontal bar at the bottom of the screen that displays information about the current condition of the program, such as the status of items in the window, the progress of the current task, or information about the selected item.) displays the words Filter Applied in the lower-left corner of the screen. Multiple Filters Applied is displayed when both a view filter and a synchronization filter have been applied. A synchronization filter allows you to choose which items are downloaded or kept in your Offline Folder file (.ost) (Offline Folder file: The file on your hard disk that contains offline folders. The offline folder file has an .ost extension. You can create it automatically when you set up Outlook or when you first make a folder available offline.). Find out more about sychronization filters.
Top of Page Top of Page

Show or hide items or files with a view filter

  1. Click on the folder for which you want to apply a filter.
  2. On the View menu, point to Current View, and then click Customize Current View.
  3. Click Filter.
  4. Do one or more of the following:
    • Filter using common filtering criteria    
      • On the Messages tab, select the filter options you want.
    • Filter using additional criteria, such as a category or importance level    
      • Click the More Choices tab, and then select the filter options you want.
If you select more than one filter option field in the Filter dialog box, only the items that meet all of the criteria will appear. However, if you use one filter field, and enter multiple criteria, items that meet at least one criterion within that field will be found.
For example, if you type Joanna Fuller, Florian Voss, and Jon Morris in the From filter field, you will find messages that are from one, two, or all three of those people.
  • Filter using custom criteria    
  1. Click the Advanced tab.
  2. Click Field.
  3. Point to the field set you want, and then click the field you want to use in the search criteria.
  4. In the Condition list, click the condition (condition: Part of the criteria that a field must meet for searching or filtering. Some conditions must be used with a value; for example, the field Author with the condition equals with the value Jane.) you want to use with the selected field. The conditions that are available depend on the field that is selected.
  5. If the condition requires a value (value: The text, date, number, or logical input that completes a condition that a field must meet for searching or filtering. For example, the field Author with the condition equals must include a value, such as John, to be complete.), enter the value you want the field and condition to meet in the Value box.
Top of Page Top of Page

Remove a view filter

  1. On the View menu, point to Current View, and then click Customize Current View.
  2. Click Filter.
  3. Click Clear All.

Thursday, September 30, 2010

How to Use the Health Service Lockdown Tool in Operations Manager 2007


On computers requiring high security, for example a domain controller, you may need to deny certain identities access to rules, tasks, and monitors that might jeopardize the security of your server. The Health Service lockdown tool (HSLockdown.exe) enables you to use various command-line options to control and limit the identities used to run a rule, task, or monitor.

You will be unable to start the OpsMgr Health Service if you have used the Health Service Lockdown tool to lock out the Action Account. To be able to restart the OpsMgr Health Service, follow the second procedure in this topic to unlock the Action Account.
The following command-line options are available:
  • HSLockdown [ManagementGroupName] /L - List Accounts/groups
  • HSLockdown [ManagementGroupName] /A - Add an allowed account|group
  • HSLockdown [ManagementGroupName] /D - Add a denied account|group
  • HSLockdown [ManagementGroupName] /R - Remove an allowed/denied account|group
Accounts must be specified in one of the following fully qualified domain name (FQDN) formats:
  • NetBios : DOMAIN\username
  • UPN : username@fqdn.com
If you used the add or deny options when running the Health Service Lockdown tool, you will need to restart the OpsMgr Health Service before the changes take effect.
When evaluating allowed and denied listings, know that denies takes priority over allows. If a user is listed as allowed, and the same user is a member of a group that is listed as denied, the user will be denied.

To use the health service lockdown tool

  1. Log on to the computer with an account that is a member of the Administrators group.
  2. On the Windows desktop, click Start, and then click Run.
  3. In the Run dialog box, type cmd and then click OK.
  4. At the command prompt, type : (where is the drive where the Operations Manager 2007 installation media is located) and then press ENTER.
  5. Type cd\Program Files\System Center Operations Manager 2007 and then press ENTER.
  6. Type HSLockdown [Management Group Name] /D [account or group] to deny the group or account, and then press ENTER.

To unlock the Action Account

  1. Log on to the computer with an account that is a member of the Administrators group.
  2. On the Windows desktop, click Start, and then click Run.
  3. In the Run dialog box, type cmd and then click OK.
  4. At the command prompt, type : (where is the drive where the Operations Manager 2007 installation media is located) and then press ENTER.
  5. Type cd\Program Files\System Center Operations Manager 2007 and then press ENTER.
  6. Type HSLockdown [Management Group Name] /A and then press ENTER.

Thursday, September 23, 2010

Backup Basics in Windows Server 2008 R2

nstallation
First off, we need to install the backup feature, as it's not installed by default. Use the Add Features wizard in Server Manager and add the Windows Server Backup Features (Figure 1). I'm going to use the command-line tools sub-feature so that I can use Windows PowerShell, which I will explain in more detail later in this article.
You can also use command-line tools, including ServerManagerCMD.exe, to install the feature:
C:\ servermanagercmd -install backup-features

[Click on image for larger view.]
Figure 1. The backup feature is not installed by default, so you must install it using the Add Features Wizard.
The next step is to identify locations for your backups. You can back up files to a network share, a local volume or a dedicated disk. You can't back up data to tape, but given the growth and widespread availability of inexpensive USB-attached storage, this isn't that much of a setback these days.
Creating a Backup Job
Windows Backup is intended to provide a one-stop setup to protect a server. You can enable a scheduled task to back up files and the system state, or to provide for a bare-metal restore. Microsoft assumes you'll have one scheduled task for this purpose. I'm assuming that you're using the Windows Backup feature because of limited budget and are after maximum protection given the utility's constraints.
After you install the Windows Backup feature, expand the Storage node in Server Manager and select Windows Server Backup. In the Actions pane, select "Backup Schedule," which will start the Backup Schedule Wizard. Then, click Next on the Getting Started screen.
During step two, specify what type of backup you want. Try doing a complete server backup. You can also create a custom backup and pick items such as selected files and system state. I'll show you how to do a quick file backup later, but for now I'm assuming you want complete server protection.
In the third step, specify when you want the backup task to run. Most of the time, a single backup should be sufficient, but you can run it more than once a day. If you're backing up critical files, this might be a good choice.
In step four, determine where to store the backup. Microsoft recommends using a dedicated hard disk. Remember, this drive will be reformatted and unavailable for anything else. You can also use a volume or a network share. Pay close attention to the warnings and limitations. You might see a warning reminding you that the disk will be reformatted. If you don't see all the disks, click the Show All Available Disks button to refresh. When you select a new disk, you'll be warned.
Once selected, you'll have a chance to confirm your backup settings. If anything is incorrect, use the Previous button to go back and correct the error. If all goes well, you should get a summary screen. The next day, you can check the Windows Server Backup node for results or errors.
You can also use Windows Backup to run a one-time backup. Select the Backup Once option in the Actions pane. You can use the same settings as your scheduled job or pick something completely different. If you select the latter, the wizard runs again and you can enter new parameters. For example, you might want to copy files to a network share. Remember, any existing backups to the same folder will be overwritten. The backup will execute immediately. If this is a separate backup task you'd like to do often, then you'll want to take advantage of a scripted solution from the command line or Windows PowerShell. I'll cover that procedure later.
Restoring Data
Windows Backup uses a time stamp as version information. Using the Recover task launches a wizard that's easy to follow. Select the appropriate backup source. The Recovery Wizard will display a datetime control of all available backups (see Figure 2). Select the appropriate one. Depending on the type of backup, you may only have once choice.

[Click on image for larger view.]
Figure 2. Data recovery is easy with the Recovery Wizard.
Moving on, select what type of data you want to recover. If you select Files and Folders, you'll be able to highlight the files you want to recover. Unfortunately, selecting files from multiple directories is next to impossible. You can easily recover everything or recover selected files from one directory. Keep that in mind when you set up the backup job.
When you recover files, you'll need to specify the target folder, which can be the original folder or an alternate location. You can also control what happens when you restore a current file if a current version exists. You can create a copy so that you have both versions; you can overwrite the existing version; or you can skip restoring if an existing version is detected. The recovery process happens immediately.
Using WBADMIN.EXE
If you installed the command backup tools, then you have a few more options. Open a command prompt and look at help for WBADMIN.EXE. You can use the tool to set up a scheduled backup, but I think the GUI is much easier. I find this tool more useful for creating one-time backup jobs. Run the following command to see syntax help:
C:\> wbadmin start backup /?
I don't have space to cover all the options, but let me demonstrate how you might use the command-line tool to periodically back up files to a network share:
@echo off
::Demo-Backup.bat
::demonstration script using WBADMIN.EXE on a 
Windows Server 2008 R2 Server

rem backup share UNC
set backupshare=\\mycompany-dc01\backup

rem files and folders to include
set include=c:\scripts,c:\files

rem define date time variables for building 
the folder name
set m=%date:~4,2%
set d=%date:~7,2%
set y=%date:~10,4%
set h=%time:~0,2%
set min=%time:~3,2%
set sec=%time:~6,2%

rem defining a new folder like \\mycompany-dc01\
backup\RESEARCHDC\12152009_132532
set newfolder=%backupshare%\%computername%\
%m%%d%%y%_%h%%min%%sec%
echo Creating %newfolder%

mkdir %newfolder%

rem run the backup
echo Backing up %include% to %newfolder%
wbadmin start backup -backuptarget:%newfolder% 
-include:%include% -quiet
rem Clear variables
set backupshare=
set include=
set m=
set d=
set y=
set h=
set min=
set sec=
set newfolder=
I don't want to overwrite any existing backups, so I'll create a new folder that uses the computer name and a datetime stamp as part of the file name. The batch file has code to handle that task. The main function of the script is to call WBADMIN.EXE to create a backup on the specified share. Look at syntax help if you want to tweak this step. I like this script because I can set up my own scheduled task using the Task Scheduler. So, even though the backup wizard only lets me create one scheduled task, I can create as many as I want using WBADMIN.EXE. I can also use this tool to create system state backups, as well.
To see what backup jobs have executed, run this command:
C:\> wbadmin get versions
Pay attention to the version identifier; you'll need it to recover files using WBADMIN (you can also use the Recovery Wizard).
Backing up with PowerShell
The other command-line approach is to use Windows Backup PowerShell cmdlets. To access them, you'll first need to load the Windows backup snap-in:
PS C:\> add-pssnapin Windows.ServerBackup
To see which cmdlets are included, use Get-Command:
PS C:\> get-command -pssnapin windows.server 
backup
Unfortunately, creating a backup job is a multistep process. While you can type the necessary commands at the prompt interactively, I think you'll find it easier with a scripted approach. Here's a PowerShell version of my original batch file:
#requires -version 2.0
#requires -pssnapin Windows.ServerBackup

#Demo-WBBackup.ps1

$policy = New-WBPolicy
$files=new-WBFileSpec c:\scripts,c:\files
Add-wbFileSpec -policy $policy -filespec $files
$backdir=("\\mycompany-dc01\backup\{0}\{1:MMd 
dyyyy_hhmmss}" -f $env:computername,(get-date))

write-host "Creating $backdir" -foregroundcolor Green
mkdir $backdir | out-null

$backupLocation = New-WBBackupTarget -network 
$backdir 

Add-WBBackupTarget -Policy $policy -Target 
$backupLocation

write-host "Backing up $files to $backdir" -fore 
groundcolor Green
$policy
Start-WBBackup -Policy $policy
The PowerShell cmdlets are based around creating and executing a policy. The policy includes the files or volumes to include or exclude, as well as where to back up the files and a few assorted options. You can also create system-state and bare-metal recovery jobs. In my demonstration, I'm simply backing up a few directories. The Start-WBBackup cmdlet carries out the backup task.
When you look at the list of Windows Backup cmdlets, you'll notice one glaring omission. There are no cmdlets for restoring data. I imagine the assumption is that you wouldn't want to automate this step, although you can with WBADMIN.EXE. Perhaps cmdlets will be added in the future. In the meantime, you can use the Recovery Wizard or WBADMIN.EXE to restore files.

Friday, September 17, 2010

installing dotnet framework 3 in windows 2008 roles

The Windows Server 2008 operating system brings a powerful set of features to the .NET Framework developer. The .NET Framework version 2.0 is included in all the versions of Windows Server 2008. Internet Information Services (IIS) 7.0 includes new flexibility and capabilities for building scalable Web sites and applications. By adding the Application Server role, Windows Server 2008 enables an improved environment for deploying and running custom, server-based business applications. It also includes support for Web services built on Windows Communication Foundation (WCF), Windows Workflow Foundation (WF), and more.
If you have existing .NET Framework applications, you should be aware of the available support provided by Windows Server 2008 for the various .NET Framework versions. The following table outlines the support provided.
.NET Framework Version
Supported in Windows Server 2008
Comments
1.0
No
You should migrate these applications to a more recent version of the .NET Framework.
1.1 Service Pack 1
Yes
Applications written using the .NET Framework 1.1 SP1 will continue to work on Windows Server 2008.
Note the end dates of support for this version of the Framework, which are not related to the product life cycle of Windows Server 2008. For more information, see the .NET Framework 1.1 dates in Microsoft Support Life Cycle.
2.0 Service Pack 1
Yes
Included in Windows Server 2008.
Supported regardless of the server roles selected. You can run applications built for the .NET Framework 2.0 without installing additional software or requiring additional configuration of your server.
3.0 Service Pack 1
Yes
Included in Windows Server 2008.
Configuring Windows Server 2008 as an Application Server activates the included support for the .NET Framework 3.0 Service Pack 1.
3.5
Yes
Windows Server 2008 does not ship with the .NET Framework 3.5. However, you can install this version to take advantage of the new features it offers.
Note: This version depends on the .NET Framework 2.0 Service Pack 1 and the .NET Framework 3.0 Service Pack 1, which are included in Windows 2008 Server.
For more information about .NET Framework support in Windows Server 2008, see the following:

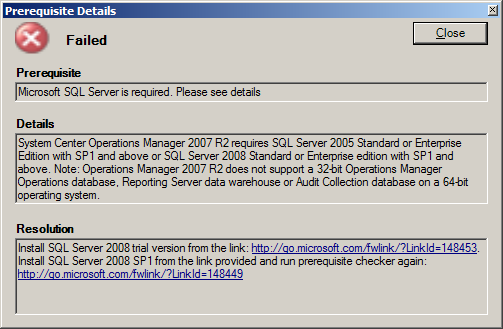
scom 2007 r2 microsoft sql server is required. please see details

When installing OpsMgr on SQL 2008 R2 the installation will not find the SQL instance and give the following error: Microsoft SQL Server is required. Please see details
prereq
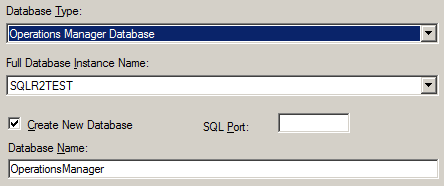
To go around this requirement, use the DBCreateWizard.exe that you find on the OpsMgr media \SupportTools\\DBCreateWizard.exe
Observe that this is NOT TESTED OR SUPPORTED by Microsoft!!!
And that one will find the instance.
sqlr2
Observe that this is NOT TESTED OR SUPPORTED by Microsoft!!!

Tuesday, September 7, 2010

xmlnotepad 2007 slow


We have discovered a problem in XML Notepad 2007 related to our new schema files we are using in Wolverine.  If you encounter a problem where XML Notepad is producing errors when it shouldn’t be or freezing/crashing then I have the solution for you!

How to fix XML Notepad:
1.       Open XML notepad (may need to open a file that uses a schema, it would hang if I tried to use a file with no schema such as .cfg).
2.       Click View -> Schemas…
3.       In the new window that opens click File -> Clear.
4.       Click OK.

How to make sure it STAYS fixed:
1.       Open XML Notepad (but make sure not to have a file that specifies a schema/.xsd file).
2.       Clear the schemas as above.
3.       Close XML Notepad.
4.       Browse to the XML Notepad confg file (usually found at C:\Documents and Settings\\Local Settings\Application Data\Microsoft\Xml Notepad\)
5.       Right click on the ‘xmlnotepad.settings’ file.
6.       Click Properties.
7.       Check the option for Read Only.
8.       Click OK.

Monday, August 30, 2010

how to lock winxp workstation

There are several ways to lock your Windows XP computer, but all of them use the same command line. The method you choose is a matter of personal preference.
  1. via the keyboard
    The easiest way to lock Windows XP is by simply pressing the Windows logo key and the letter L (for Lock) on a Microsoft Natural Keyboard or any other compatible keyboard that includes the Window key. Doing so will pop up the Unlock Computer Password box.

  2. via a Shortcut.
    If you don't have a keyboard with a Window key or simply don't like the keyboard method, then here's how you can make a desktop shortcut to lock your computer.

    Right
    click an empty area of your desktop, choose New/Shortcut and enter this line as the command line:

               rundll32.exe user32.dll, LockWorkStation

    Click Next. Name the shortcut whatever you prefer and click Finish. That's it.

    If you'd like to change the icon, just right click the shortcut and go to Properties/Shortcut/Change Icon.

  3. via the command line
    The above command line can also be used at a DOS prompt to lock your computer. One simple way you can do it would be by clicking Start/Run, typing CMD and then entering the command and pressing Enter.

  4. via a bat file
    This is similar to a Windows shortcut method. But it's a DOS version. If you've never created a bat (batch) file, but would like to try this method, simply open a new text file (such as with Notepad) and type the following commands:

              @echo off
              rundll32.exe user32.dll, LockWorkStation
              cls
      
    Save the file with a .bat extension, such as Lock.bat, and you're done. Double click to make the file run.
Those are the basic methods to lock XP, but there are some other relating factors of which you should be aware.
Password
It should go without saying that if you don't use a password to log on to your computer, then anyone can access your computer and unlock it. If you want to use the lock feature, then set a password by going to User Accounts in the Control Panel and then click Create Password.
Fast User Switching
Fast User Switching allows multiple login sessions at the same time. Whether you have this feature enabled or disabled will make a big difference in how your locked computer can be accessed and on the behavior of your shortcuts when executed.
If enabled, executing any of the above locking methods will bring up the Welcome screen and other users will be able to log on to the computer, as is the norm for Fast User Switching. So, you really don't get much security at all this way, if your intention is to lock your machine. With Fast User Switching, only your profile is locked, not the ability for other users to log into your system. Any other user can just log on to your computer and use it.
If Fast User Switching is disabled, you will have to enter a password to unlock the computer. Double clicking your shortcut will bring up the Unlock Computer password dialog box. This is the same lock method that Windows NT and 2000 uses.

If you're not sure whether or not you have Fast User Switching enabled or disabled, go to User Accounts in the Control Panel and click the Change the way users log on or off tab. There you will see your status for Fast User Switching.
Welcome Screen
Whether the Welcome screen is enabled or disabled also has an effect on the way your computer can be locked.
If the Welcome screen is enabled, you can also lock your computer in Task Manager (Ctrl+Alt+Delete) by clicking the Lock Computer option in the Shutdown menu list. This option will only appear if the Welcome screen is enabled—without Fast User Switching being enabled.
Note! In order to use Fast User Switching, the Welcome screen must be enabled. You cannot select Fast User Switching if the Welcome screen option is unchecked.

Tuesday, August 24, 2010

while typing the password utility manager open automatically

Utility Manager enables users to check an accessibility program's status and start or stop an accessibility program. Users with administrator-level access can designate to have the program start when Utility Manager starts. Users can also start accessibility programs before logging on to the computer by pressing the Windows logo key + U at the Welcome screen.
The built-in accessibility programs available from the Utility Manager are Magnifier, Narrator, and On-Screen Keyboard. Narrator, a text-to-speech program, starts when Utility Manager opens. This gives users who are blind or have impaired vision immediate access to Utility Manager.
Using Utility Manager, you can tell Windows to automatically start accessibility programs each time you log on to your computer, when you lock your computer desktop, or when Utility Manager starts. For example, you can specify that Magnifier start automatically the next time you log on to your computer. This eliminates the need for you to go through the steps of opening Magnifier each time you log on to your computer.
Open Utility Manager by pressing the Windows logo key + U

open utility manager by pressing   + U . and stop all the applications which are running though utility manager. the problem will be solved.

Friday, August 20, 2010

Changes to the distribution list membership could not be saved. You do not have sufficient permissions to perform this operation on this object.


CAUSE
This behavior may occur if the Outlook client is accessing a global catalog in a domain where the distribution groups do not exist.

This global catalog does not contain a writable replication of that Universal Security Group (USG) or Universal Distribution Group (UDG), and you cannot make changes to it.
RESOLUTION
To resolve this behavior, move the Universal Security Group or Universal Distribution Group to the same domain where the global catalog and mail-enabled users are located.

As an alternative, you can make the Outlook client use a global catalog server that is in the same domain as the distribution group. For more information, click the following article number to view the article in the Microsoft Knowledge Base:
319206  (http://kbalertz.com/Feedback.aspx?kbNumber=319206/ ) How to configure Outlook to a specific global catalog server or to the closest global catalog server

Wednesday, August 18, 2010

telnet in windows 7

Telnet in Windows 7

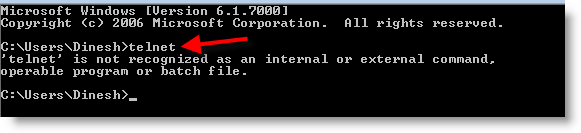
You can easily identify whether telnet is installed on your computer by typing ‘telnet’ in command prompt. If it’s not installed the following message will be appeared.
Telnet in Windows 7
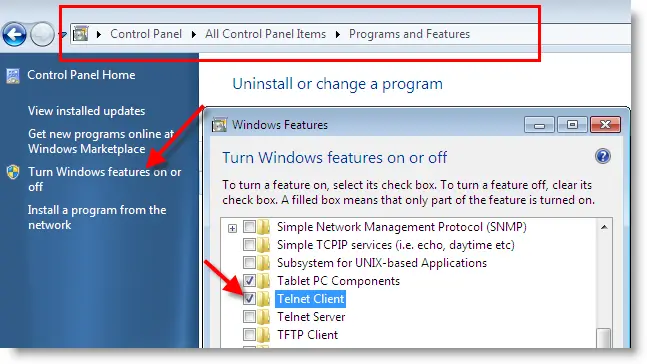
Telnet in Windows 7 can be easily done by installing telnet client which is not installed by default. To install,
1) Go to Control panel
2) Click on ‘ Programs and Features’
3) At left side, click on ‘ Turn Windows features on or off’

 Telnet in Windows 7
Go down in Windows Features box, and tick ‘Telnet Client’ as shown above. Then press OK, and let installation complete.
That’s it, telnet client installation is done in windows 7.  When telnet client is installed, windows firewall settings also changed automatically to allow telnet packets.
Now if you type the same ‘telnet’ command, you can get telnet console in windows 7.

Tuesday, August 17, 2010

cannot copy autorun access is denied

We had Mcafee installed on the server and in the VirusScan Console there is
a task called "Access Protection". Under that I found that there was a
rule under the 'File, Share, and Folder Protection' tab called 'Prevent
remote creation of autorun.inf files'. I unchecked this and could copy inf
files to the network share.

Monday, August 9, 2010

visio viewer 2007 not working with IE8

I was unable to open .vsd file (visio) in IE. I installed/uninstalled viewer from ms site but no use.
  I uninstalled this security update) number : KB973525 ( control panel ( check "show updates " check box at top)

Wednesday, August 4, 2010

symantec your email message was unable to be sent

1.Exit any email programs that may be running.
2.Open Norton AntiVirus.
3.Click Options.
4.Click Email Protection.
5.Uncheck all boxes in the Protected email clients box.
6.Uncheck "Enable email protection (recommended)".
7.Click OK.

Tuesday, August 3, 2010

Outlook 2007: Disabling/Enabling Add-ins

This describes how to re-enable/enable and disable add-ins in outlook. This is how to correct a program that installs an outlook plugin that you don’t use or want.


Disable/Enable Add-ins in Outlook 2007:
1. In Outlook 2007, go to Tools > Trust Center
2. Click on the Add-ins section
3. You will now see all active, non-active, and disabled add-ins. Click on the add-in you want to enable/disable and then click on the Go button towards the bottom.
4. This will then open up the COM add-ins page. You can then check/uncheck the add-ins you want to enabe or disable.
Click the thumbnail for a bigger picture: