Wednesday, January 19, 2011

Create a System Restore Point in Windows 7

It is recommended that you create a restore point before installing new software or making any major changes to your computer.  Often times when you install new software you’re given the choice to create a point but if not you can do one manually as well.
Right-click on My Computer and go to Properties.
1
Next click on the System Protection link.
2
The System Properties dialog screen opens up and you will want to click on Create.
1
Type in a description for the restore point which will help you remember the point at which is was created.
1
The time it takes to create the restore point will depend on the amount of data, computer speed etc.
1
2
All done!  Now if something goes wrong you have the satisfaction knowing that you can go back in time to the point before the changes were made.

It is recommended that you create a restore point before installing new software or making any major changes to your computer. Often times when you install new software you’re given the choice to create a point but if not you can do one manually as well. Right-click on My Computer and go to Properties. 1 Next click on the System Protection link. 2 The System Properties dialog screen opens up and you will want to click on Create. 1 Type in a description for the restore point which will help you remember the point at which is was created. 1 The time it takes to create the restore point will depend on the amount of data, computer speed etc. 1 2 All done! Now if something goes wrong you have the satisfaction knowing that you can go back in time to the point before the changes were made.

Monday, January 17, 2011

How to Fix Vrlogon.dll Failed to Load Error

rlogon.dll is a dynamic link library file that belongs to IBM Fingerprint Software from UPEK Inc. Error Message:
An error message related to vrlogon.dll may be found among users of IBM Lenovo products.  You may receive an error message like the ones posted below:
A recently installed program has disabled the Welcome screen and Fast User Switching. To restore these features, you must uninstall the program. The following file name might help you identify the program that made the change:vrlogon.dll.
The Logon User Interface DLL vrlogon.dll failed to load. Contact your system administrator to replace the DLL, or restore the original DLL.
Cause
This error will appear if the option to Replace Windows logon with fingerprint-protected logon is checked in the ThinkPad fingerprint software. Clicking on Change the way users log on or off will produce the error message stated above.
The following ThinkPad products running Windows XP may be affected by this error:
ThinkPad T42
ThinkPad T42p
ThinkPad Z60m
ThinkPad Z60t
Resolution
This error may be resolved without uninstalling the ThinkPad fingerprint software. Uninstalling the software is not recommended.
The instructions that follow will apply to ThinkPad Fingerprint software v5.6.1.
  1. Go to Start.
  2. Select All Programs.
  3. Select ThinkVantage.
  4. Select ThinkVantage Fingerprint Software.
  5. Click on Control Center.
  6. Click Settings.
  7. Click on System Settings next.
  8. Select the Logon tab.
  9. Disable Allow to bypass logon using Windows password.
  10. Shutdown your system completely.
  11. This will allow the changes to take place.
The error will be gone when the ThinkPad reboots and the User Account may be accessed without the error.
Method 2
Another method that may work for you requires you to download a certain file from off of the internet.
Downloading files can pose some risk as you can never be 100% sure of what the file you’re downloading it is opened.
So, be sure to keep your system safe from harmful viruses and other malware by using an antivirus program like Antivirus Plus.  Also,  make sure that you only use recommended and trusted programs.
You should also pair your antivirus program with a good anti-spyware program such as StopZilla.  This will offer you added protection and keep you safe from identity theft.

How to Fix Vrlogon.dll Failed to Load Error

rlogon.dll is a dynamic link library file that belongs to IBM Fingerprint Software from UPEK Inc.
Error Message:
An error message related to vrlogon.dll may be found among users of IBM Lenovo products.  You may receive an error message like the ones posted below:
A recently installed program has disabled the Welcome screen and Fast User Switching. To restore these features, you must uninstall the program. The following file name might help you identify the program that made the change:vrlogon.dll.
The Logon User Interface DLL vrlogon.dll failed to load. Contact your system administrator to replace the DLL, or restore the original DLL.
Cause
This error will appear if the option to Replace Windows logon with fingerprint-protected logon is checked in the ThinkPad fingerprint software. Clicking on Change the way users log on or off will produce the error message stated above.
The following ThinkPad products running Windows XP may be affected by this error:
ThinkPad T42
ThinkPad T42p
ThinkPad Z60m
ThinkPad Z60t
Resolution
This error may be resolved without uninstalling the ThinkPad fingerprint software. Uninstalling the software is not recommended.
The instructions that follow will apply to ThinkPad Fingerprint software v5.6.1.
  1. Go to Start.
  2. Select All Programs.
  3. Select ThinkVantage.
  4. Select ThinkVantage Fingerprint Software.
  5. Click on Control Center.
  6. Click Settings.
  7. Click on System Settings next.
  8. Select the Logon tab.
  9. Disable Allow to bypass logon using Windows password.
  10. Shutdown your system completely.
  11. This will allow the changes to take place.
The error will be gone when the ThinkPad reboots and the User Account may be accessed without the error.
Method 2
Another method that may work for you requires you to download a certain file from off of the internet.
Downloading files can pose some risk as you can never be 100% sure of what the file you’re downloading it is opened.
So, be sure to keep your system safe from harmful viruses and other malware by using an antivirus program like Antivirus Plus.  Also,  make sure that you only use recommended and trusted programs.
You should also pair your antivirus program with a good anti-spyware program such as StopZilla.  This will offer you added protection and keep you safe from identity theft.

Thursday, January 6, 2011

How to remove nickname cache entries, one at a time

Outlook 2010

  1. Open a new email message.
  2. Type the first few characters of the nickname cache entry that you want to remove from the cache.
  3. When the entry appears in the "suggested names" list, move your mouse pointer over the name until it becomes highlighted. (But do not click the name).
  4. When the “X” icon appears next to the highlighted name, click X to remove the name from the list.

Outlook 2007 or Outlook 2003

  1. Open a new email message.
  2. Type the first few characters of the nickname cache entry that you want to remove from the cache.
  3. When the entry appears in the "suggested names" list, use the UP and DOWN arrow keys on your keyboard to select the entry, and then press DELETE on your keyboard.

How to clear the whole nickname cache

Outlook 2010

Use one of the following methods to reset the whole Outlook nickname cache for Microsoft Outlook 2010.

Method 1

  1. With Outlook 2010 open, click File (BackStage), and then click Options.
  2. Click the Mail tab.
  3. Under Send Messages, click Empty Auto-Complete List.
Outlook will generate a new nickname cache.


Method 2

  1. Click Start, and then click Run.
  2. Start Outlook by using the /CleanAutoCompleteCache switch.

    For example: Outlook.exe /CleanAutoCompleteCache

    Note If Outlook is not installed in the default location, you must point to the path of Outlook.exe. 
Outlook will generate a new nickname cache.

Outlook 2002 through Outlook 2007

Windows 7 or Windows Vista: Use the following steps to reset the whole Outlook nickname cache.
  1. Exit Outlook.
  2. Click Start, and then click click Computer.
  3. Click Organize, and then click Folder and search options.
  4. On the View tab, click to enable the Show hidden files, folders, and drives option.
  5. Click OK.
  6. On the Start menu, click All Programs, click Accessories, and then click Run.
  7. In the Run dialog box, type the following command (including the quotation marks), and then click OK:

    “C:\ Users\UserName\AppData\Roaming\Microsoft\Outlook”


    Note Username in this path is the name of the currently logged on Windows user.
  8. Right-click the .NK2 file that has name of the profile that you want to reset, and then click Rename. 
  9. Rename the file as profilename.bak, and then press ENTER.
  10. Start Outlook.
 Windows XP: Use the following steps to reset the whole Outlook nickname cache.
  1. Quit Outlook.
  2. Click Start, and then click Search.
  3. In the Search Companion left-side panel, click All files or folders.
  4. In the All or part of the file name: box, type *.NK2.
  5. In the Look In box, click to select your local hard disk.
  6. Click More advanced options, click to select Search hidden files and folders check box.
  7. Click Search.
  8. Right-click the .NK2 file with the name of the profile that you want to reset, and then click Rename.
  9. Rename the file to profilename.bak, and then press ENTER.
  10. Quit Windows Explorer.
  11. Restart Outlook.
Outlook will generate a new nickname cache.

Use the steps in the following section to reset the Outlook nickname cache for both Microsoft Windows 2000 and Microsoft Windows Millennium Edition (Me).
  1. Quit Outlook.
  2. Start Windows Explorer.
  3. On the Tools menu, click Folder Options, and then click the View tab.
  4. Under Advanced Settings, click to select the Show hidden files and folders check box.
  5. Click OK.
  6. Click Start, point to Search, and then click For Files or Folders.
  7. In the Search for Files and Folders box, type *.NK2 in the Search for files or folders named box.
  8. In the Look In box, click to select your local hard disk.
  9. Click Search Now.
  10. Right-click the .NK2 file with the name of the profile that you want to reset, and then click Rename.
  11. Rename the file to profilename.bak, and then press ENTER.
  12. Quit Windows Explorer.
  13. Restart Outlook.
Outlook will generate a new nickname cache.

Use the steps in the following section to reset the Outlook nickname cache for both Microsoft Windows NT 4.0 and Microsoft Windows 98:
  1. Quit Outlook.
  2. Start Windows Explorer.
  3. On the Tools menu, click Folder Options, and then click the View tab.
  4. Under Advanced Settings, click to select the Show all files check box.
  5. Click OK.
  6. Click Start, point to Search, and then click For Files or Folders.
  7. In the Named box, type *.NK2.
  8. In the Look In box, click to select your local hard disk.
  9. Click Find Now.
  10. Right-click the .NK2 file with the name of the profile that you want to reset, and then click Rename.
  11. Rename the file to profilename.bak, and then press ENTER.
  12. Quit Windows Explorer.
  13. Restart Outlook.
Outlook will generate a new nickname cache.

http://support.microsoft.com/kb/287623

Tuesday, January 4, 2011

win xp installation

1.Insert the Windows XP CD into your computer and restart your computer.
2.If prompted to start from the CD, press SPACEBAR. If you miss the prompt (it only appears for a few seconds), restart your computer to try again.
Command window with prompt "Press any key to boot from CD"
3.Windows XP Setup begins. During this portion of setup, your mouse will not work, so you must use the keyboard. On the Welcome to Setup page, press ENTER.
Windows XP Professional Setup page
4.On the Windows XP Licensing Agreement page, read the licensing agreement. Press the PAGE DOWN key to scroll to the bottom of the agreement. Then press F8.
Windows XP Licensing Agreement page
5.This page enables you to select the hard disk drive on which Windows XP will be installed. Once you complete this step, all data on your hard disk drive will be removed and cannot be recovered. It is extremely important that you have a recent backup copy of your files before continuing. When you have a backup copy, press D, and then press L when prompted. This deletes your existing data.
6.Press ENTER to select Unpartitioned space, which appears by default.
Windows XP Professional Setup, partitioned and unpartitioned space page
7.Press ENTER again to select Format the partition using the NTFS file system, which appears by default.
Windows XP Professional Setup page with Format the partition using the NTFS file system selected
8.Windows XP erases your hard disk drive using a process called formatting and then copies the setup files. You can leave your computer and return in 20 to 30 minutes.
Windows XP Professional Setup Please wait while Setup formats the partition page

Part 2: Continue the installation
9.Windows XP restarts and then continues with the installation process. From this point forward, you can use your mouse. Eventually, the Regional and Language Options page appears. Click Next to accept the default settings. If you are multilingual or prefer a language other than English, you can change language settings after setup is complete.
Regional and Language Options page
10.On the Personalize Your Software page, type your name and your organization name. Some programs use this information to automatically fill in your name when required. Then, click Next.
Personalize Your Software page
11.On the Your Product Key page, type your product key as it appears on your Windows XP CD case. The product key is unique for every Windows XP installation. Then, click Next.
Your Product Key page
12.On the Computer Name and Administrator Password page, in the Computer name box, type a name that uniquely identifies your computer in your house, such as FAMILYROOM or TOMS. You cannot use spaces or punctuation. If you connect your computer to a network, you will use this computer name to find shared files and printers. Type a strong password that you can remember in the Administrator password box, and then retype it in the Confirm password box. Write the password down and store it in a secure place. Click Next.
Computer Name and Administrator Password page
13.On the Date and Time Settings page, set your computer’s clock. Then, click the Time Zone down arrow, and select your time zone. Click Next.
Date and Time Settings page
14.Windows XP will spend about a minute configuring your computer. On the Networking Settings page, click Next.
Networking Settings page
15.On the Workgroup or Computer Domain page, click Next.
Workgroup or Computer Domain page

Part 3: Complete the installation
16.Windows XP will spend 20 or 30 minutes configuring your computer and will automatically restart when finished. When the Display Settings dialog appears, click OK.
Display Settings dialog box
17.When the Monitor Settings dialog box appears, click OK.
Monitor Settings dialog box
18.The final stage of setup begins. On the Welcome to Microsoft Windows page, click Next.
Welcome to Microsoft Windows page
19.On the Help protect your PC page, click Help protect my PC by turning on Automatic Updates now. Then, click Next.
Help protect your PC page
20.Windows XP will then check if you are connected to the Internet:
•If you are connected to the Internet, select the choice that describes your network connection on the Will this computer connect to the Internet directly, or through a network? page. If you’re not sure, accept the default selection, and click Next.
Will this computer connect to the Internet directly, or through a network? page
•If you use dial-up Internet access, or if Windows XP cannot connect to the Internet, you can connect to the Internet after setup is complete. On the How will this computer connect to the Internet? page, click Skip.
How will this computer connect to the Internet? page
21.Windows XP Setup displays the Ready to activate Windows? page. If you are connected to the Internet, click Yes, and then click Next. If you are not yet connected to the Internet, click No, click Next, and then skip to step 24. After setup is complete, Windows XP will automatically remind you to activate and register your copy of Windows XP.
Ready to activate Windows? page
22.On the Ready to register with Microsoft? page, click Yes, and then click Next.
Ready to register with Microsoft? page
23.On the Collecting Registration Information page, complete the form. Then, click Next.
Collecting Registration Information page
24.On the Who will use this computer? page, type the name of each person who will use the computer. You can use first names only, nicknames, or full names. Then click Next. To add users after setup is complete or to specify a password to keep your account private, read Create and customize user accounts.
Who will use this computer? page
25.On the Thank you! page, click Finish.
Thank you! page
Congratulations! Windows XP setup is complete. You can log on by clicking your name on the logon screen. If you’ve installed Windows XP on a new computer or new hard disk drive, you can now use the File and Settings Transfer Wizard to copy your important data to your computer or hard disk drive

transfer putty settings

PuTTY is tops on the short list of applications I install first on any Windows machine. Over the years I've used PuTTY, I've installed it on a huge number of computers but I've always had one complaint; There isn't a configuration file I can backup or move to a new machine.

Getting all the little comfort settings correct for each SSH connection can be a pain. The third time you set emulation, keys, encryption type, etc. for each machine you regularly access, you lose patience. The fifth time you find yourself re-entering settings you might do what I did, find a better way.

Moving PuTTy settings between computers is an easy task once you know what's involved. We'll find the registry keys where PuTTy stores its configuration information and export them to a file. We'll then use that file we've made to import our configuration on the target machine.

Exporting Your PuTTy Configuration

Putty stores its settings in the Windows registry. To save a backup of your Putty settings, you'll need to export this registry key to a file.

HKEY_CURRENT_USER\Software\SimonTatham

(Simon Tatham is the original developer responsible for PuTTy)

1. Click Start->Run and type "RegEdt32" in the "Open" dialog. Click "Ok"


2. One RegEdt32 starts, you'll be presented with an application which looks something like:


3. Press "Ctrl+F" to bring up the Find dialog. Enter the name of the key, "SimonTratham" in the "Find What" field, and make sure only "Keys" is checked in the "Look At" section of the dialog. Finally, click "Find Next"


4. The search may take a while, reminding us that the Windows Registry is a large and mysterious place where dragons be. Let's use these few seconds to reflect on the fact that you should never, ever, never change things in the registry unless you are absolutely, positively, totally, completely, 100% dead sure that you know exactly what you're doing. When the search completes we'll see the key name for which we're looking.


5. Click File->Export. Give your file an appropriate name like, "putty.reg" and click "Save"


6. We're done! Save the putty.reg file somewhere safe. The file doesn't contain any passwords or actual SSH key values so, it's relatively safe from prying eyes. Still, it does contain your configuration and that kind of data is a private matter.

Importing Your PuTTy Configuration

To import your saved PuTTy configuration on any other Windows computer simply copy your exported registry key, right click on the file and click "Merge"


Windows will ask you for confirmation that you want to import this set of registry values. We know this file is safe, because we created it but, you should never import registry information from an unknown source.


That's all you need to know about moving your PuTTy configuration from one machine to another. This can be really useful information when upgrading to a new PC or, if you're an office IT guy where your users all have a standard list of servers they need to connect via SSH, you can create a reference configuration on once machine and "share" it between every computer in the office.

view hidden folders in windows 7


Windows 7 hides certain files so that they are not able to be seen when you exploring the files on your computer. The files it hides are typically Windows 7 System files that if tampered with could cause problems with the proper operation of the computer. It is possible, though, for a user or piece of software to set make a file hidden by enabling the hidden attribute in a particular file or folder's properties. Due to this it can be beneficial at times to be able to see any hidden files that may be on your computer. This tutorial will explain how to show all hidden files in Windows 7.
To enable the viewing of hidden and protected system files in Windows 7 please follow these steps:
  1. Close all programs so that you are at your desktop.

  2. Click on the Start button. This is the small round button () in the lower left corner of your screen that has a Windows flag on it.

  3. Click on the Control Panel menu option.

  4. When the control panel opens you will see a screen similar to Figure 1 below.


    Figure 1. Windows 7 Control Panel
    Figure 1. Windows 7 Control Panel


  5. Click on the Appearance and Personalization link.

  6. You will now be in the Appearance and Personalization control panel as shown in Figure 2 below.


    Figure 2. Windows 7 Appearance and Personalization screen
    Figure 2. Windows 7 Appearance and Personalization screen


    Now click on the Show hidden files and folders option as shown by the red arrow in Figure 2 above.

  7. Under the Hidden files and folders section select the radio button labeled Show hidden files, folders, and drives.

  8. Remove the checkmark from the checkbox labeled Hide extensions for known file types.

  9. Remove the checkmark from the checkbox labeled Hide protected operating system files (Recommended).

    Once this is done, your Folder Options screen should look similar to the following image.


    Figure 3. Folder Options screen
    Figure 3. Folder Options screen


  10. Press the Apply button and then the OK button.
You will now be at your desktop and Windows 7 will be configured to show all hidden files.

Tuesday, December 28, 2010

the commnd prompt disabled by your administrator

When you attempt to run CMD.exe or a batch file, you may receive the message "The command prompt has been disabled by your administrator". This is caused by restrictions placed in Registry.DisableCMD value is set to 1 or via Group Policy. To enable Task Manager, try any of these methods:
Method 1: Using the console registry tool
  • Click Start, Run and type thiscommand exactly as given below: (better - Copy and paste)
Method 2: Edit the registry directly
  • Open Registry Editor (Regedit.exe) and navigate to:
[HKEY_CURRENT_USER\Software\Policies\Microsoft\Windows\System]
  • In the right-pane, double-click DisableCMD and set it's data to 0
     
Method 3: UsingGroup Policy Editor in Windows XP Professional.
  • Click Start, Run, type gpedit.msc and click OK.
  • Navigate to User Configuration \ Administrative Templates \ System
  • Double-click the Prevent access to the command prompt
You can then disable or set the policy to Not Configured. Disabling or setting this policy to NotConfigured should solve the problem.

Monday, December 27, 2010

You might not have permission to use this network resource. Contact your administrator.__Windows 7, Vista, and XP networking

Control Panel - Administrative Tools - Local Security Policy


Local Policies - Security Options


Network security: LAN Manager authentication level

Send LM & NTLM responses


Minimum session security for NTLM SSP

Disable Require 128-bit encryption

control panel-- credential manager
remove the password options

Monday, December 20, 2010

internet explorer 8 closing unexpectedly

Method 1: Reset Internet Explorer settings

Reset Internet Explorer to its default settings. This removes all changes that were made to Internet Explorer since it was installed, but it does not delete your favorites or feeds. To do this, follow these steps:
  1. Close all Internet Explorer and Windows Explorer windows.
  2. Click Start
    Start button
    , and then click Control Panel.
  3. In Control Panel, open Internet Options.
  4. Click the Advanced tab, and then click Reset.
  5. In the Reset Internet Explorer Settings dialog box, click Reset.
  6. When Internet Explorer finishes restoring the default settings, click Close, and then click OK two times.
  7. Close Internet Explorer, and then reopen it. The changes take effect the next time that you open Internet Explorer.

Method 2: Uninstall Internet Explorer, and then reinstall it

If resetting Internet Explorer to its default settings does not fix the problem, uninstall Internet Explorer 8 or Internet Explorer 9 Beta, and then reinstall it. To do this, select the appropriate operating system, and then follow the corresponding steps.

Note This method cannot be used for Internet Explorer 7 issues as it is a part of Windows Vista and cannot be uninstalled.

Windows 7

Uninstall Internet Explorer 8 or Internet Explorer 9 Beta from Windows 7-based or Windows Server 2008 R2-based computers
  1. Close all programs.
  2. Click Start, and then click Control Panel.
  3. Click Programs, and then click Turn Windows features on or off.
  4. In the list of Windows features, clear the Internet Explorer 8 or the Internet Explorer 9 Beta box.
  5. Click Yes when you are prompted to.
  6. Click OK. Internet Explorer 8 or Internet Explorer 9 Beta will now be uninstalled. The system will restart after the installation.
Install Internet Explorer 8 or Internet Explorer 9 Beta on Windows 7-based or Windows Server 2008 R2-based computers
  1. Close all programs.
  2. Click Start, and then click Control Panel.
  3. Click Programs, and then click Turn Windows features on or off.
  4. In the list of Windows features, check the  Internet Explorer 8 or the Internet Explorer 9 Beta box.
  5. Click Ok and wait for system to restart.

Windows Vista

Uninstall Internet Explorer 8 or Internet Explorer 9 Beta from Windows Vista-based computers
  1. Close all programs.
  2. Click Start, and then click Control Panel.
  3. Click Programs, and then click Uninstall a Program.
  4. In the Tasks pane, click View installed updates.
  5. In the list of installed updates, double-click Windows Internet Explorer 8 or Windows Internet Explorer 9 Beta, and then click Yes when you are prompted for confirmation.
Note If Windows Internet Explorer 8 or Windows Internet Explorer 9 Beta does not appear in the list of installed updates, try the steps are listed in the "Alternative steps" section of the following Knowledge Base article:
957700  How do I uninstall or remove Internet Explorer 8?
Install Internet Explorer 8 on Windows Vista or Windows Server 2008-based computers
  1. Visit the following Microsoft Web site:
  2. Click the Download button on the page to start the download, or select a different language from the Change language list, and then click Go.
  3. Follow one of these steps:
    • To start the installation immediately, click Run.
    • To save the download to your computer for installation later, click Save.
    • To cancel the installation, click Cancel.
Install Internet Explorer 9 Beta on Windows Vista or Windows Server 2008-based computers
To download Internet Explorer 9 Beta, visit the following Microsoft Web site: 

Windows XP

Uninstall Internet Explorer 7 or Internet Explorer 8 from Windows XP-based computers
  1. Click Start, and then click Control Panel.
  2. Click Add or Remove Programs.
  3. Make sure that the Show updates check box is checked.
  4. Click Windows Internet Explorer 7 or Windows Internet Explorer 8.
  5. Click Remove.
Install Internet Explorer 7 or Internet Explorer 8 on Windows XP-based computers
  1. Visit either of the following Microsoft Web sites depending on which version you want to install:
  2. Click the Download button on the page to start the download, or select a different language from the Change language list, and then click Go.
  3. Follow one of these steps:
    • To start the installation immediately, click Run.
    • To save the download to your computer for installation later, click Save.
    • To cancel the installation, click Cancel.

Method 3: Internet Explorer troubleshooters in Windows 7

By default, Windows 7 has two Internet Explorer troubleshooters on a new installation. These are
  1. Internet Explorer Performance
  2. Internet Explorer Safety

Run Internet Explorer troubleshooters

  1. Close all programs.
  2. Click Start, and then click Control Panel.
  3. Click Find and Fix Problems under System and Security.
  4. Click View All on the task pane on the left.
  5. Click Internet Explorer Performance.
  6. Click Next in the dialogue box.
  7. The troubleshooter will run and fix all identified issues automatically. Click Close.
After you run the "Internet Explorer Performance" troubleshooter, start Internet Explorer to see whether the issue is fixed. If the issue still occurs, run the ‘Internet Explorer Safety’ troubleshooter by using the same steps as mentioned earlier.

Thursday, December 9, 2010

Uninstall Internet Explorer 7


To uninstall Internet Explorer 7, follow these steps:
  1. Click Start, and then click Run.
  2. In the Open box, type %windir%\ie7\spuninst\spuninst.exe, and then click OK.
  3. Follow the wizard instructions to uninstall Internet Explorer 7.

Tuesday, December 7, 2010

Windows 7 Cannot Connect to Internet

Having problems connecting to the Internet on your new Windows 7 machine? Windows 7 is great and can automatically fix a lot of common problems related to connecting to the Internet, but not all!
The first thing you should try if you having Internet problems is to try and connect from both a wireless and wired connection. You first want to try and narrow down the problem to Windows 7, to your network setup, or to your Internet provider.
Here are some possible solutions you can try that will hopefully get your Internet connection up and running in Windows 7.

Method 1 – Turn Off Firewall/Anti-Virus Programs

One common reason why this problem occurs in new installations of Windows 7 is because of a third-party firewall or anti-virus program. Just to make sure it’s not that, go ahead and uninstall any of these types of programs.
You might be wondering why it would matter, especially if you have the same program running on another computer like XP or Vista. The problem could be that if the firewall or anti-virus program is not compatible with Windows 7, it can accidentally block connections to the Internet.

Method 2 – Install Drivers in Emulation Mode

So if you didn’t buy a new computer and are instead installing Windows 7 on a slightly older machine, you problem could be because of incompatible drivers.
You can fix this in two ways. First, try going to the computer manufactures website and download the latest drivers for your wireless card. Install it and see if the problem is fixed.
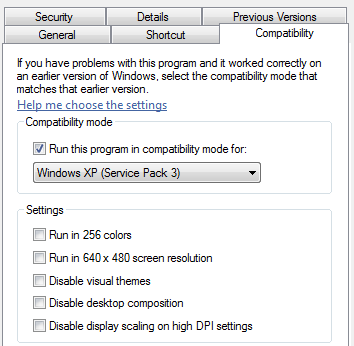
If not, it might mean you need to install the driver in compatible mode. You can do this by right-clicking on the executable file, choosing Properties, clicking on the Compatibility tab and checking the box that says “Run this program in compatibility mode for:” and then choose the OS.
windows 7 cannot connect internet
Again, make sure to run the driver setup program in this compatible mode to see if that fixes the problem.

Method 3 – Disable Protected Mode

The other reason you may not be able to connect is because of IE 8, which now ships with Windows 7. Some people have reported that the security settings are set such that they cannot connect to any website at all!
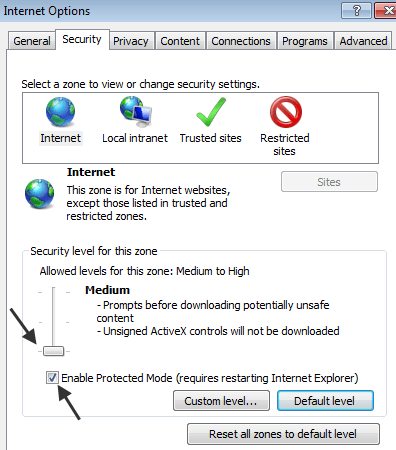
You can test this by going to Tools, then Internet Options, and clicking on the Security tab. Click on Internet and move the slide bar all the way to the bottom (lowest security).
ie 8 internet options
Once you move the slider all the way down, click OK. Then close IE 8 and open it again. Try connecting to the Internet. If it doesn’t work, try unchecking the Enable Protected Mode option. Make sure to restart IE again.

Method 4 – Try Network Troubleshooter

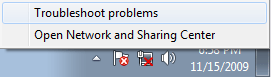
If nothing else is working, you may as well try the built-in Windows 7 Network Diagnostics tool also. To run it, right-click on the Network icon in your system tray and choose Troubleshoot Problems.
troubleshoot network
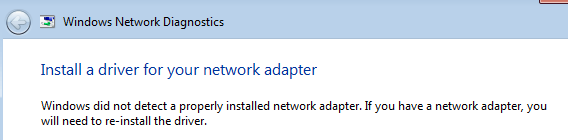
It will automatically try to detect what the problem is and give you a possible reason and a solution.
windows 7 no internet

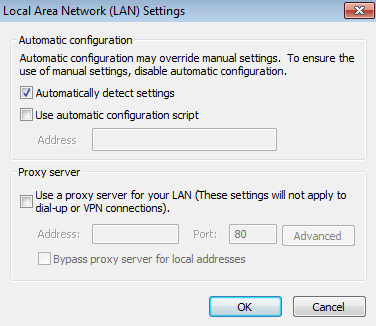
Method 5 – Toggle Automatically Detect Settings option

Another thing you can try is to check or uncheck the Automatically Detect Settings option in IE. You can get there by going to Tools, Internet Options, Connections, LAN Settings.
automatically detect settings
If it’s checked, uncheck it and vice versa. See if that solves your problem. Also, make sure that the “Use a proxy server” box is unchecked.

Method 6 – Uninstall Network Card

You can also try to uninstall the network card from Device Manager and let Windows 7 re-install it on reboot.
Go to the Control Panel, click on Hardware and Sound, and then open Device Manager. Right-click on your network card and choose Uninstall. If prompted to remove the driver, click Yes.
Then restart Windows and the default Windows 7 driver will be installed, which might get your connection working again.

Method 7 – Enable/Disable Network Card

A simpler solution before uninstalling the network card might be to simply disable and then re-enable the network card.
Go to the Network and Sharing Center and right-click on your network card and choose Disable. Then simply re-enable it and see if this fixes your problem.
Hopefully, one of these methods will get your Internet connection in Windows 7 working again! If not, post a comment here and we’ll try to help!

Tuesday, November 30, 2010

Installing or Removing Remote Server Administration Tools for Windows 7

To install the Administration Tools pack by using the Windows interface
  1. Download the Administration Tools package from the Microsoft Web site (http://go.microsoft.com/fwlink/?LinkID=137379).
  2. Open the folder into which the package downloaded, double-click the package to unpack the files, and then start the Remote Server Administration Tools Setup Wizard.
    Note

    You must accept the License Terms and Limited Warranty to install Administration Tools.
  3. Complete all the steps that are required by the wizard, and then click Finish to exit the wizard when installation is completed.
  4. Click Start, click Control Panel, and then click Programs.
  5. In the Programs and Features area, click Turn Windows features on or off.
    If you are prompted by User Account Control to allow the Windows Features dialog box to open, click Continue.
  6. In the Windows Features dialog box, expand Remote Server Administration Tools.
  7. Select the remote management tools that you want to install, and then click OK.
  8. Configure the Start menu to display the Administration Tools shortcut, if it is not already there.
    1. Right-click Start, and then click Properties.
    2. On the Start Menu tab, click Customize.
    3. In the Customize Start Menu dialog box, scroll down to System Administrative Tools, and then select Display on the All Programs menu and the Start menu. Click OK.
      Shortcuts for snap-ins installed by Remote Server Administration Tools for Windows 7 are added to the Administrative Tools list on the Start menu.

Thursday, November 11, 2010

remove or disable RSS feed in outlook 2007

To get rid of the send/receive error caused by RSS Feeds. try to remove all from below two areas.

1)

1. Click on tools
2. Click on options
3. Select "Mail Setup" Tab
4. Click the "Send/Receive" Button
5. Make sure that "All Acounts" is high lighted and then click the "Edit" button
6. Under Accounts in the left hand column select select "RSS Feeds"
7. Uncheck all boxes on this page.
8. Click the "OK" button then you can close out the rest.
 

2)  Disable Outlook’s RSS Sync:
    1. Open Outlook 2007 2. Click the Tools menu 3. Click Options 4. Select the Other tab 5. Click the Advanced Options button 6. Uncheck Sync RSS feeds to the Common Feed List 7. Click OK X 2outlook_remove_rss_feeds
Woo-hoo. That will speed up Outlook. If you want to remove the RSS subscriptions from Outlook, you may wish to do this following.
Mass Remove Feed Subscriptions from Outlook:
    1. Click Tools menu and then Options again. 2. Select the poorly named Mail Setup tab 3. Click the Data Files button 4. Click the RSS Feeds tab 5. Click the first feed and scroll down to the bottom of the feed list 6. Hold the SHIFT key and click the last feed. All feeds should now be selected. 7. Click the Remove button 8. Confirm you want them all deleted.
Now we’ll need to delete the old feed content as well…
    9. Expand the RSS Feed folder under Personal Folders 10. Select each feed and press Delete. You’ll have to confirm the delete. 11. Repeat ad nauseum until all are gone.


Tuesday, November 9, 2010

ntdetect error

Remove the non-system disk from your boot device. For example, remove the non-system disk from the floppy drive or the CD-ROM drive.

Change your computer's boot sequence. Make sure that your computer's first boot sequence is the CD-ROM Drive.

1.Insert the Windows XP CD-ROM into the CD-ROM drive, and then restart the computer.

Click to select any options that are required to start the computer from the CD-ROM drive if you are prompted.

2.When the "Welcome to Setup" screen appears, press R to start the Recovery Console.

3.If you have a dual-boot or multiple-boot computer, select the installation that you must access from the Recovery Console.

4.When you are prompted, type the Administrator password. If the administrator password is blank, just press ENTER.

5.Enter in the following commands

COPY X:\i386\NTLDR C:\
COPY X:\i386\NTDETECT.COM C:\
[where X=CD ROM Drive]
Take out the CD ROM and type exit