Thursday, March 19, 2015

Installing and Configuring Microsoft Deployment Toolkit (MDT) 2013 on Windows Server 2012 R2

In this post we are going to be covering slides 10-14 from my presentation, the live installation and configuration demo. Let’s get started!  For this demo, I will be using two systems, the first is my MDT 2013 server, running Windows Server 2012 R2. The second is my MDT client/target, to which I will be deploying Windows Server 2012 R2 from a volume license ISO. On the MDT server, I will start by downloading the Microsoft Assessment and Deployment Kit (ADK) for Windows 8.1 which can be found here:http://www.microsoft.com/en-us/download/details.aspx?id=39982.
Click Download:
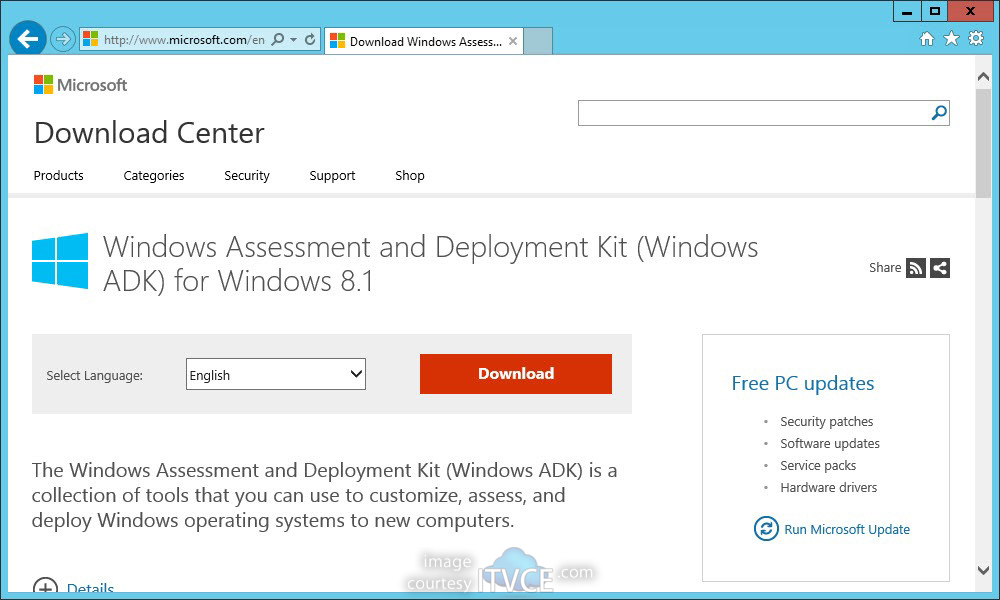
MDT-1000
Click Run:
MDT-1001
I would always recommend downloading the ADK to a local folder or network share, since these files take a while to download and are commonly used in many Microsoft products, including System Center. Select a local or network path and click Next:
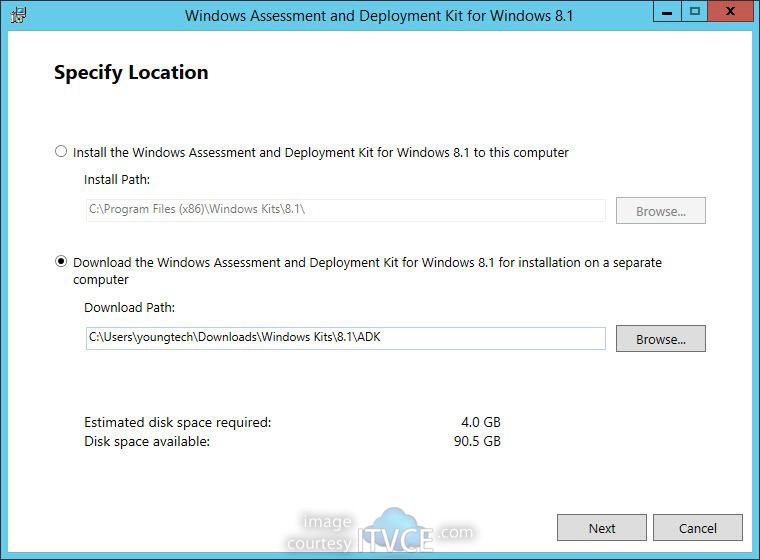
MDT-1002
Click Next:
MDT-1003
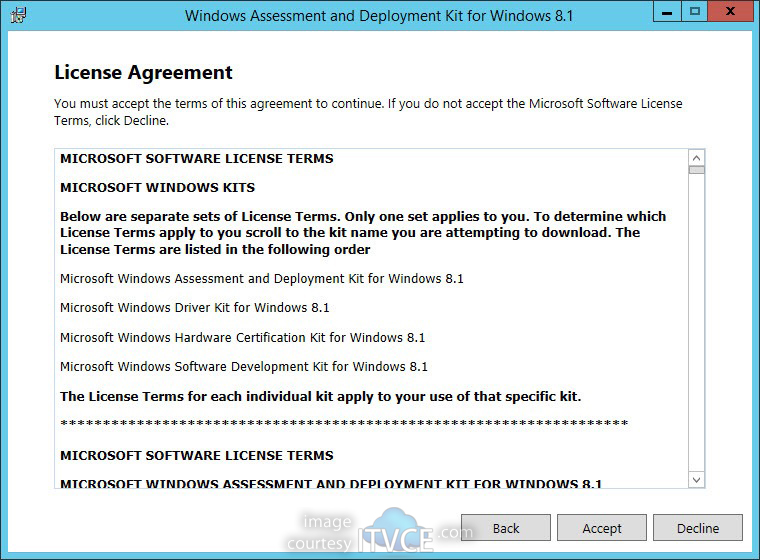
Accept the license agreement:
MDT-1004
After many minutes (or even hours), the ~3GB files will finish downloading. When complete, re-launch the ADK setup wizard by executing adksetup.exe from the path specified earlier:
MDT-1005
If the installation files are detected, the installer will simply prompt for an installation directory. Click Next:
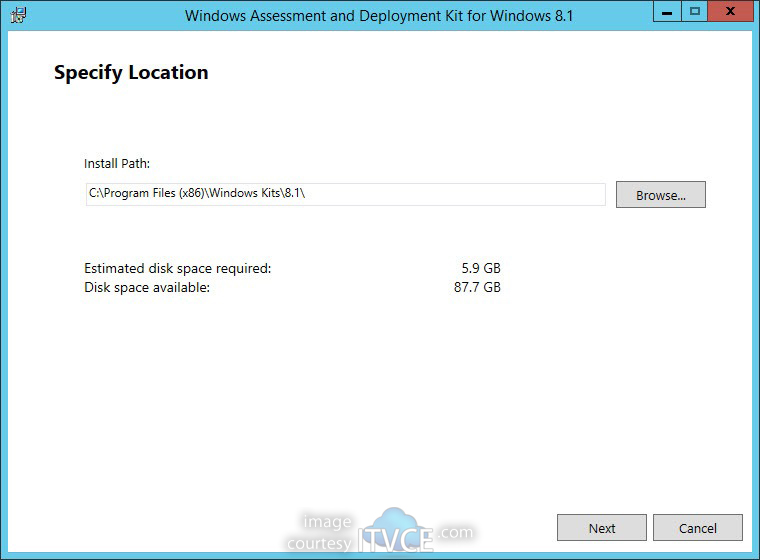
MDT-1006
Click Next:
MDT-1007
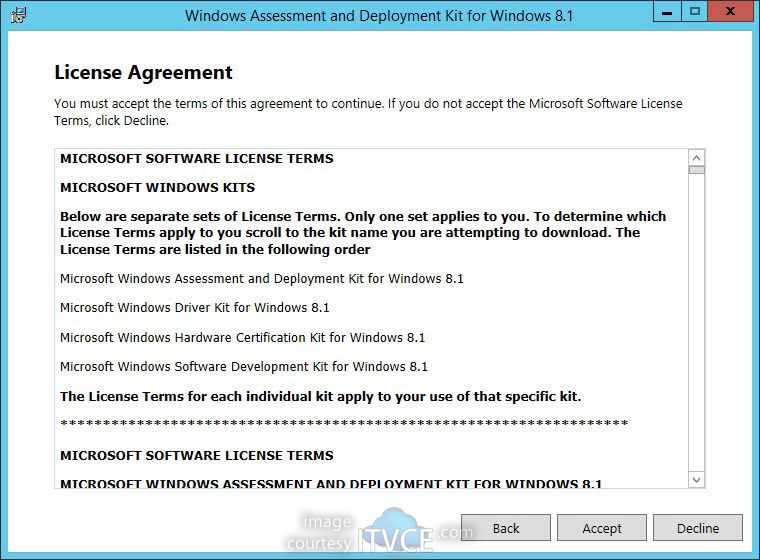
Accept the license agreement:
MDT-1008
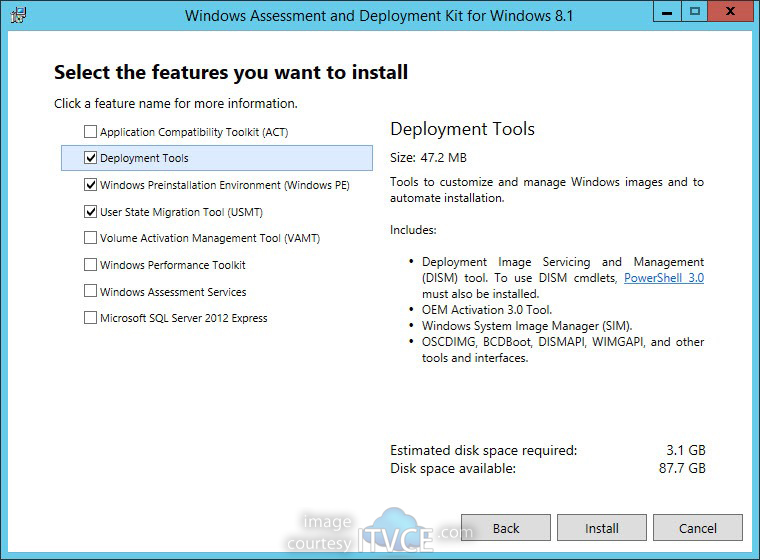
Uncheck all features except Deployment Tools, Windows Preinstallation Environment (Windows PE), and User State Migration Tool (USMT). These are the only features required for the MDT Server. Click Install:
MDT-1009
After a couple minutes, the installation will finish. Click Close:
MDT-1010
Next, we’ll download the MDT 2013 install files from: http://www.microsoft.com/en-us/download/details.aspx?id=40796. Click Download:
MDT-1011
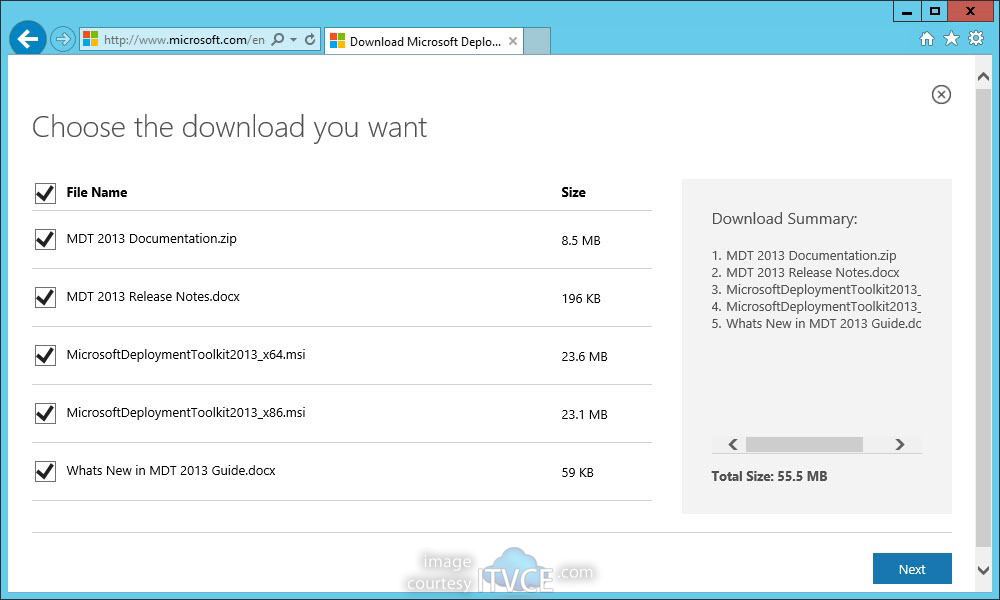
Select all files and click Next:
MDT-1012
Click Save for each file, putting the files in an MDT folder:

MDT-1013
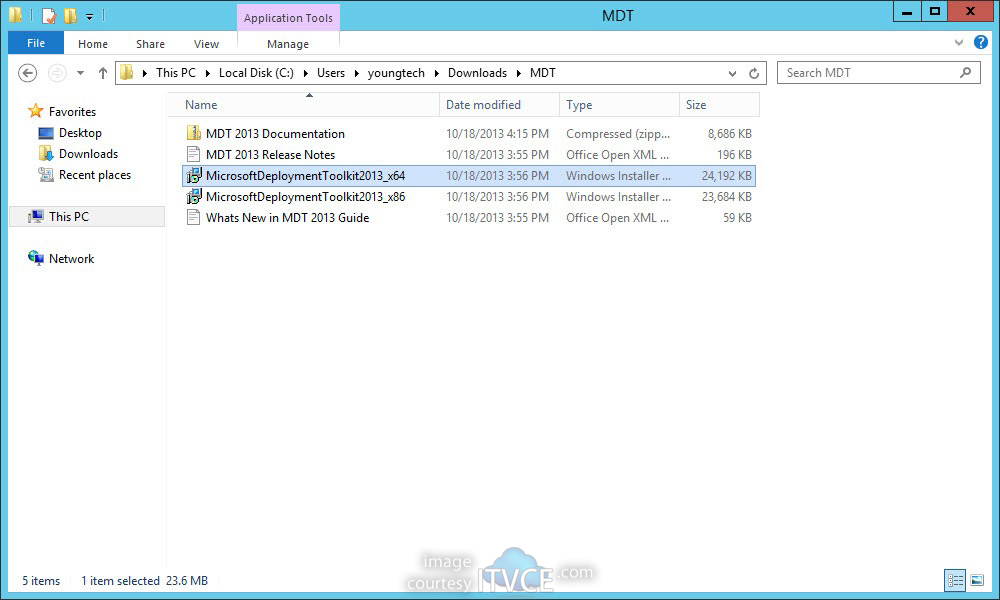
Once each of the five files have been downloaded, launch MicrosoftDeploymentToolkit2013_x64.msi:
MDT-1014
Click Next:
MDT-1015
Accept the license agreement and click Next:
MDT-1016
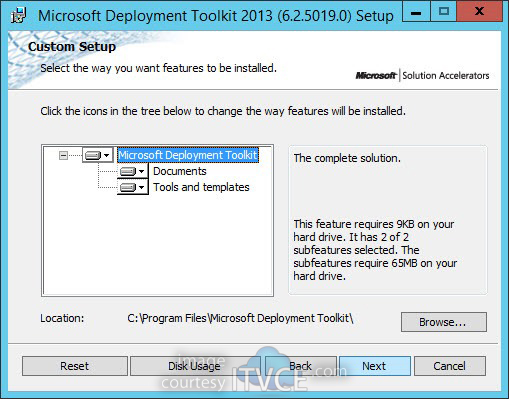
Click Next:
MDT-1017
Click Next:
MDT-1018
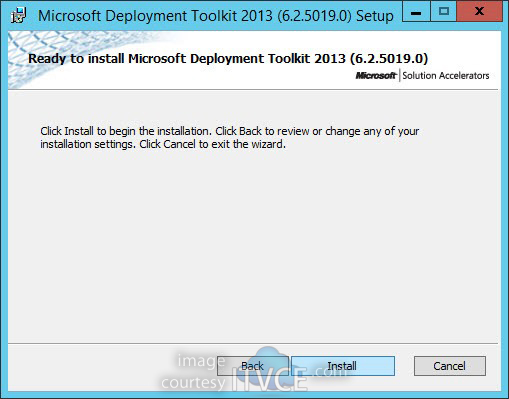
Click Install:
MDT-1019
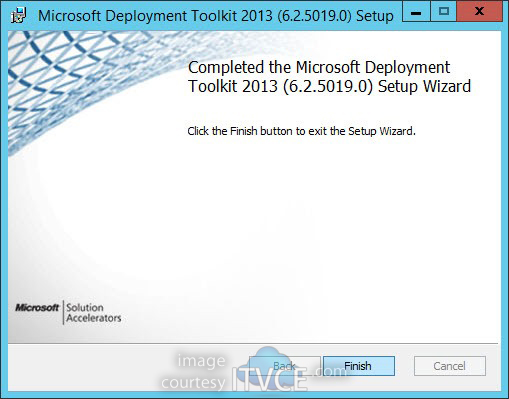
Click Finish:
MDT-1020
On Windows Server 2012 R2, click the Start menu:
MDT-1021
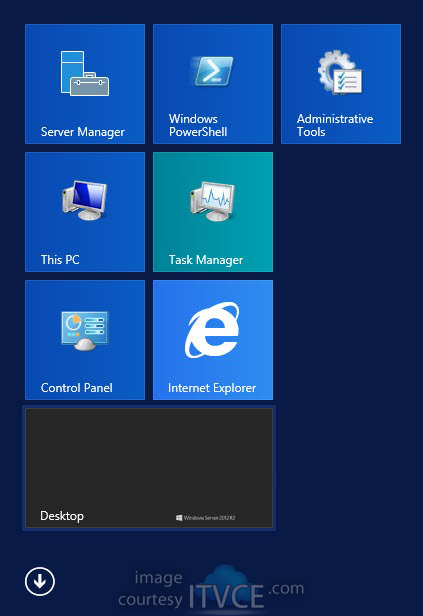
As with many newly installed applications, you’ll find the app shortcuts are a bit buried in Windows Server 2012 R2 until you get used to it. From the Start interface, click the Down arrow in the bottom left for all programs:
MDT-1022
A new Microsoft Deployment Toolkit section is created. Launch the Deployment Workbench (New):
MDT-1023
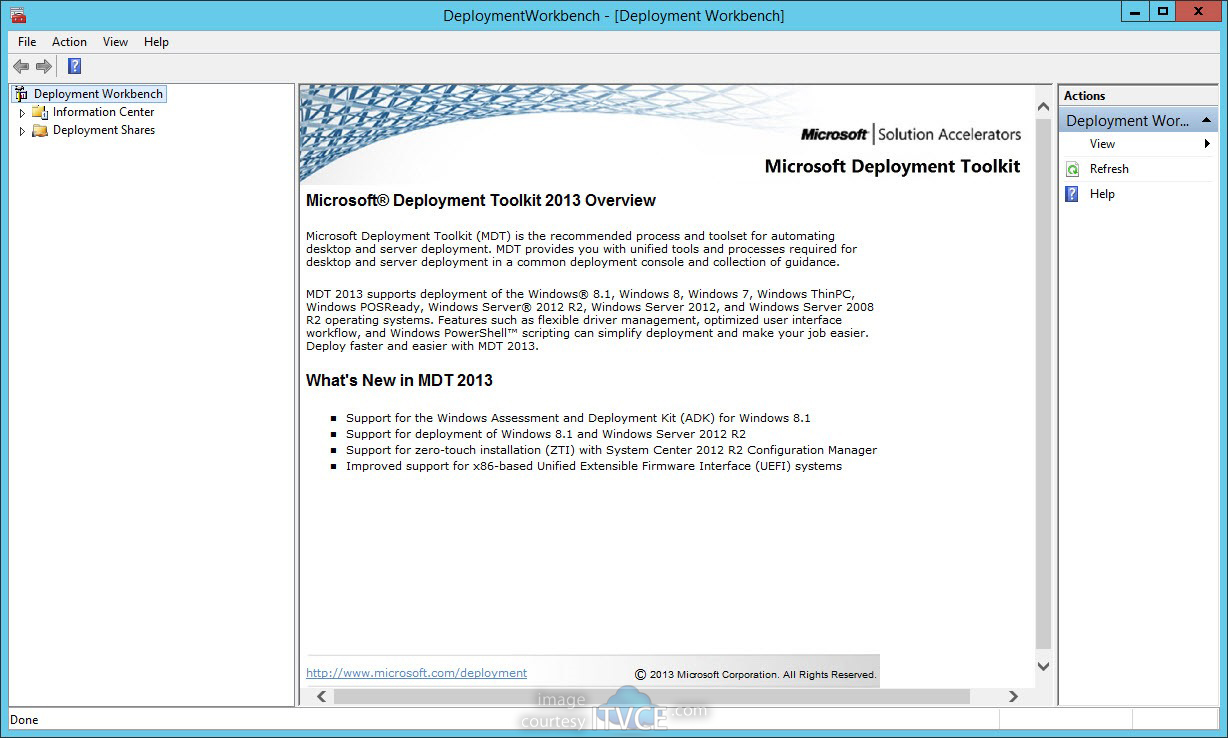
The first time launched, you’ll see a nice overview of MDT 2013:
MDT-1024
Right click Deployment Shares in the left navigation and select New Deployment Share:
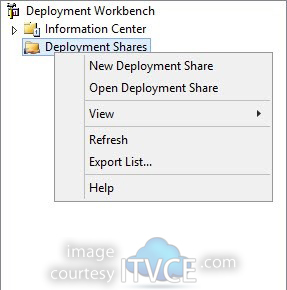
MDT-1025
Change the deployment share path or leave defaults and click Next:
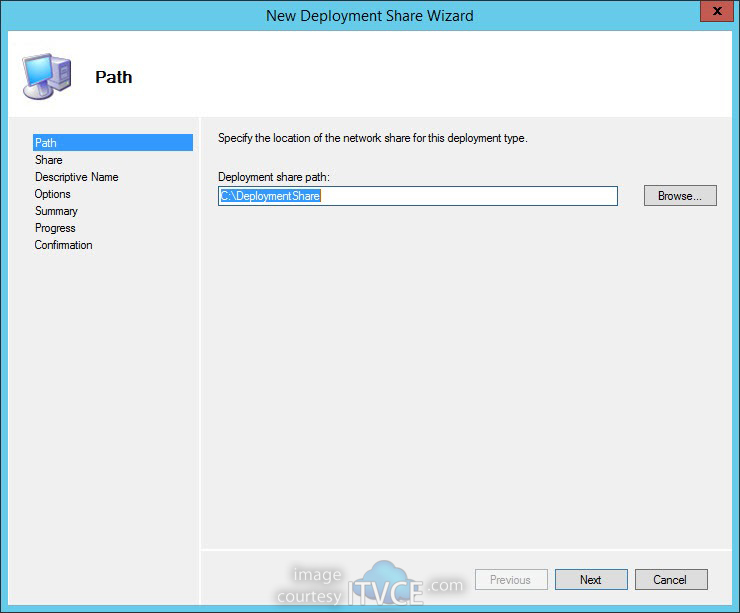
MDT-1026
Change the deployment share name or leave defaults and click Next:
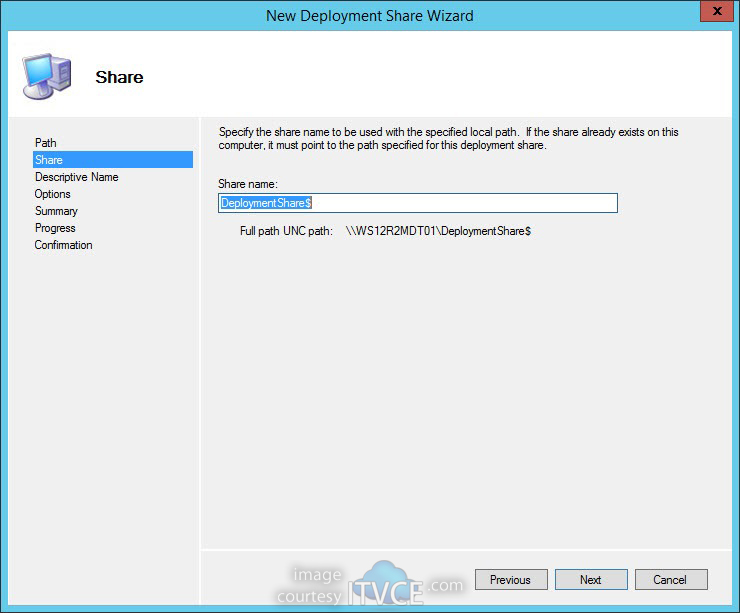
MDT-1027
Change the deployment share description or leave defaults and click Next:
MDT-1028
Review and uncheck each of the default options and click Next:
MDT-1029
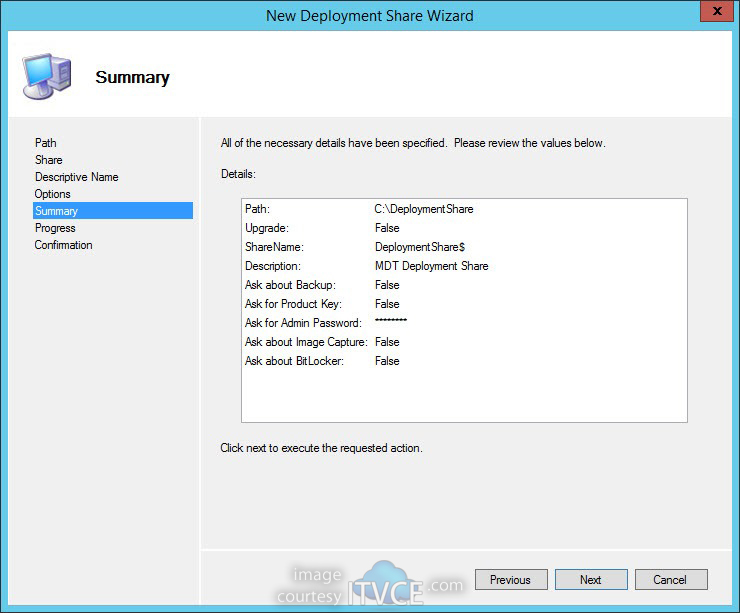
Review and click Next:
MDT-1030
Click Finish:
MDT-1031
Open Computer Management. Expand Local Users and Groups and right click Users to select New User:
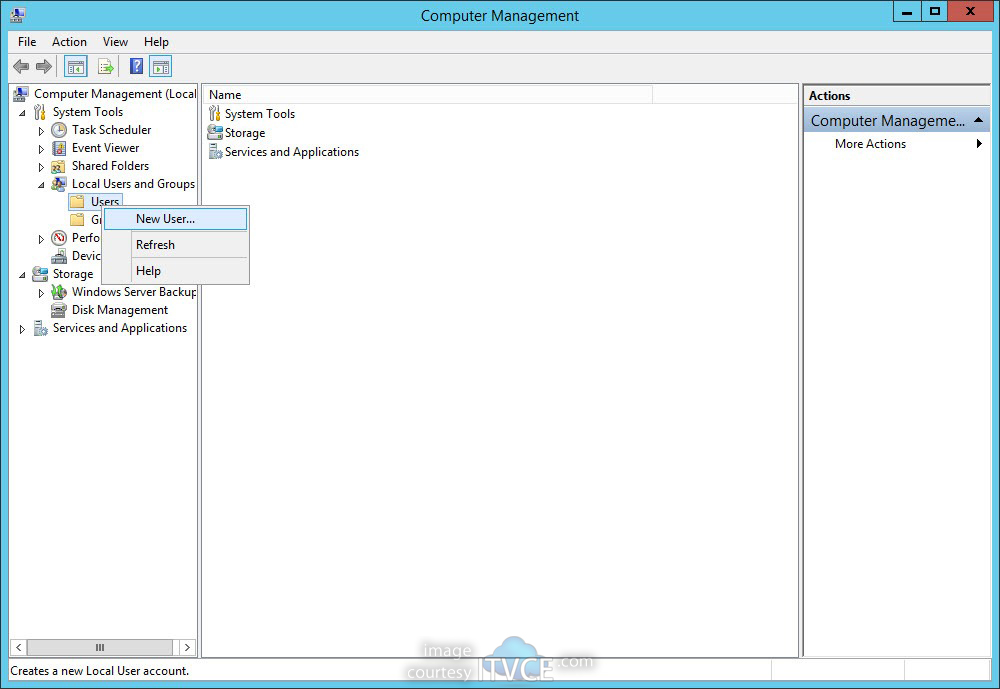
MDT-1039
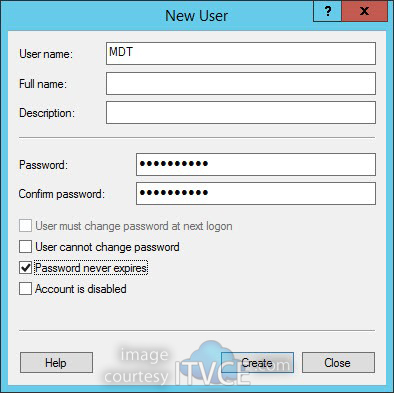
A local user account with rights to the MDT share will be very beneficial for deployments. Create a local user, set password never expires, and enter a password that can be safely stored in plain text without much risk (not a super secretive password):
MDT-1040
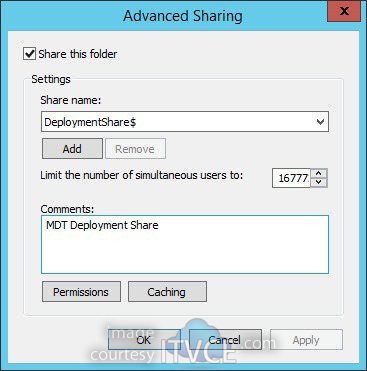
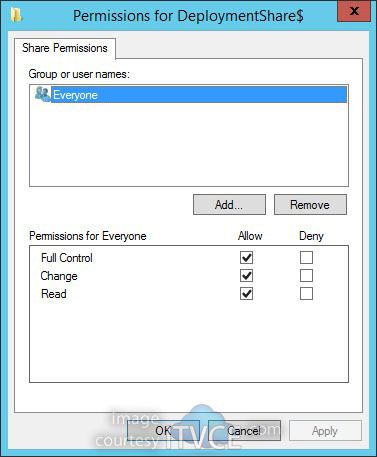
By default the deployment share is created with Everyone Full Control permissions. To review, find the deployment folder, right click and go to the Sharing tab. Click Advanced Sharing:
MDT-1041
Click Permissions:
MDT-1042
Note Everyone is added by default with Full Control (security is controlled by NTFS permissions on the folder):
MDT-1043
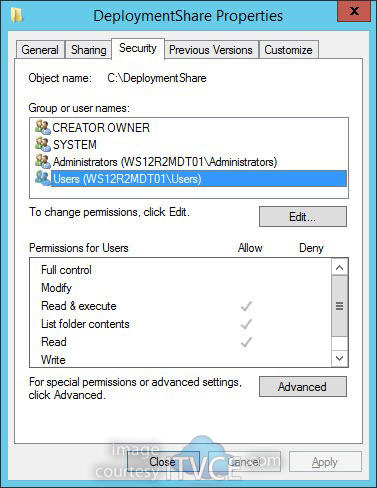
On the Security tab of the share, note that Users have Read & Execute, List Folder Contents, and ReadNTFS permissions. This is perfect for our newly created MDT user to access the share during deployments:
MDT-1044
Back in the Deployment Workbench, right click the new deployment share and select Properties:
MDT-1033
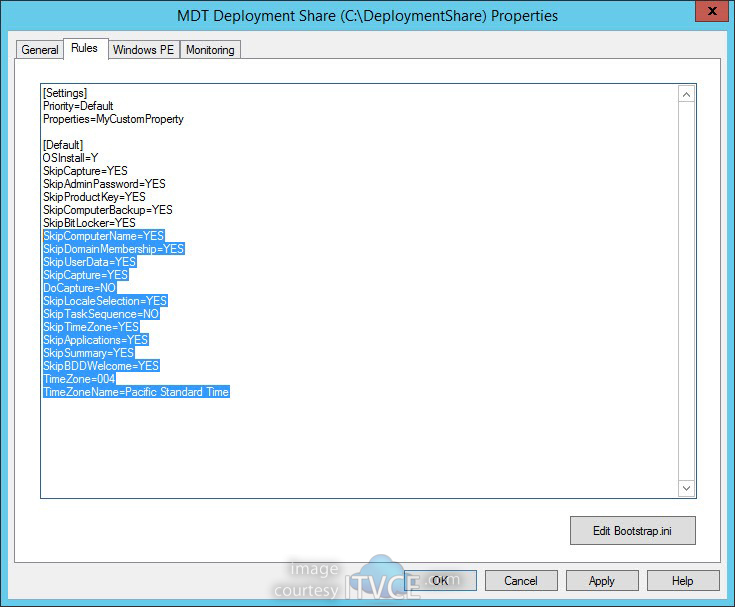
Under the Rules section, drop the following block of options at the end of the [Default] section:
SkipComputerName=YES
SkipDomainMembership=YES
SkipUserData=YES
SkipCapture=YES
DoCapture=NO
SkipLocaleSelection=YES
SkipTaskSequence=NO
SkipTimeZone=YES
SkipApplications=YES
SkipSummary=YES
SkipBDDWelcome=YES
TimeZone=004
TimeZoneName=Pacific Standard Time
After you’re fairly experienced with MDT, you can read up and review all of the CustomSettings.ini options in various documentation articles and blogs online. Once each option has been added, click Edit Bootstrap.iniin the bottom right:
MDT-1034
Under the [Default] section, drop the following block of options:
UserID=MDT
UserDomain=WS12R2MDT01
UserPassword=P@ssw0rd01
KeyboardLocale=en-US
SkipBDDWelcome=YES
Close the Notepad document and you will be prompted to save changes:
MDT-1035
Click Save:
MDT-1036
Click Apply to save changes to CustomSettings.ini for the deployment share:
MDT-1037
Click OK:
MDT-1038
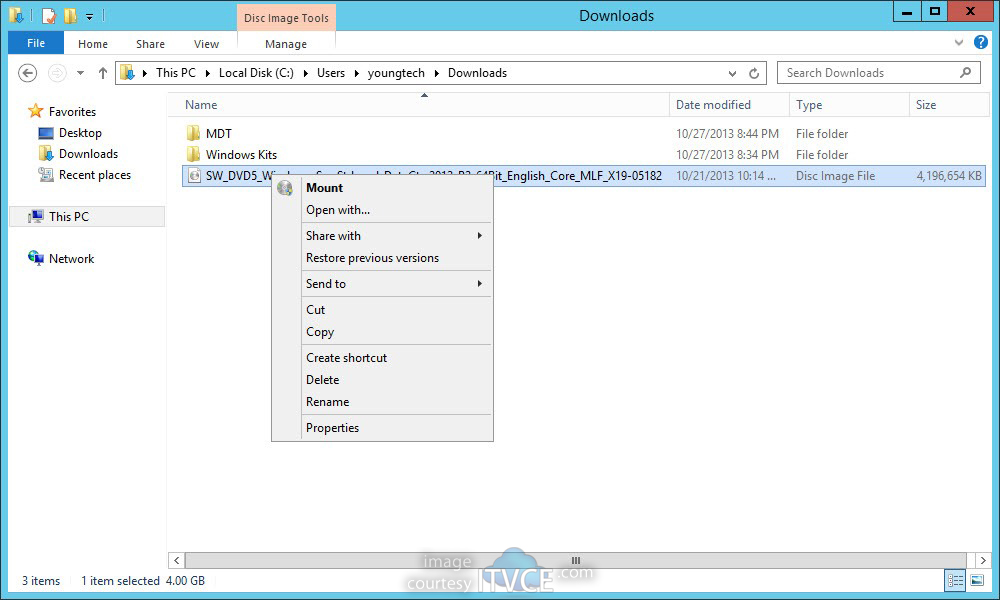
Next, we’ll import the Operating System images (WIM) for Windows Server 2012 R2. To do this, I will very handily double click to Mount the volume license ISO:
MDT-1045
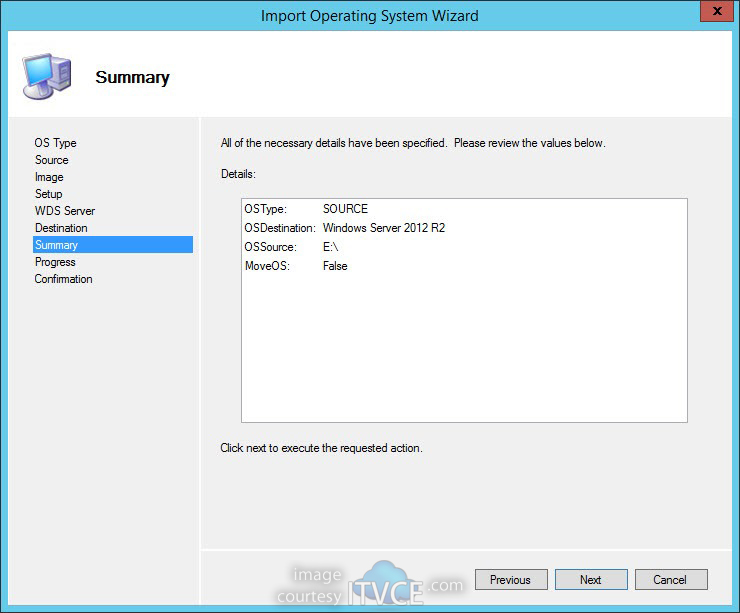
The next drive letter available for my MDT server was E:\ so the installation media is now mounted using that drive:
MDT-1046
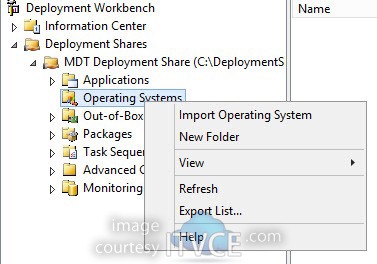
In the Deployment Workbench, right click Operating System and select Import Operating System:
MDT-1047
Select Full set of source files and click Next:
MDT-1048
Type E:\ to use the recently mounted ISO. Click Next:
MDT-1049
Enter a destination directory name (I typically just clean up the default name that was detected). Click Next:
MDT-1050
Click Next:
MDT-1051
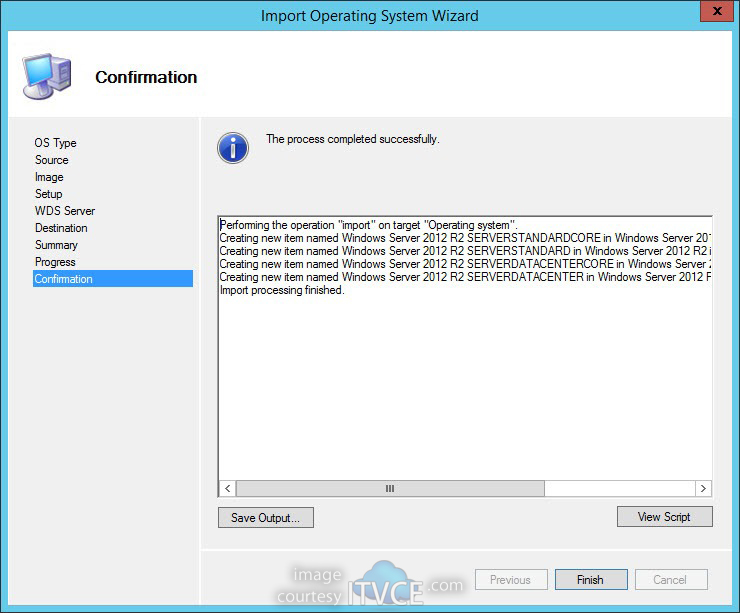
Upon completion (typically a couple minutes) click Finish:
MDT-1052
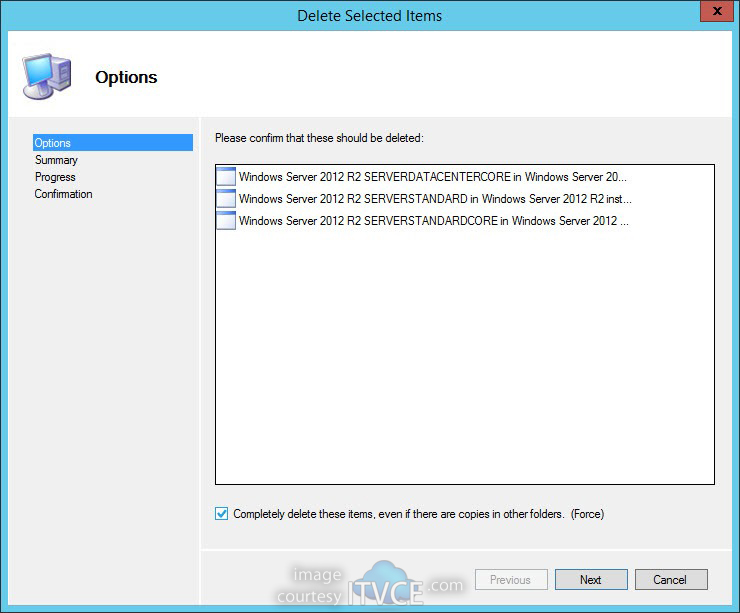
Typically, I do some cleanup since I won’t need most of the WIM files imported. For now, I’ll delete the three WIM files and leave Server Datacenter. To do so, select each file, right click and select Delete:
MDT-1053
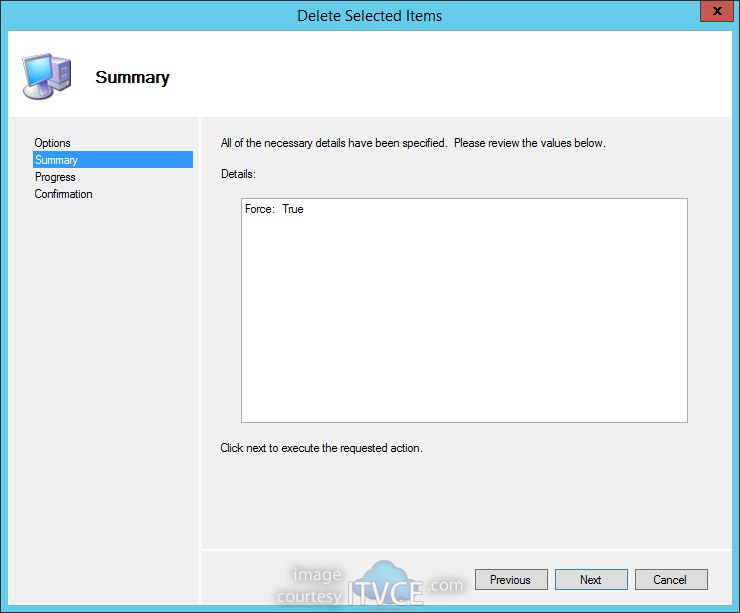
I’ll select Completely delete and click Next:
MDT-1054
Click Next:
MDT-1055
Click Finish:
MDT-1056
Next, I’ll rename to clean up the WIM file name to “Windows Server 2012 R2 Datacenter.wim”:
MDT-1057
Right click Task Sequence and select New Task Sequence:
MDT-1058
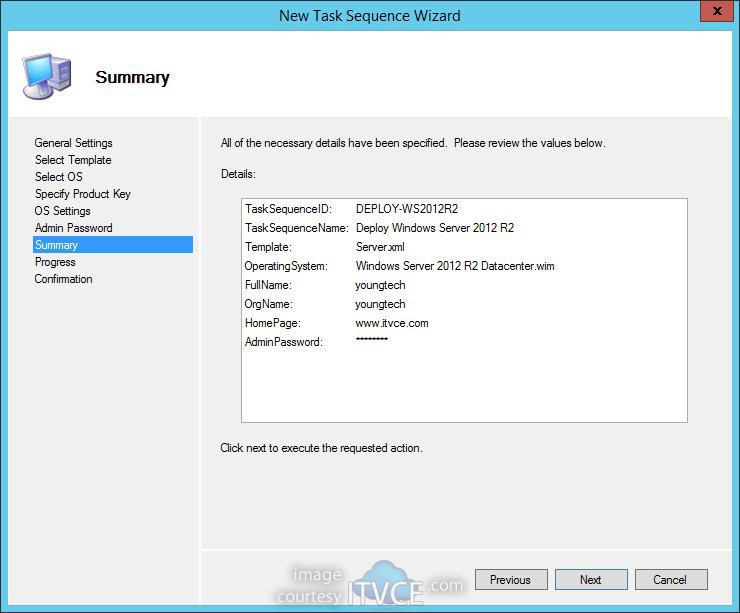
Enter DEPLOY-WS2012R2 for the Task sequence ID and a name to be selected using the deployment wizard, “Deploy Windows Server 2012 R2” for example. Click Next:
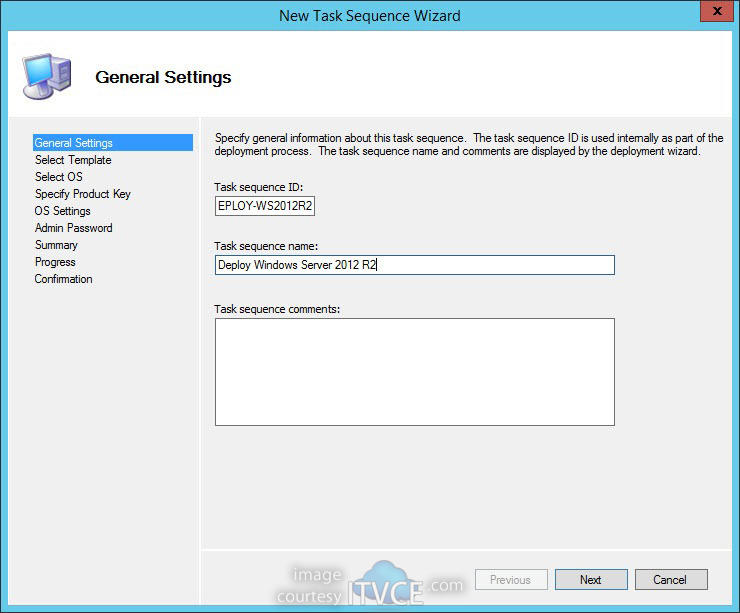
MDT-1059
Select Standard Server Task Sequence from the drop-down and click Next:
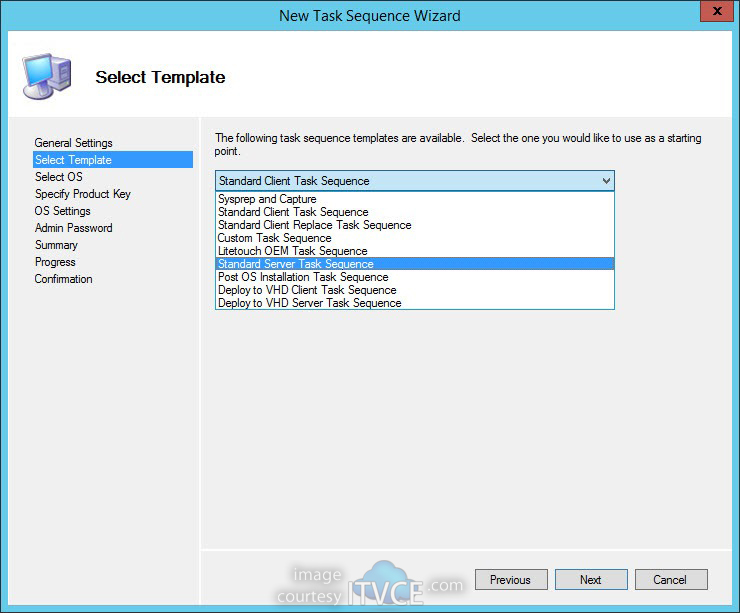
MDT-1060
Select the Operating System from the list and click Next:
MDT-1061
Your choice to enter a product key, or do this later. Click Next:
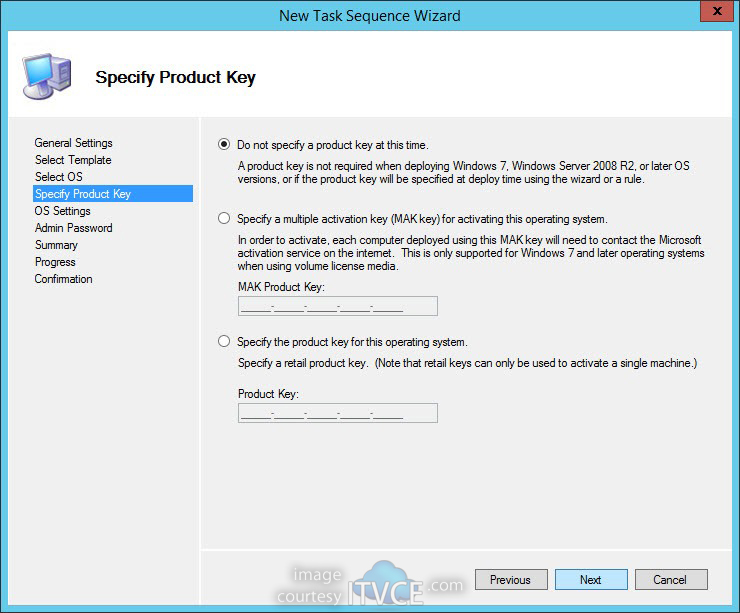
MDT-1062
Enter a name, organization, and home page. Click Next:
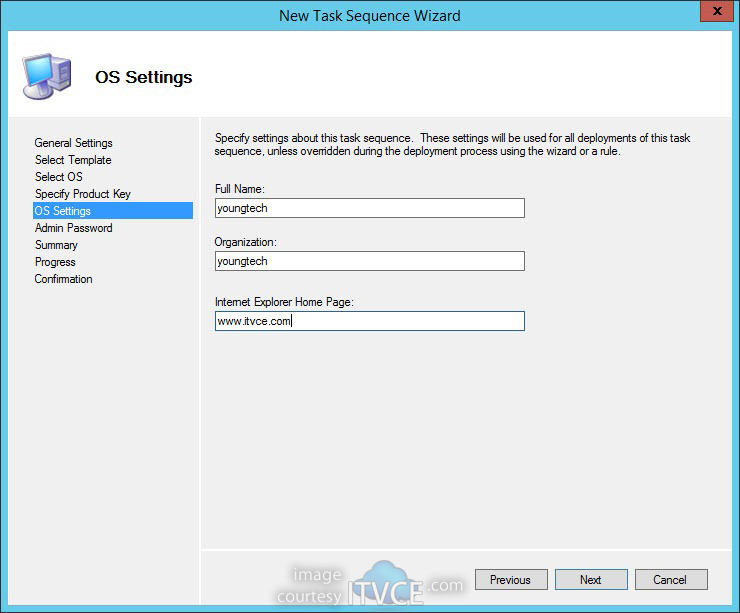
MDT-1063
Enter a password that you don’t mind having stored in plain text as this is kept within the Unattend.xml file. The administrator password can always be changed post-deployment. Click Next:
MDT-1065
Click Next:
MDT-1066
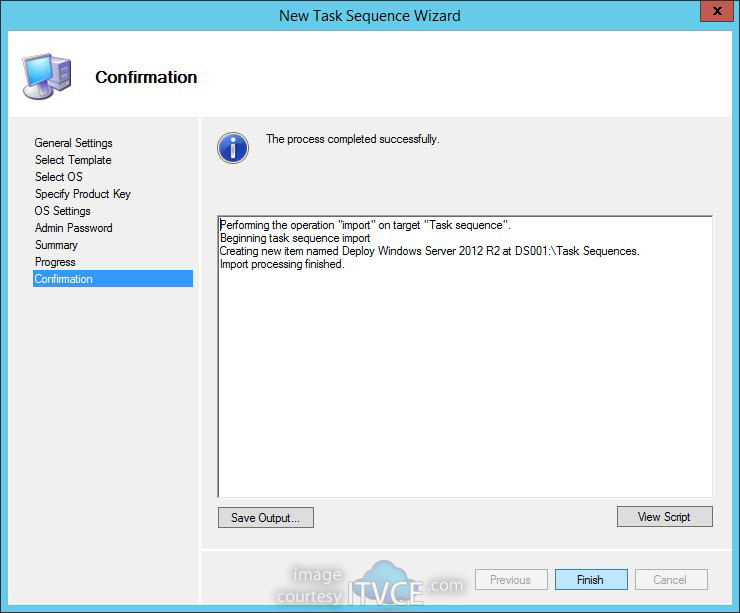
Click Finish:
MDT-1067
Next, we’ll modify the task sequence to enable Windows Updates. Right click the new task sequence and select Properties:
MDT-1068
Under the State Restore section, there are two entries for Windows Update which are both disabled by default. Highlight each of these tasks and click the Options tab:
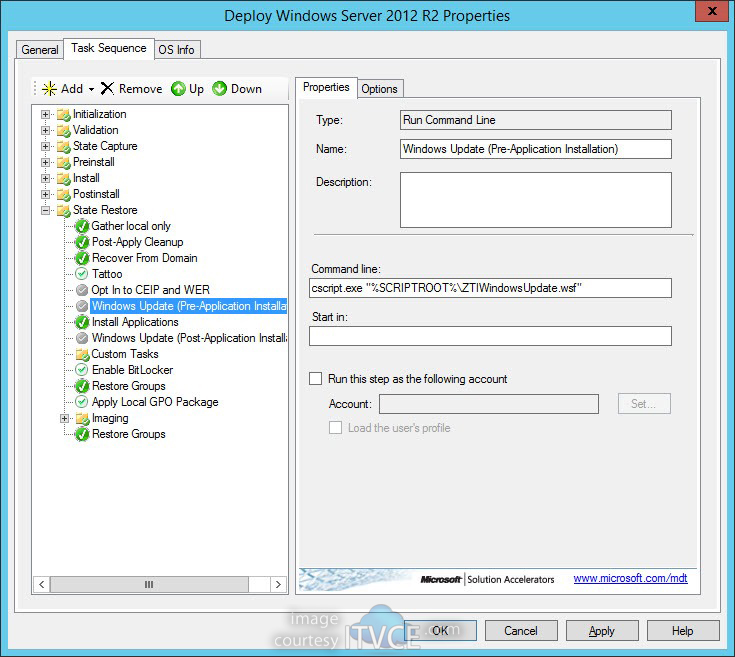
MDT-1069
Uncheck Disable this step to enable the step.
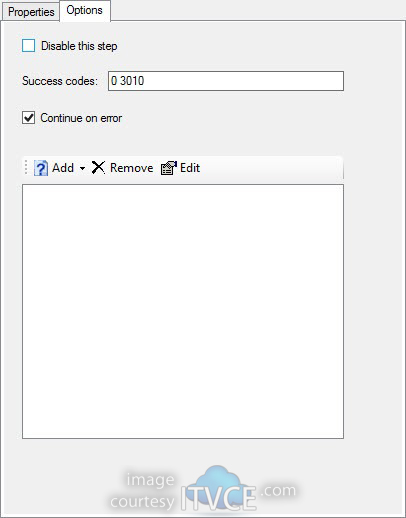
MDT-1070
Repeat for the second Windows Update entry:
MDT-1071
Uncheck Disable this step and both tasks should now be enabled. This will come in hand later when we start slipping in applications to the task sequence. Click OK to save all changes to the task sequence:
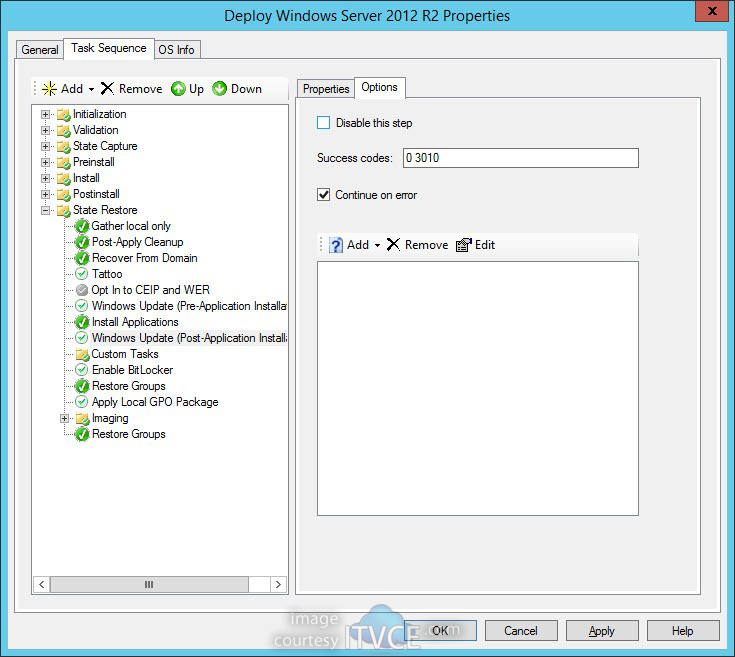
MDT-1072
Optionally (and highly recommended), the default Microsoft Solutions Accelerator background can be replaced by using an identically sized and bit depth BMP file in the following location: C:\Program Files\Microsoft Deployment Toolkit\Samples\Background.bmp:
MDT-1073
Finally, let’s package everything up to create a LiteTouch ISO file for booting. In the Deployment Workbench, right click the deployment share and select Update Deployment Share:
MDT-1074
Leave defaults and click Next:
MDT-1075
Click Next:
MDT-1076
Upon completion, click Finish:
MDT-1077
Once the deployment share has been updated the first time, the LiteTouchPE_x64.iso files are created under the \Boot folder in the deployment share.  These ISO files can be used to directly boot physical and virtual machines, or integrated into Windows Deployment Services for PXE booting to deploy MDT images.
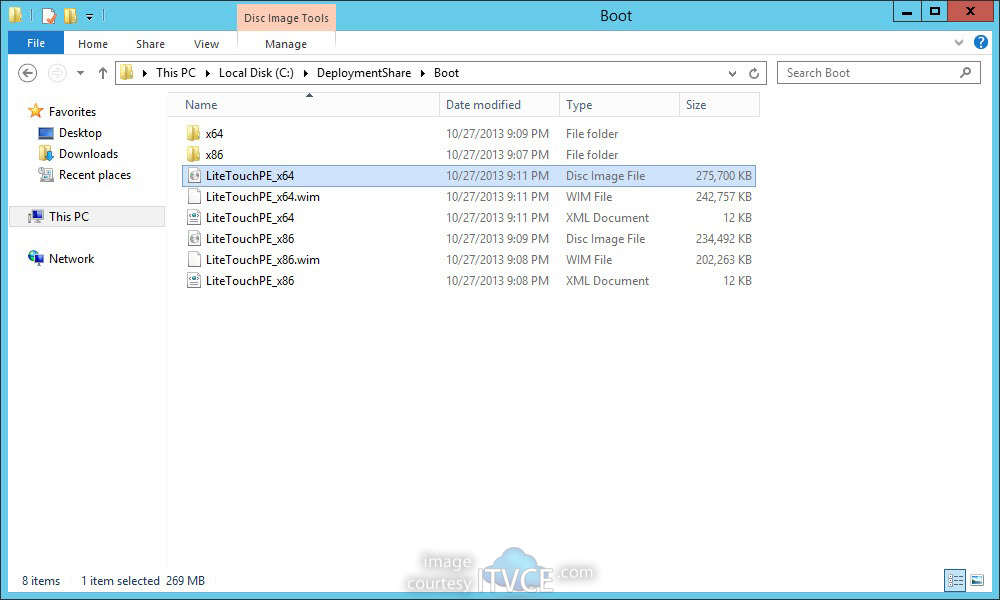
MDT-1078
For this blog post, I have attached the LiteTouchPE_x64.iso file to a new virtual machine. On first boot, the machine will boot from optical media and start the process:
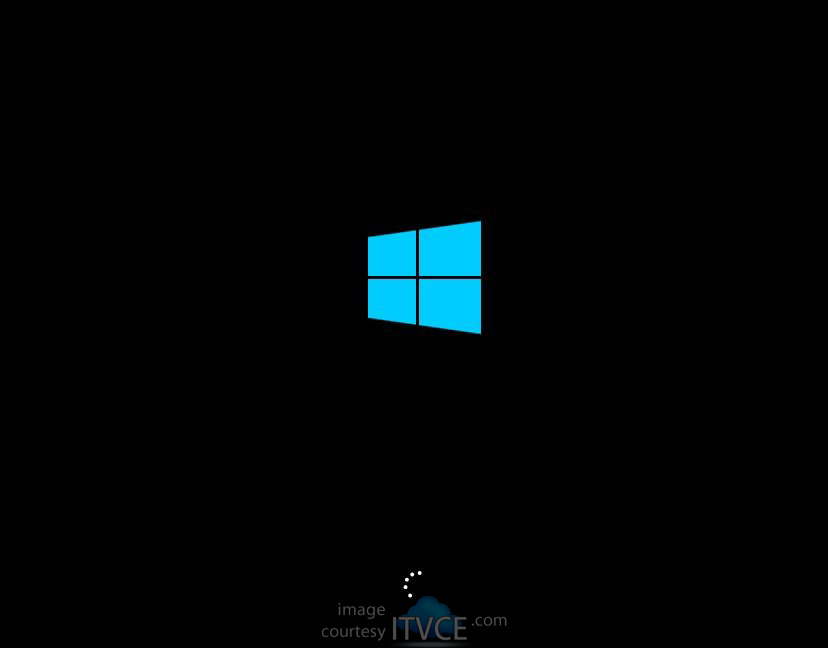
MDT-2000
Using the Bootstrap.ini and CustomSettings.ini options I provided, only a single question must be answered during deployment:
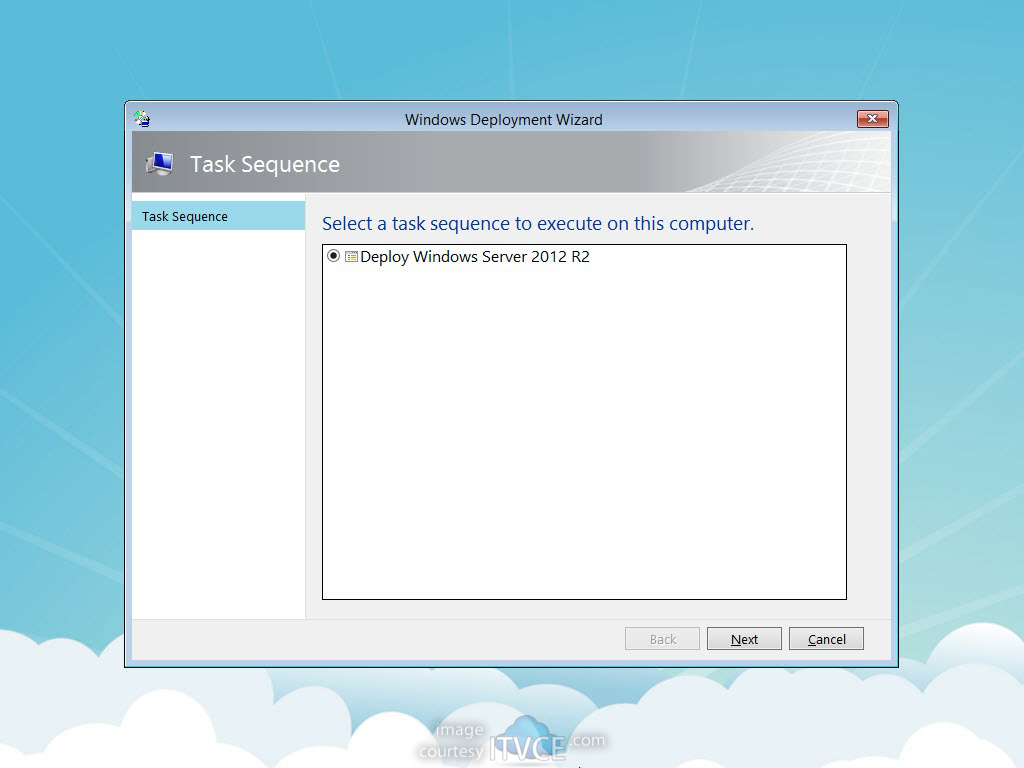
MDT-2001
Optionally, two additional lines can be added to the Bootstrap.ini file to skip this screen and automatically deploy a task sequence of your choosing. These options are:
SkipTaskSequence=YES
TaskSequenceID=DEPLOY-WS2012R2
This can be very helpful when creating MDT Media, a topic that I will likely cover in a future blog post.
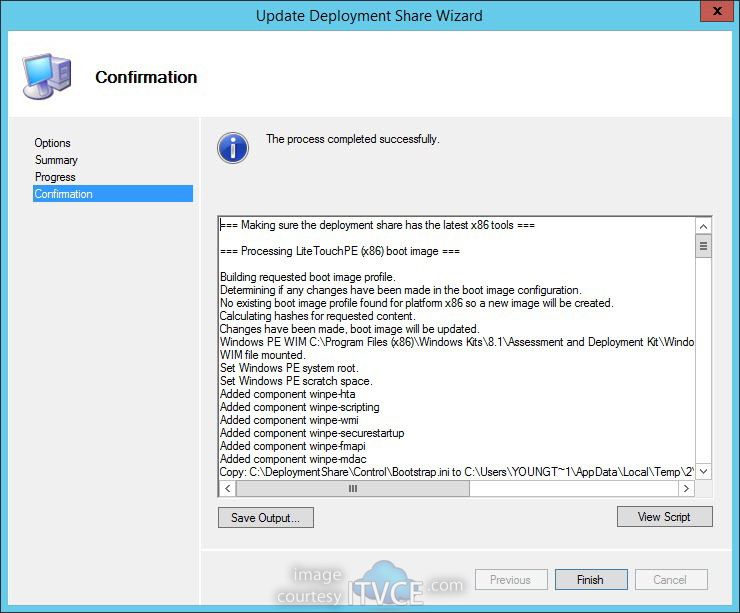
Upon completion, the wizard will indicate success of failure. Click Finish:
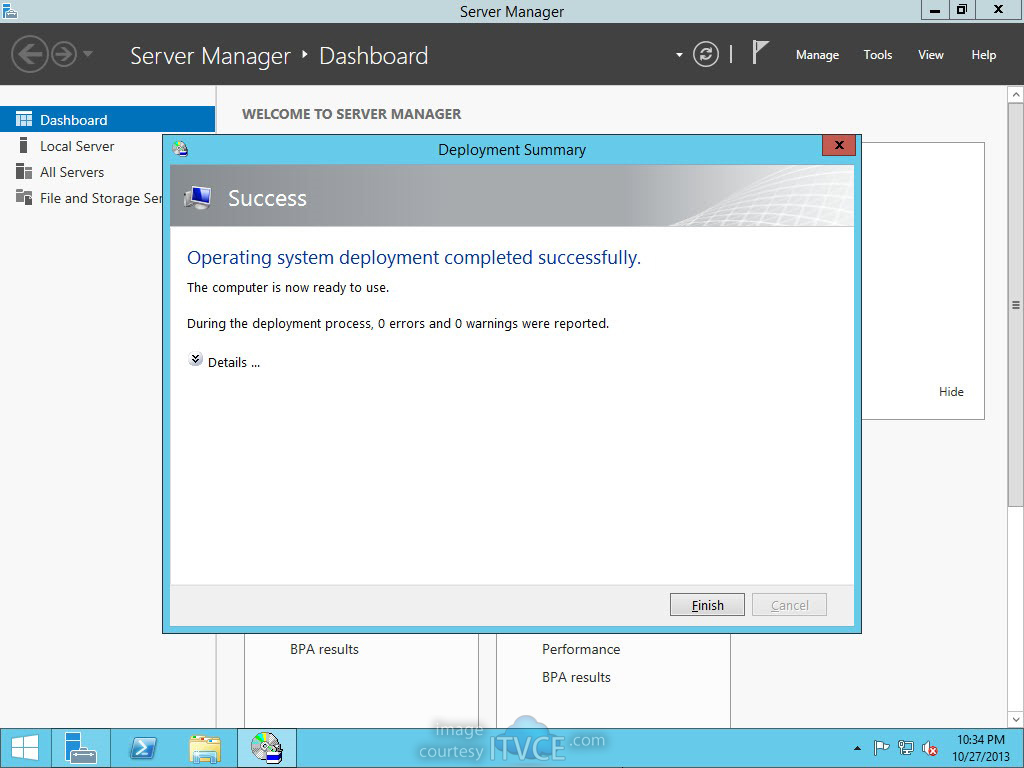
MDT-2002
http://blog.itvce.com/2013/10/27/installing-and-configuring-microsoft-deployment-toolkit-mdt-2013-on-windows-server-2012-r2/ 

Tuesday, March 10, 2015

Resolutions for error code 0x800F0906 windows 8.1 Ent

This error code occurs because the computer cannot download the required files from Windows Update.

Method 1: Check your internet connection

This behavior can be caused by network, proxy, or firewall configurations or by network, proxy, or firewall failures. To resolve this problem, try to connect to the Microsoft Update website.

If you cannot access this website, check your Internet connection, or contact the network administrator to determine whether there is a configuration that blocks access to the website.

Method 2: Configure the Group Policy setting

Method 3: Use Windows installation media

You can use the Windows installation media as the file source when you enable the .NET Framework 3.5 feature. To do this, follow these steps:
  1. Insert the Windows installation media.
  2. At an elevated command prompt, run the following command:
    Dism /online /enable-feature /featurename:NetFx3 /All /Source::\sources\sxs /LimitAccess
    Note In this command,  is a placeholder for the drive letter for the DVD drive or for the Windows 8 installation media. For example, you run the following command:
    Dism /online /enable-feature /featurename:NetFx3 /All /Source:D:\sources\sxs /LimitAccess
  3. http://support.microsoft.com/kb/2734782

Thursday, February 26, 2015

Error message when you try to run the BitLocker Drive Encryption program: "Cannot run

To resolve this problem, edit the following BCD entries:
  • Windows Boot Manager 
    Set this entry to point to the system partition. To do this, follow these steps:
    1. Click Start 
      the Start button
       , click All Programs, click Accessories, right-click Command Prompt, and then click Run as administrator

      User Account Control permission
       If you are prompted for an administrator password or for confirmation, type your password or clickContinue.
    2. At the command prompt, type bcdedit -set {bootmgr} device partition=S:

      Note In this command, S: represents the drive letter for the system partition.
  • Windows Memory Tester 
    Set this entry to point to the system partition. To do this, type the following command at the elevated command prompt:
    bcdedit -set {memdiag} device partition=S:

    Note In this command, S: represents the drive letter for the system partition.
  • Resume from Hibernate 
    Set this entry to point to the operating system partition. This partition is also known as the boot partition. To do this, follow these steps:
    1. At the elevated command prompt, type bcdedit -enum all

      Note the identifier value for the Resume from Hibernate entry.
    2. At the elevated command prompt, type bcdedit -set {identifier} device partition=C:.

      Note In this command, identifier represents the identifier value for the Resume from Hibernate entry in step 1 of this procedure. Also, C: represents the drive letter for the boot partition.
http://support.microsoft.com/kb/929834


Wednesday, February 11, 2015

Task Manager Menu Bar and Tabs Are Not Visible

  1. Click Start, and then click Run.
  2. Type taskmgr.exe.
  3. Hold down CTRL+ALT+SHIFT at the same time, and while holding them down press ENTER.
http://support.microsoft.com/kb/193050 

Tuesday, February 3, 2015

Reset Winsock (Vista)

Click the Windows Start button. 

2. Type Cmd in the Start Search text box and press Ctrl-Shift-Enter (keyboard shortcut to run Command Prompt as Administrator). Click Continue to allow elevation request. 

3. Type netsh winsock reset in the Command Prompt shell, and then press the Enter key. 

4. Type netsh int ipv4 reset in the Command Prompt shell, and then press the Enter key. 

5. If you use ipv6, type netsh int ipv6 reset in the Command Prompt shell, and then press the Enter key. 

Note: you may need to run Network Diagnostics afterwards to "repair" your connection after this.

https://www.hotcomm.com/FAQ/FAQ_ResetWinsock.asp

Monday, February 2, 2015

Microsoft Outlook Error – Cannot add to the Server Junk Email Lists

his applies to Exchange Email Setups running under the Exchange Server 2010 Setup
Before you go in and try to reach your exchange admins to look at this issue.
Kindly first check your contacts folder in outlook. Do you have more than 1000+ contacts? The error may seem to be cropping from this; though its not your fault.
Under Options – Click Junk Email – Under Safe Senders Tab – Remove the Tick Mark against “Also Trust e-mail from my contacts”
With this option enabled, Outlook attempts to add all of the email addresses for your contacts to the Safe Senders list. So if you are having thousands in your contacts folder; your limit on the exchange server for such information which is by default 510kb is exhausted.
If this option was unticked and you still continue to face the problem; it is time to get in touch with the Exchange Administrators
If you are an exchange admin yourself; below post would be helpful
http://tekrecipes.com/2013/09/23/microsoft-outlook-error-cannot-add-to-the-server-junk-email-lists/ 

Tuesday, October 28, 2014

Junos Pulse VPN client install issue - roll back

HKEY_LOCAL_MACHINE\SYSTEM\CurrentControlSet\Control\Network\MaxNumFilters
In my case, I had 13 filters but the MaxNumFilters was only set at 8! Some installs (like Virtual PC) will not complete if you have 13 or more

http://answers.microsoft.com/en-us/windows/forum/windows_7-performance/how-can-i-find-out-how-many-network-filter-drivers/78a969d0-1e37-402a-b94d-877334cc07a7

Tuesday, September 16, 2014

You receive a "The User Profile Service failed the logon” error message

To delete the error SID and create a new profile, follow these steps:
  1. Delete the error SID.
    To have us fix this problem for you, go to the "Fix it for me" section. If you would rather fix it yourself, go to the "Let me fix it myself" section.

    Fix it for me

    To fix this problem automatically, click the Fix this problem link. Then click Run in the File Download dialog box, and follow the steps in this wizard. 
    Fix this problem 
    Microsoft Fix it 50446

    Notes
    • This wizard may be in English only, but the automatic fix also works for other language versions of Windows.
    • If you are not on the computer that has the problem, you can save the automatic fix to a flash drive or to a CD, and then you can run it on the computer that has the problem.

    Let me fix it myself

    Important This section, method, or task contains steps that tell you how to modify the registry. However, serious problems might occur if you modify the registry incorrectly. Therefore, make sure that you follow these steps carefully. For added protection, back up the registry before you modify it. Then, you can restore the registry if a problem occurs. For more information about how to back up and restore the registry, click the following article number to view the article in the Microsoft Knowledge Base:
    322756 How to back up and restore the registry in Windows
    To resolve this problem yourself, follow these steps:
    1. Delete the profile by using the Computer Properties dialog box. To do this, follow these steps:
      1. Click Start, right-click Computer, and then click Properties.
      2. Click Change settings.

        2705066
      3. In the System Properties dialog box, click the Advanced tab.

        2705067
      4. In the User Profiles area, click Settings.
      5. In the User Profiles dialog box, select the profile that you want to delete, click Delete, and then clickOK.
    2. Click Start, type regedit in the Search box, and then press ENTER.
    3. Locate and then click the following registry subkey:
      HKEY_LOCAL_MACHINE\SOFTWARE\Microsoft\Windows NT\CurrentVersion\ProfileList
    4. Right-click the SID that you want to remove, and then click Delete.
  2. Log on to the computer and create a new profile.

Monday, September 8, 2014

How to Make a USB Bootable

Have an old USB drive lying around that you don't use anymore? Turn it into an operating install disk for Windows, Linux or Mac, or a diagnostic tool for your PC. Follow this guide to learn how.

Method 1 of 5: Making a USB Drive to Install Any PC Operating System

  1. Make a USB Bootable Step 1.jpg
    1
    Open the Command Prompt. You will need to run Command Prompt as an Administrator. Right-click on it and select Run as Administrator. You may need to enter the Administrator password.
    • This method will create a USB drive that is bootable. You can then copy the contents of an operating installation disc onto the drive to create a portable installation drive.
    • This method only works in Windows Vista, 7, and 8.
    Ad
  2. Make a USB Bootable Step 2 Version 2.jpg
    2
    Open the disk management utility. This can be opened by entering the command diskpart.
  3. Make a USB Bootable Step 3 Version 2.jpg
    3
    Display the connected disks. Type the command list disk to show a list of all the drives connected to your computer. Your USB drive should be listed here as well. Make note of the number next to your USB drive.
  4. Make a USB Bootable Step 4 Version 2.jpg
    4
    Select the USB drive. Enter the command select disk #, replace “#” with the number from the previous step.
  5. Make a USB Bootable Step 5 Version 2.jpg
    5
    Clean the flash drive. Enter the command clean to have the disk management utility verify the integrity of the USB drive, and erase all data.
  6. Make a USB Bootable Step 6 Version 2.jpg
    6
    Create a bootable partition. Once the USB drive is clean, type in create partition primary. You will see a message saying that the operation was successful.
  7. Make a USB Bootable Step 7 Version 2.jpg
    7
    Select the new partition. Enter the command select partition 1 and press Enter. Once you receive a confirmation message, type active and press Enter. This will activate the partition.
  8. Make a USB Bootable Step 8.jpg
    8
    Format the USB drive. Input the command format fs=fat32. When you press Enter, the program will work for a few minutes (if it is a small USB, e.g. 32Gb could actually take hours to SLOW format), and the progress will be displayed as a percentage.
  9. Make a USB Bootable Step 9 Version 2.jpg
    9
    Assign the USB a drive letter. Enter the command assign to give the thumb drive a letter designation. Type exit to end the disk management program.
  10. Make a USB Bootable Step 10 Version 2.jpg
    10
    Copy the operating system. Once the USB drive has been made bootable, you can copy over the installation files for the operating system you want to install. You can do this by dragging and dropping using your preferred file manager/explorer.
    • Copy over any drivers you might need during the operating system installation to make the process much smoother.

Method 2 of 5: Making a Windows Vista or 7 Install Drive

  1. Make a USB Bootable Step 11.jpg
    1
    Create or Obtain A Windows Vista/7 ISO. Install a free burning program. There are a number of free burning utilities available online. You need one that can create ISO files. If you received your Windows 7 as a downloadable ISO file from Microsoft, you can skip to Step 2.
    • Insert your Windows 7 DVD. Open your new burning program. Look for an option such as “Copy to Image” or “Create Image.” If prompted, select your DVD drive as the source.
      Make a USB Bootable Step 11Bullet1.jpg
    • Save your ISO file. Choose an easy to remember name and location for the file. The ISO you make will be equal in size to the disc you are copying. This means it can take up several gigabytes of space on your hard drive. Be sure you have enough storage available.
      Make a USB Bootable Step 11Bullet2.jpg
    • Creating the ISO can take a long time, depending on the speed of your computer and DVD drive.
  2. Make a USB Bootable Step 12.jpg
    2
    Download Windows 7 USB/DVD Download Tool. This is available for free from Microsoft. Despite its name, this tool works with Windows Vista ISOs as well. You can run this tool on virtually any version of Windows.
  3. Make a USB Bootable Step 13.jpg
    3
    Select the Source file. This is the ISO that you created or downloaded in the first section. Click Next.
  4. Make a USB Bootable Step 14.jpg
    4
    Select USB device. You are given the option to either burn to a DVD or create a USB device. For this guide, click USB Device.
  5. Make a USB Bootable Step 15.jpg
    5
    Choose your USB device. Make sure that your flash drive is connected correctly. You will need at least 4GB space on your flash drive to copy over the Windows installation.
  6. Make a USB Bootable Step 16.jpg
    6
    Wait while program works. The program will format the USB drive to boot correctly, then copy the ISO file onto the drive. The copying process can take up to 15 minutes to complete, depending on the speed of your machine.

Method 3 of 5: Making a Windows XP Install Drive

  1. 1
    Gather your software and hardware. You will need USB_Prep8 and bootsect.exe. These are developer tools both freely available online. You will also need a flash drive at least 1GB in size, and a Windows XP installation CD or DVD.
    • Insert the USB drive and the Windows XP disc. Close any Autoplay windows that open.
http://www.wikihow.com/Make-a-USB-Bootable