Monday, April 11, 2011

step by step installation of exchange 2010 on win 2008 r2

Prerequisites

Before installing Exchange Server 2010, here are the prerequisites to be installed in all the servers

1. Net Framework 3.5
2. Powershell 2.0 CTP 3
3. Windows Remote Management

The above three components must be installed regardless of which role you wish to install.
Step by Step
1. Prepare your forest and organization in Active Directory

First you need to do the Schema preparation. Since this is a fresh new setup in the lab, I will perform the preparation on domain controller
2.JPG
Run Setup from the directory where your Exchange 2010 installation files are located. Here is the cmdlets
Setup /PrepareSchema or Setup /ps
*If you are running the prep process on the computer which is member of the forest or domain, and the OS is Windows Server 2008, you need to install the following component before executing the prep.
ServerManagerCmd -i RSAT-ADDS
Below screen capture shows that its completed.
3.JPG
Next, you will need to prep the domain and organization. Here is the cmdlet
Setup /p /on:SG or Setup /PrepareAD /OrganizationName:SG (where SG is my organization name in the Lab)
4.JPG
5.JPG
Now we have done the initial preparation. The forest and domain are ready to have the first Exchange 2010 server installed.
2. Install first Exchange 2010 server
We will do that on server "Bugis" which will have Client Access Role, Transport Role and Mailbox Role. But we will eventually remove the Mailbox role and deploy DAG on server "Outram", "Redhill" and "Dover". There is a reason behind why I choose to have 3 mailbox servers to form a DAG. That will be discussed in my future articles soon.
There are additional components needed before Exchange installation.,
As my first Exchange server is a combination all the 3 roles mentione above, I used the following command (refer the below screen capture)
ServerManagerCmd -i Web-Server Web-Metabase Web-Lgcy-Mgmt-Console Web-Basic-Auth Web-Windows-Auth Web-Net-Ext Web-Digest-Auth Web-Dyn-Compression NET-HTTP-Activation Web-ISAPI-Ext RPC-over-HTTP-proxy RSAT-ADDS


6.JPG
Here is the break down of what you will need to install in role level.
Client Access Role
ServerManagerCmd -i Web-Server Web-Metabase Web-Lgcy-Mgmt-Console Web-Basic-Auth Web-Windows-Auth Web-Net-Ext Web-Digest-Auth Web-Dyn-Compression NET-HTTP-Activation Web-ISAPI-Ext RPC-over-HTTP-proxy RSAT-ADDS
Transport Role
ServerManagerCmd -i Web-Server Web-Metabase Web-Lgcy-Mgmt-Console Web-Basic-Auth Web-Windows-Auth Web-Net-Ext RSAT-ADDS
Mailbox Role
ServerManagerCmd -i Web-Server Web-Metabase Web-Lgcy-Mgmt-Console Web-Basic-Auth Web-Windows-Auth Web-Net-Ext RSAT-ADDS
*For Mailbox Role, you have to install another component call "MSFilter Pack"
After the installation, you are required to perform restart server.
7.JPG
There are some updates & fixes need to be applied in specific.
Client Access Role
KB951725, KB950888, KB952664, KB953290
Transport Role
KB951725, KB950888, KB952664
Mailbox Role
KB951725, KB950888, KB952664
Now we are truly ready for the installation. I will not talk about installation using UI, because I prefer using command line.
Execute the command as shown in the screen capture below.

8.JPG

Here are the definitions of the parameters

/m = /mode

/r = /role, /roles
H = Transport or you can use HT
C = Client Access or you can use CA
M = Mailbox or you can use MB
Just hit "Enter" and sit back enjoy your coffee or newspaper. :-)
9.JPG
Voila, you have now completed the installation and enjoy. (below are the two screenshots of new Exchange Management Console and OWA after installation)
EMC 2010.JPG
OWA 2010.JPG

Service 'MSExchangeTransport' failed to reach status 'Running' on this server.

Aparently, this normally happens when you disable IPv6 in Local Area Connection.
This is due to the behavior of IPv6 in Windows Server 2008, when you disable IPv6 in Local Area Connection on Windows 2008 server.

The following error was generated when: “$error.Clear(); if ($RoleStartTransportService) { start-SetupService -ServiceName MSExchangeTransport }”, generated the following error: “Service ‘MSExchangeTransport’ failed to reach status ‘Running’ on this server.”
clip_image002
After doing lot of troubleshooting and searching on the net, found that this is happening due to IPV6, and installation needs IPv6 to be disabled in your local area connection on the system. After disabling my setup went smoothly, follow the below instructions to disable IPv6 from your system.
To completely disable IPv6 on a Windows Server 2008-based system, follow these steps:
1. Open Registry Editor.
2. Locate the following registry subkey:HKEY_LOCAL_MACHINE\SYSTEM\CurrentControlSet\Services\Tcpip6\Parameters
3. In the details pane, click New, and then click DWORD (32-bit) Value.
4. Type DisabledComponents, and then press ENTER.
5. Double-click DisabledComponents, and then type 0xffffffff in Hexadecimal or 4294967295 in Decimal.
If setup still gives error, remove IPv6 entry from “hosts” file %systemroot%\system32\drivers\etc

then enable ip6 from network by changing adapter settings

enable windows remote managemetn on win2008 r2

Assuming the remote server is all set up and prepared to enter production, first, open Server Manager on the remote server.
Click on the "Configure Server Manager for Remote Management" link.
Select the "Enable remote management of this server from other computers".
Click "Ok".

The server's firewall will automatically be configured to allow the relevant traffic in.
How do you connect to the remote server?
On the computer you wish to use as the management machine (running either Windows Server 2008 R2 or Windows & with RSAT), open Server Manager.
Right-click on the Server Manager item and select "Connect to Another Computer".

In the Connect to Another Computer window, type the name or browse to the server you wish to connect to.

Tuesday, March 22, 2011

microsft oc for android phones


 here is the link to downlod the software for android phones.

http://www.androidzoom.com/android_applications/communication/androcs-beta_mkuq.html


Monday, March 14, 2011

How to install/Enable System restore on Win server 2003

Solution 1
Note:- Take a complete backup of your registry before doing any changes
In this procedure you need to download Add System Restore from here
Extract the zip file into a folder, in this you will see two files – AddSystemRestoreEntries.reg and sr.inf
Double click on AddSystemRestoreEntries.reg and click on Yes when prompted.
Insert your Windows XP CD and Right click on sr.inf and select Install.
Point to the /i386 directory on the CD if prompted.
Reboot your win server 2003 that’s it now you are ready for your new win server 2003 feature
System restore screen

This computer is configured as a source transport server for 1 connector (s) i the organization, These must be moved or deleted


"Error: This computer is configured as a source transport server for 1 connector(s) i the organization, These must be moved or deleted before Setup can continue."
If you have other Exchange Hub Transport servers then you need to add one of those to the send connector. In my case I'm removing the only Exchange box.
Solution
1. Click Start > All Programs > Microsoft Exchange Server 2007 > Exchange Management Console.
2. Expand Organization Configuration > Hub Transport > Send Connectors > Right click the connector > Select Remove (or if you are changing to another server select properties > Source Server > Change).

Wednesday, March 9, 2011

Allow someone else to manage your mail and calendar

This feature requires you to use a Microsoft Exchange Server 2000, Exchange Server 2003, or Exchange Server 2007 account. Most home and personal accounts do not use Microsoft Exchange. For more information about Microsoft Exchange accounts and how to determine which version of Exchange your account connects to, see the links in the See Also section.
Similar to having an assistant help you manage your incoming paper mail, you can use Microsoft Outlook to allow another person, known as a delegate, to receive and respond to meeting requests or responses and to send e-mail messages on your behalf. You can also grant additional permissions that allow your delegate to read, create, or have full control over items in your Exchange mailbox.
Delegate Access is most commonly used between a manager and his or her assistant, where the assistant (delegate) is responsible for processing the manager's incoming meeting requests or e-mail messages and coordinating the manager's schedule. This article assumes that scenario for explaining the feature; however, Delegate Access can be used between peers.
In this article

About Delegate Access

Two Microsoft Office Outlook 2007 users who both use an Exchange account in the same organization can share their Exchange folders with each other. Folder sharing is one of the collaborative features of Exchange. When you grant access to your Outlook folders to another Outlook user, you can control whether the delegate has read-only or more advanced permissions. By default, items that you mark as private cannot be accessed by anyone else.
 Important   You should not rely on the Private feature to prevent other people from accessing the details of your appointments, contacts, or tasks through programmatic methods or by using other e-mail programs.
Delegate Access is a more advanced feature than just sharing your Outlook folders. If you want to grant additional permissions, such as allowing a delegate the ability to create e-mail messages or respond to meeting requests on your behalf, you must use Delegate Access.
 Notes 
  • As the manager, your mail must be delivered to your mailbox on the Exchange server, not to a Personal Folders file (.pst) on your computer.
  • You and the delegate must use the same version of Office Outlook.
When a delegate has Send on Behalf permissions, the delegate can compose an e-mail message and enter the manager's name in the From box. Recipients of the e-mail message will see the text Delegate Name on behalf of Manager Name next to From.
 Note   There is an advanced Exchange feature that allows one or more people to be granted Send As permissions for another Exchange mailbox. This allows someone to send a message as if he or she is the owner of the mailbox. Send As permissions can be used with or without Delegate Access. When Send As permissions are enabled, the recipient will see only the manager's name next to From. An Exchange or Microsoft Windows administrator must configure this option. This scenario is more common where there is a shared Exchange mailbox, such as a staff member who sends e-mail messages to customers from a shared Exchange mailbox and not his or her own Exchange account.
ShowExchange administrator instructions to enable Send As permissions
 Tip   To determine whether a delegate has Exchange Send As permissions or only Outlook Delegate Access Send on Behalf permissions, ask the delegate to create a new message and send it to his or her own e-mail account. Make sure the delegate enters the name for the other mailbox in the From box, for example, the manager's name. When the message is received, if both names appear in the From box along with the text "on behalf of," the delegate has only Outlook Delegate Access Send on Behalf permissions.
As the person granting permission, you determine the level of access that the delegate has to your folders. You can grant a delegate permission to read items in your folders or to read, create, change, and delete items. By default, when you add a delegate, the delegate has full access to your Calendar and Tasks folders. The delegate can also respond to meeting requests on your behalf.
If you want to allow the delegate to see all of the messages in your Inbox, you must grant additional permissions. Instructions for granting permissions are included in the Turn on Delegate Access section.
If you grant someone access to your Exchange folders, that person has access to all items in the folders except those marked private. Instructions for allowing delegates to view private items are included in the Choose items that cannot be viewed by a delegate section. Items in subfolders are not available to the delegate unless you change the sharing permissions on the subfolder or you create a new subfolder. New subfolders inherit the folder access permissions of the parent folder.
Top of Page Top of Page

Turn on Delegate Access

A delegate automatically receives Send on Behalf permissions. This means your delegate can do the following:
  • Respond to a meeting request sent to you, the manager.
  • Receive meeting request responses sent to you, the manager.
  • Compose and send an e-mail message that, when received, will have Delegate Name on behalf of Manager Name next to From.
By default, the delegate can read only the meeting requests and responses sent to the manager. The delegate does not have access to read any other messages in your Inbox.
  1. On the Tools menu, click Options.
  2. Click the Delegates tab, and then click Add.
Delegate Access
  1. Type the name of the person whom you want to designate as your delegate, or search for and then click the name in the search results list.
 Note   The delegate must be a person in the Exchange Global Address List.
  1. Click Add, and then click OK.
  2. In the Delegate Permissions dialog box, you can accept the default permission settings or select custom access levels for Exchange folders.
If a delegate needs permission to work with meeting requests and responses only, the default permission settings, including Delegate receives copies of meeting-related messages sent to me, is sufficient. You can leave the Inbox permission setting at None. Meeting requests and responses will go directly to the delegate's Inbox.
 Note   By default, the delegate is granted Editor (can read, create, and modify items) permission to your Calendar folder, because after the delegate responds to the meeting on your behalf, the meeting is automatically added to your Calendar folder.
Delegate Access permissions
  1. To send a message to notify the delegate of the changed permissions, select the Automatically send a message to delegate summarizing these permissions check box.
  2. If you want, select the Delegate can see my private items check box.
 Important   This is a global setting that affects all of your Exchange folders, including all Mail, Contacts, Calendar, Tasks, Notes, and Journal folders. You cannot allow access to private items in only one folder.
  1. Click OK.
 Note   Messages sent with Send on Behalf permissions include both the delegate's and manager's names next to From. When a message is sent with Send As permissions, only the manager's name appears. See the About Delegate Access section for more information about Send As permissions.
Top of Page Top of Page

Change permissions for your delegate

  1. On the Tools menu, click Options, and then click the Delegates tab.
  1. Click the name of the delegate for whom you want to change permissions, and then click Permissions.
 Note   If you want to remove all Delegate Access permissions, click Remove and skip the remainder of these steps.
Delegate Access permissions
  1. Change the permissions for any Outlook folder that the delegate has access to.
  2. To send a message to notify the delegate of the changed permissions, select the Automatically send a message to delegate summarizing these permissions check box.
 Note   If you want copies of meeting requests and responses that you receive to be sent to a delegate, make sure the delegate is assigned Editor (can read, create, and modify items) permission to your Calendar folder, and then select the Delegate receives copies of meeting-related messages sent to me check box.
Top of Page Top of Page

Choose items that can't be viewed by a delegate

If you have given permissions to a delegate so that he or she can access your Outlook folders, you can hide personal information in appointments, meetings, tasks, and contacts. Open each personal item, and in the Options group, click Private.
If you want a delegate to see your private items, do the following:
  1. On the Tools menu, click Options, and then click the Delegates tab.
  1. In the list, click the name of the delegate to whom you want to give permission to see your private appointments.
  2. Click Permissions.
  3. Select the Delegate can see my private items check box.
Delegate Access private items
 Important   You should not rely on the Private feature to prevent other people from accessing the details of your appointments, contacts, or tasks. To make sure that other people cannot read the items that you marked as private, do not grant them Reviewer (can read items) permission to your Calendar, Contacts, or Tasks folder. A person who is granted Reviewer (can read items) permission to access your folders could use programmatic methods or other e-mail programs to view the details of a private item. Use the Private feature only when you share folders with people whom you trust.

Manage another person's mail and calendar items

This feature requires you to use a Microsoft Exchange Server 2000, Exchange Server 2003, or Exchange Server 2007 account. Most home and personal accounts do not use Microsoft Exchange. For more information about Microsoft Exchange accounts and how to determine which version of Exchange your account connects to, see the links in the See Also section.
There are two ways to work with another person's Microsoft Outlook folders — folder sharing and Delegate Access.
If you are a delegate and routinely respond to e-mail messages and meeting requests on behalf of someone else, you may want to add his or her Exchange mailbox to your account for quick access.
In this article

About working with another person's folders

Before you can work with another person's Outlook folders, that person must grant you permission to those folders. There are several ways to do this.
Delegate Access is an Outlook feature that allows one person to act on behalf of another Outlook user. The most common scenario in which this feature is used is a manager and his or her assistant. The assistant might be responsible for maintaining the manager's schedule, including creating and responding to meeting requests. Some assistants might also monitor their manager's Inbox.
Folder sharing is a way to provide access between two people, but it differs from Delegate Access because it does not include permissions for one to act on behalf of the other. Folder sharing is useful if you want someone to be able to access one of your folders, perhaps while you are on vacation, but you do not want the person to reply to meeting requests or e-mail messages on your behalf.
This article assumes that the delegate already has Delegate Access permissions. Find links to more information about how to grant Delegate Assess permissions in the See Also section.
Top of Page Top of Page

Add another person's mailbox to your profile

If you frequently work with someone else's Exchange folders, you probably will want to add the other person's Exchange mailbox to your Outlook profile. Doing so will automatically open the other person's mailbox each time you open Outlook. The other mailbox appears in the Navigation Pane beneath your Exchange mailbox folders.
 Note   The person who is sharing a mailbox must grant you Folder Visible permission on the root folder of the Exchange mailbox. The shared mailbox usually appears as Mailbox - user name.
ShowInstructions for granting Folder Visible permission
As the delegate, do the following in Outlook:
  1. On the Tools menu, click Account Settings.
  2. In the list, click the Exchange account type, and then click Change.
Account Settings
  1. Click More Settings, and then click the Advanced tab.
  2. Click Add, and then enter the mailbox name of the person whose mailbox you want to add to your user profile. If you do not know the mailbox name, ask the person who granted you Delegate Access permissions.
Advanced tab
Top of Page Top of Page

Open another person's folders

  1. On the File menu, point to Open, and then click Other User's Folder.
 Tip   To avoid this step in the future, see the instructions on how to add another person's mailbox to the Navigation Pane in the Add another person's mailbox to your profile section.
  1. In the Name box, enter the name of the person who granted you Sharing or Delegate Access permissions, or click Name to select from a list.
  2. In the Folder type list, click the folder that you want to open.
Top of Page Top of Page

Respond to meeting requests for another person

When a manager selects the Send meeting requests and responses only to my delegates, not to me check box on the Delegates tab (Tools menu, Options command), the delegate is granted sufficient permissions to accept meeting requests for the manager.
However, if the Send meeting requests and responses only to my delegates, not to me check box is not selected, a delegate must have both Editor (can read, create, and modify items) permissions in a manager's Calendar or Tasks folder and at least Reviewer (can read items) permissions in the manager's Inbox.
  1. Open the other person's Inbox if his or her meeting requests are not sent to you directly.
 Tip   To avoid this step in the future, see the instructions on how to add another person's mailbox to the Navigation Pane in the Add another person's mailbox to your profile section.
  1. Open the meeting request.
Meeting request
  1. Click Accept, Tentative, or Decline.
Top of Page Top of Page

Create meeting requests on behalf of another person

  1. Open the other person's calendar.
  2. On the File menu, point to New, and then click Meeting Request.
  3. In the To box, type the names of the attendees, or click To to select from a list.
  4. In the Subject box, enter the subject of the meeting.
  5. In the Location box, enter the location of the meeting.
  6. Enter the start and end times for the meeting in the Start and End boxes.
  7. Select other options that you want.
 Note   Find links to information about how to create meeting requests in the See Also section.
  1. Click Send.
Top of Page Top of Page

Create an e-mail message on behalf of another person

  1. On the File menu, point to New, and then click Mail Message.
Keyboard shortcut  To create a new e-mail message, press CTRL+SHIFT+M.
  1. In the From box, type the name of the person you are sending the message on behalf of.
To select the name from a list in the Address Book, click From.
If you do not see the From button and box, on the Options tab, in the Fields group, click Show From.
  1. Add recipients, a subject, and the contents of the message as you normally do.
  2. Click Send.
Top of Page Top of Page

Reply to an e-mail message on behalf of another person

  1. If you have already opened the other person's Inbox folder, skip to step 3.
  2. To open another person's Inbox folder, do one of the following:
  • Open as another user's folder    
  1. On the File menu, point to Open, and then click Other User's Folder.
  2. Type the name of the person you are sending the message on behalf of, or click Name to select the name from the Global Address List.
  3. Click OK.
  • Add the other user's folder to your Navigation Pane    
  1. On the Tools menu, click Account Settings.
  2. On the E-mail tab, click the Exchange account, and then click Change.
  3. Click More Settings.
  4. On the Advanced tab, under Mailboxes, under Open these additional mailboxes, click Add.
  5. In the Add Mailbox dialog box, type the name of the other mailbox, and then click OK.
  6. Restart Outlook.
  7. In the Navigation Pane, select the other person's Inbox folder.
  1. Select the message that you want to reply to on behalf of your manager.
  2. On the Standard toolbar, click Reply. If you have opened the message, on the Message tab, in the Respond group, click Reply, Reply to All, or Forward.
Keyboard shortcut  To reply to an e-mail message, press CTRL+R.
A new message window opens.
  1. In the From box, type your manager's name. To select the name from a list in the Address Book, click From. If you do not see the From button and box, on the Options tab, in the Fields group, click Show From.
  2. Add recipients, a subject, and the contents of the message as you normally do.
  3. Click Send.
Top of Page Top of Page

Save sent items in another person's Sent Items folder

When e-mail messages and meeting requests are sent by a delegate on behalf of a manager, a copy of each item is saved in the delegate's Sent Items folder; this behavior is by design.
As an alternative, the manager can grant permissions to his or her Sent Items folder to the delegate. The delegate can then move or copy the items from his or her own Sent Items folder to the manager's Sent Items folder after the delegate opens the manager's mailbox as an additional mailbox.
 Note   It is assumed you already set up Delegate Access.
  1. The manager should do the following:
    1. In the Navigation Pane, right-click the Sent items folder.
    2. Click Change Sharing Permissions.
    3. On the Permissions tab, click the name of the delegate.
    4. Under Permissions, in the Permission level list, click Editor (can read, create, and modify items).
    5. Click OK.
  2. The delegate should do the following:
  1. On the Tools menu, click Account Settings.
  2. Select the Exchange account, and then click Change.
  3. In the Change E-mail Account dialog box, click More Settings.
  4. On the Advanced tab, under Mailboxes, click Add.
  5. Type the name of the manager, and then click OK.
  6. Click Apply, click OK, click Next, and then click Finish.
The manager's Sent Items folder appears in the Navigation Pane under Mailbox - manager.
Top of Page Top of Page

Change where deleted items are moved

While acting as a delegate, if you delete an item in your manager's mailbox, the deleted item is moved to your Deleted Items folder. A registry setting is available that switches the destination of deleted items to the mailbox owner's Deleted Items folder. These procedures are provided for advanced users and administrators.
 Warning   If you use Registry Editor incorrectly, you may cause serious problems that may require you to reinstall your operating system. Microsoft cannot guarantee that you can solve problems that result from using Registry Editor incorrectly. Use Registry Editor at your own risk.
  1. Exit Outlook.
  2. Click Start, and then click Run.
  3. Type regedit, and then click OK.
  4. Locate the registry key at HKEY_CURRENT_USER\Software\Microsoft\Office\12.0\Outlook\Options\General
  5. Right-click DelegateWastebasketStylevalue, and then click Modify.
If the key is not present, do the following to create it:
  1. Right-click the General folder in the path defined in step 4.
  2. Point to New, and then click DWORD Value.
  3. Type DelegateWastebasketStyle, and then press ENTER.
  1. Change the value data in the Edit DWORD Value dialog box to one of the following values.
Value Description
8 Stores deleted items in your folder
4 Stores deleted items in the mailbox owner's folder
  1.  Note   Make sure that the delegate has at least Author permissions for the Deleted Items folder of the manager's mailbox. If the delegate does not have these permissions, and this registry option is set to 4, the item will be permanently deleted, or the delegate will receive one of the following messages:
  • The item could not be deleted, it was either moved or already deleted, or access was denied.
  • Operation Failed.
  1. Exit the Registry Editor.
  2. Restart Outlook.

Tuesday, February 22, 2011

alternative to hyperterminal windows 7

If you’ve recently upgraded to Windows 7 and are wondering what happened to HyperTerminal, you’re not alone! HyperTerminal was a sweet little program that let you connect to other computers, Telnet sites, host computers, BBSs, etc using your modem or Ethernet connection.
In Windows 7 and Vista, you will no longer find the HyperTer minal program. If you need HyperTerminal to control serial devices, there is a way to get it back! Also, there are several new alternatives to HyperTerminal that are probably better for secure shell access and troubleshooting modems.

Windows Remote Shell

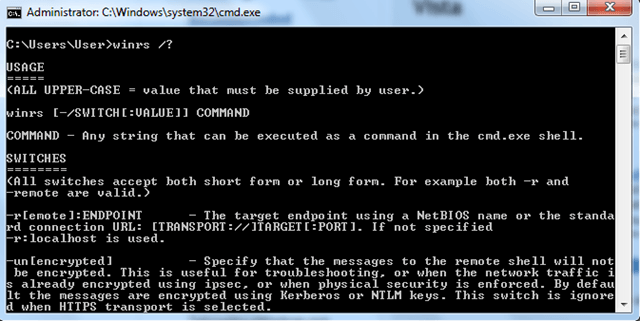
Firstly, if you only need remote shell access, you can use the new Windows Remote Shell command line option in Windows 7 and Vista. To learn more about using WRS, simply open a command prompt and type in winrs /?.
windows remote shell
It’s basically a SSH replacement that allows remote command line access over an encrypted connection. It also uses the SOAP protocol.

Phone and Modem Options

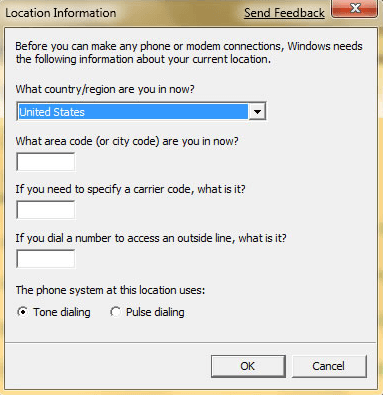
If you were using HyperTerminal to troubleshoot modems, you can now use Phone and Modem Options to do this. Go to Control Panel, click on Hardware and Sounds and then click on Phone and Modem Options.
hyperterminal windows 7
All you have to do is provide information about the Country/Region, Area Code, Carrier Code, and Outside Dial Number to access the dialog box. Once you do that, you can troubleshoot your modem in Windows 7 or Vista.

HyperTerminal Alternatives

If you don’t want to use all these alternative methods, you can still use alternative programs for HyperTerminal. Here are some of my favorites.
HyperTerminal Private Edition – This is a commercial terminal emulation program that you can use to communicate with serial COM ports, dial-up modems, and TCP/IP networks.
TeraTerm – TeraTerm is an open-source terminal emulator and SSH module that supports IPv6, SSH1, SSH2, Telnet, serial ports, and file transfer protocols (XMODEM, Kermit, ZMODEM, B-PLUS, etc).
Putty – Another free Telnet and SSH implementation for Windows. It also is an xterm terminal emulator. This is probably my favorite alternative to HyperTerminal.

Original XP HyperTerminal

If you just can’t live without the original HyperTerminal in Windows XP, you can actually extract two files from your XP installation and copy them over to Windows 7 or Vista.
The two files you will need are hypertrm.dll and hypertrm.exe. Simply copy those files into any directory on your machine and it will work. You should be able to find hypertrm.exe in C:\Program Files\Windows NT and hypertrm.dll in C:\Windows\System32.
If you have the Windows XP CD, you should be able to find both of these files in the i386 directory on the CD.
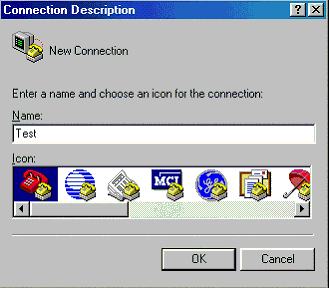
windows 7 hyperterminal
So that’s about it! Even though HyperTerminal is no longer in Windows 7, it’s really not needed since you have a lot of great alternatives like Putty, etc. If you want it simply because you’ve been using it for a long time, either download the Private Edition or copy the files from XP. Enjoy!

Friday, February 18, 2011

The account has been restricted, please contact system administrator

Sign on the the pc using local pc Administrator account.

Right mouse click MY COMPUTER – PROPERTY – COMPUTER NAME. Click CHANGE. Under MEMBER OF, click on WORKGROUP & key in WORKGROUP. Click OK. Then restart the pc.

Then sign in again using local pc Administrator account. connect the system remotely through showmypc and connect it to domain

Right mouse click MY COMPUTER – PROPERTY – COMPUTER NAME. Click CHANGE. Under MEMBER OF, click on DOMAIN & key in the domain name. Click OK. Then restart the pc.

Thursday, February 3, 2011

taskmanager has been disabled by adminiostrator

Method 1

Click Start, Run and type this command exactly as given below: (better - Copy and paste)

Method 2

Download and run this REG fix and double-click it.

Method 3

  • Click Start, Run and type Regedit.exe
  • Navigate to the following branch:
HKEY_CURRENT_USER \ Software \ Microsoft \ Windows \ CurrentVersion \ Policies\ System
  • In the right-pane, delete the value named DisableTaskMgr
  • Close Regedit.exe

Method 4:  Using Group Policy Editor - for Windows XP Professional

  • Click Start, Run, type gpedit.msc and click OK.
  • Navigate to this branch:
User Configuration / Administrative Templates / System / Ctrl+Alt+Delete Options / Remove Task Manager
  • Double-click the Remove Task Manager option.
  • Set the policy to Not Configured.

registry editing has been disabled by administrator

For standalone Windows XP systems, perform the steps below to remove the registry editing restrictions.

Method 1: Using the REG.EXE console tool

1. Click Start, Run and type this command:

You should be able to launch Tweak UI, as well as the Registry Editor.

Method 2: Using the Group Policy Editor (Windows XP Professional only)

  • Click Start, Run and type gpedit.msc and press ENTER
  • Go to the following location:
User Configuration | Administrative Templates | System
  • Double-click Disable registry editing tools and set it to Not Configured
  • Exit the Group Policy Editor
Note: If the setting already reads Not Configured, set it to Enabled, and click Apply. Then revert it back to Not Configured. This ensures that the DisableRegistryTools registry value is removed successfully.

Wednesday, February 2, 2011

Manual removal instructions for McAfee Agent 4.x

Environment


For details of all supported operating systems, see KB51109.

Problem

Under certain conditions, you may need to remove the McAfee Agent manually. Possible reasons include:

•A failed upgrade leaves mismatched files that stops the /Forceuninstall from removing the agent

•Issues with the Prevent McAfee services from being stopped option in VirusScan Enterprise 8.5i and later

•Corruption of files in previously installed versions of McAfee Agent or Common Management Agent

•Third-party software conflicts

Solution 1

Before a full manual removal, attempt to remove McAfee agent using frminst.exe and the /forceuninstall switch.


Step 1 - Disable protection of McAfee services in VirusScan Enterprise (if necessary)


VirusScan Enterprise (VSE) 8.5i and later include an Access Protection feature which prevents McAfee services from being stopped. To successfully remove the McAfee Agent, this setting must be disabled either locally or via ePolicy Orchestrator (ePO).


Option 1 - If VSE is not managed by ePO:

1.Click, Start, Programs, McAfee, VirusScan Console.

2.Right-click Access Protection and select Properties.

3.Deselect Prevent McAfee services from being stopped.

4.Click Apply.

5.Close the VirusScan Console.

6.Continue to Step 2.

Option 2 - If VSE managed by ePO:

1.Click Start, Programs, McAfee, ePolicy Orchestrator Console.

2.Select the directory or computer level where the VSE policy will be changed.

3.In the right pane, expand the VirusScan Enterprise policy.

4.Click Edit beside Access Protection Policies.

5.Click the Access Protection tab.

6.Deselect Prevent McAfee services from being stopped.

7.Click Apply.

8.Send an Agent Wakeup Call to apply the changes or wait for the next policy enforcement to take effect.

9.Close the ePO Console.


Step 2 - Run the frminst.exe /forceuninstall command

1.Click Start, Run, and type one of the following commands:


•"c:\Program Files\Network Associates\Common Framework\frminst.exe" /forceuninstall

•"c:\Program Files\McAfee\Common Framework\frminst.exe" /forceuninstall


NOTE: The path will vary depending on the version and whether you installed McAfee Agent as an upgrade or clean install. Use Windows Explorer to determine the correct path.


2.Restart the system to remove McAfee Agent processes from memory and complete the deletion of files.


If this removal procedure fails, follow the manual removal instructions in the next solution.

Solution 2

Manually removing McAfee Agent 4.x.


IMPORTANT: Before proceeding, ensure that you allow McAfee services to be stopped as described in Step 1 above.


CAUTION: This article contains information about opening or modifying the registry.

•The following information is intended for System Administrators. Registry modifications are irreversible and could cause system failure if done incorrectly.

•Before proceeding, McAfee strongly recommends backing up your registry and understanding the restore process. For more information, see: http://support.microsoft.com/kb/256986.

•Do not run a .REG file that is not confirmed to be a genuine registry import file.

Step 1 - Disable the McAfee Framework Service in the registry and restart the system


1.Click Start, Run, type regedit.exe, then click OK.

2.Navigate to and select the following key:


[HKLM\SYSTEM\CurrentControlSet\Services\McAfeeFramework]


3.Double-click the Start value and set the Value data to 4.

4.Restart the system.


Step 2 - End all running McAfee Agent processes:

1.Press CTRL+ALT+DEL to open the Task Manager.

2.Click the Processes tab.

3.Individually select each of the processes below and click End Process. Click Yes when prompted.


McTray.exe

UpdaterUI.exe

naPrdMgr.exe


4.Close Task Manager.


Step 3 - Delete McAfee Agent services from the registry

1.Click Start, Run, type regedit.exe, and click OK.

2.Navigate to and expand the following key:


[HKLM\SYSTEM\CurrentControlSet\Services]


3.Right-click the McAfeeFramework sub-key and select Delete.

4.Navigate to each of the keys below and delete the McAfeeFramework sub-key if it exists:


[HKLM\SYSTEM\ControlSet001\Services]

[HKLM\SYSTEM\ControlSet002\Services]

[HKLM\SYSTEM\ControlSetXXX\Services]


5.Navigate to and select the following registry key:


[HKLM\SOFTWARE\Network Associates\TVD\Shared Components\Framework]


6.Make note of the values for Installed Path and Data Path.

7.Delete the two folders mentioned in the above registry values.

8.Navigate to and expand the following key:


[HKLM\SOFTWARE\Network Associates\TVD\Shared Components]


9.Right-click the Framework sub-key and select Delete.

10.Navigate to the following key:


[HKLM\SOFTWARE\McAfee\McTray]


11.Right-click McTray, then select Delete.

12.Navigate to and expand the following key:


[HKEY_LOCAL_MACHINE\SOFTWARE\Microsoft\Windows\CurrentVersion\Uninstall\]


13.Right-click the appropriate sub-key below and select Delete:


McAfee Agent 4.0 - {F2969393-2D4D-4977-8166-B1251B08EF12}

McAfee Agent 4.5 - {B639A4DE-A375-47D3-89C3-DDCF98D992F7}


14.Close the registry editor.

15.Restart your computer.

Wednesday, January 19, 2011

Create a System Restore Point in Windows 7

It is recommended that you create a restore point before installing new software or making any major changes to your computer.  Often times when you install new software you’re given the choice to create a point but if not you can do one manually as well.
Right-click on My Computer and go to Properties.
1
Next click on the System Protection link.
2
The System Properties dialog screen opens up and you will want to click on Create.
1
Type in a description for the restore point which will help you remember the point at which is was created.
1
The time it takes to create the restore point will depend on the amount of data, computer speed etc.
1
2
All done!  Now if something goes wrong you have the satisfaction knowing that you can go back in time to the point before the changes were made.

It is recommended that you create a restore point before installing new software or making any major changes to your computer. Often times when you install new software you’re given the choice to create a point but if not you can do one manually as well. Right-click on My Computer and go to Properties. 1 Next click on the System Protection link. 2 The System Properties dialog screen opens up and you will want to click on Create. 1 Type in a description for the restore point which will help you remember the point at which is was created. 1 The time it takes to create the restore point will depend on the amount of data, computer speed etc. 1 2 All done! Now if something goes wrong you have the satisfaction knowing that you can go back in time to the point before the changes were made.

Monday, January 17, 2011

How to Fix Vrlogon.dll Failed to Load Error

rlogon.dll is a dynamic link library file that belongs to IBM Fingerprint Software from UPEK Inc. Error Message:
An error message related to vrlogon.dll may be found among users of IBM Lenovo products.  You may receive an error message like the ones posted below:
A recently installed program has disabled the Welcome screen and Fast User Switching. To restore these features, you must uninstall the program. The following file name might help you identify the program that made the change:vrlogon.dll.
The Logon User Interface DLL vrlogon.dll failed to load. Contact your system administrator to replace the DLL, or restore the original DLL.
Cause
This error will appear if the option to Replace Windows logon with fingerprint-protected logon is checked in the ThinkPad fingerprint software. Clicking on Change the way users log on or off will produce the error message stated above.
The following ThinkPad products running Windows XP may be affected by this error:
ThinkPad T42
ThinkPad T42p
ThinkPad Z60m
ThinkPad Z60t
Resolution
This error may be resolved without uninstalling the ThinkPad fingerprint software. Uninstalling the software is not recommended.
The instructions that follow will apply to ThinkPad Fingerprint software v5.6.1.
  1. Go to Start.
  2. Select All Programs.
  3. Select ThinkVantage.
  4. Select ThinkVantage Fingerprint Software.
  5. Click on Control Center.
  6. Click Settings.
  7. Click on System Settings next.
  8. Select the Logon tab.
  9. Disable Allow to bypass logon using Windows password.
  10. Shutdown your system completely.
  11. This will allow the changes to take place.
The error will be gone when the ThinkPad reboots and the User Account may be accessed without the error.
Method 2
Another method that may work for you requires you to download a certain file from off of the internet.
Downloading files can pose some risk as you can never be 100% sure of what the file you’re downloading it is opened.
So, be sure to keep your system safe from harmful viruses and other malware by using an antivirus program like Antivirus Plus.  Also,  make sure that you only use recommended and trusted programs.
You should also pair your antivirus program with a good anti-spyware program such as StopZilla.  This will offer you added protection and keep you safe from identity theft.