Tuesday, December 28, 2010

the commnd prompt disabled by your administrator

When you attempt to run CMD.exe or a batch file, you may receive the message "The command prompt has been disabled by your administrator". This is caused by restrictions placed in Registry.DisableCMD value is set to 1 or via Group Policy. To enable Task Manager, try any of these methods:
Method 1: Using the console registry tool
  • Click Start, Run and type thiscommand exactly as given below: (better - Copy and paste)
Method 2: Edit the registry directly
  • Open Registry Editor (Regedit.exe) and navigate to:
[HKEY_CURRENT_USER\Software\Policies\Microsoft\Windows\System]
  • In the right-pane, double-click DisableCMD and set it's data to 0
     
Method 3: UsingGroup Policy Editor in Windows XP Professional.
  • Click Start, Run, type gpedit.msc and click OK.
  • Navigate to User Configuration \ Administrative Templates \ System
  • Double-click the Prevent access to the command prompt
You can then disable or set the policy to Not Configured. Disabling or setting this policy to NotConfigured should solve the problem.

Monday, December 27, 2010

You might not have permission to use this network resource. Contact your administrator.__Windows 7, Vista, and XP networking

Control Panel - Administrative Tools - Local Security Policy


Local Policies - Security Options


Network security: LAN Manager authentication level

Send LM & NTLM responses


Minimum session security for NTLM SSP

Disable Require 128-bit encryption

control panel-- credential manager
remove the password options

Monday, December 20, 2010

internet explorer 8 closing unexpectedly

Method 1: Reset Internet Explorer settings

Reset Internet Explorer to its default settings. This removes all changes that were made to Internet Explorer since it was installed, but it does not delete your favorites or feeds. To do this, follow these steps:
  1. Close all Internet Explorer and Windows Explorer windows.
  2. Click Start
    Start button
    , and then click Control Panel.
  3. In Control Panel, open Internet Options.
  4. Click the Advanced tab, and then click Reset.
  5. In the Reset Internet Explorer Settings dialog box, click Reset.
  6. When Internet Explorer finishes restoring the default settings, click Close, and then click OK two times.
  7. Close Internet Explorer, and then reopen it. The changes take effect the next time that you open Internet Explorer.

Method 2: Uninstall Internet Explorer, and then reinstall it

If resetting Internet Explorer to its default settings does not fix the problem, uninstall Internet Explorer 8 or Internet Explorer 9 Beta, and then reinstall it. To do this, select the appropriate operating system, and then follow the corresponding steps.

Note This method cannot be used for Internet Explorer 7 issues as it is a part of Windows Vista and cannot be uninstalled.

Windows 7

Uninstall Internet Explorer 8 or Internet Explorer 9 Beta from Windows 7-based or Windows Server 2008 R2-based computers
  1. Close all programs.
  2. Click Start, and then click Control Panel.
  3. Click Programs, and then click Turn Windows features on or off.
  4. In the list of Windows features, clear the Internet Explorer 8 or the Internet Explorer 9 Beta box.
  5. Click Yes when you are prompted to.
  6. Click OK. Internet Explorer 8 or Internet Explorer 9 Beta will now be uninstalled. The system will restart after the installation.
Install Internet Explorer 8 or Internet Explorer 9 Beta on Windows 7-based or Windows Server 2008 R2-based computers
  1. Close all programs.
  2. Click Start, and then click Control Panel.
  3. Click Programs, and then click Turn Windows features on or off.
  4. In the list of Windows features, check the  Internet Explorer 8 or the Internet Explorer 9 Beta box.
  5. Click Ok and wait for system to restart.

Windows Vista

Uninstall Internet Explorer 8 or Internet Explorer 9 Beta from Windows Vista-based computers
  1. Close all programs.
  2. Click Start, and then click Control Panel.
  3. Click Programs, and then click Uninstall a Program.
  4. In the Tasks pane, click View installed updates.
  5. In the list of installed updates, double-click Windows Internet Explorer 8 or Windows Internet Explorer 9 Beta, and then click Yes when you are prompted for confirmation.
Note If Windows Internet Explorer 8 or Windows Internet Explorer 9 Beta does not appear in the list of installed updates, try the steps are listed in the "Alternative steps" section of the following Knowledge Base article:
957700  How do I uninstall or remove Internet Explorer 8?
Install Internet Explorer 8 on Windows Vista or Windows Server 2008-based computers
  1. Visit the following Microsoft Web site:
  2. Click the Download button on the page to start the download, or select a different language from the Change language list, and then click Go.
  3. Follow one of these steps:
    • To start the installation immediately, click Run.
    • To save the download to your computer for installation later, click Save.
    • To cancel the installation, click Cancel.
Install Internet Explorer 9 Beta on Windows Vista or Windows Server 2008-based computers
To download Internet Explorer 9 Beta, visit the following Microsoft Web site: 

Windows XP

Uninstall Internet Explorer 7 or Internet Explorer 8 from Windows XP-based computers
  1. Click Start, and then click Control Panel.
  2. Click Add or Remove Programs.
  3. Make sure that the Show updates check box is checked.
  4. Click Windows Internet Explorer 7 or Windows Internet Explorer 8.
  5. Click Remove.
Install Internet Explorer 7 or Internet Explorer 8 on Windows XP-based computers
  1. Visit either of the following Microsoft Web sites depending on which version you want to install:
  2. Click the Download button on the page to start the download, or select a different language from the Change language list, and then click Go.
  3. Follow one of these steps:
    • To start the installation immediately, click Run.
    • To save the download to your computer for installation later, click Save.
    • To cancel the installation, click Cancel.

Method 3: Internet Explorer troubleshooters in Windows 7

By default, Windows 7 has two Internet Explorer troubleshooters on a new installation. These are
  1. Internet Explorer Performance
  2. Internet Explorer Safety

Run Internet Explorer troubleshooters

  1. Close all programs.
  2. Click Start, and then click Control Panel.
  3. Click Find and Fix Problems under System and Security.
  4. Click View All on the task pane on the left.
  5. Click Internet Explorer Performance.
  6. Click Next in the dialogue box.
  7. The troubleshooter will run and fix all identified issues automatically. Click Close.
After you run the "Internet Explorer Performance" troubleshooter, start Internet Explorer to see whether the issue is fixed. If the issue still occurs, run the ‘Internet Explorer Safety’ troubleshooter by using the same steps as mentioned earlier.

Thursday, December 9, 2010

Uninstall Internet Explorer 7


To uninstall Internet Explorer 7, follow these steps:
  1. Click Start, and then click Run.
  2. In the Open box, type %windir%\ie7\spuninst\spuninst.exe, and then click OK.
  3. Follow the wizard instructions to uninstall Internet Explorer 7.

Tuesday, December 7, 2010

Windows 7 Cannot Connect to Internet

Having problems connecting to the Internet on your new Windows 7 machine? Windows 7 is great and can automatically fix a lot of common problems related to connecting to the Internet, but not all!
The first thing you should try if you having Internet problems is to try and connect from both a wireless and wired connection. You first want to try and narrow down the problem to Windows 7, to your network setup, or to your Internet provider.
Here are some possible solutions you can try that will hopefully get your Internet connection up and running in Windows 7.

Method 1 – Turn Off Firewall/Anti-Virus Programs

One common reason why this problem occurs in new installations of Windows 7 is because of a third-party firewall or anti-virus program. Just to make sure it’s not that, go ahead and uninstall any of these types of programs.
You might be wondering why it would matter, especially if you have the same program running on another computer like XP or Vista. The problem could be that if the firewall or anti-virus program is not compatible with Windows 7, it can accidentally block connections to the Internet.

Method 2 – Install Drivers in Emulation Mode

So if you didn’t buy a new computer and are instead installing Windows 7 on a slightly older machine, you problem could be because of incompatible drivers.
You can fix this in two ways. First, try going to the computer manufactures website and download the latest drivers for your wireless card. Install it and see if the problem is fixed.
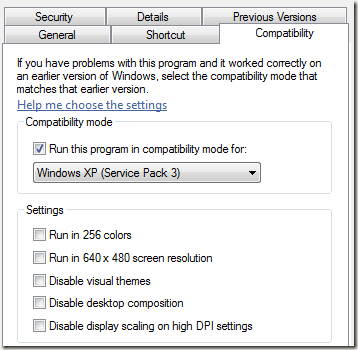
If not, it might mean you need to install the driver in compatible mode. You can do this by right-clicking on the executable file, choosing Properties, clicking on the Compatibility tab and checking the box that says “Run this program in compatibility mode for:” and then choose the OS.
windows 7 cannot connect internet
Again, make sure to run the driver setup program in this compatible mode to see if that fixes the problem.

Method 3 – Disable Protected Mode

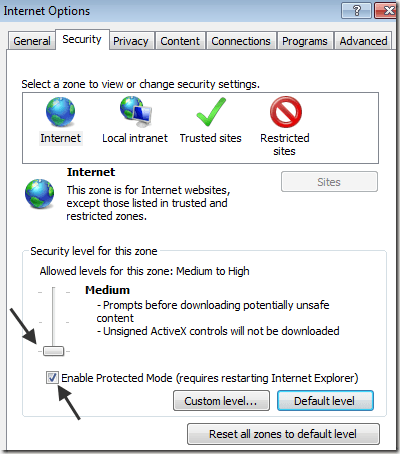
The other reason you may not be able to connect is because of IE 8, which now ships with Windows 7. Some people have reported that the security settings are set such that they cannot connect to any website at all!
You can test this by going to Tools, then Internet Options, and clicking on the Security tab. Click on Internet and move the slide bar all the way to the bottom (lowest security).
ie 8 internet options
Once you move the slider all the way down, click OK. Then close IE 8 and open it again. Try connecting to the Internet. If it doesn’t work, try unchecking the Enable Protected Mode option. Make sure to restart IE again.

Method 4 – Try Network Troubleshooter

If nothing else is working, you may as well try the built-in Windows 7 Network Diagnostics tool also. To run it, right-click on the Network icon in your system tray and choose Troubleshoot Problems.
troubleshoot network
It will automatically try to detect what the problem is and give you a possible reason and a solution.
windows 7 no internet

Method 5 – Toggle Automatically Detect Settings option

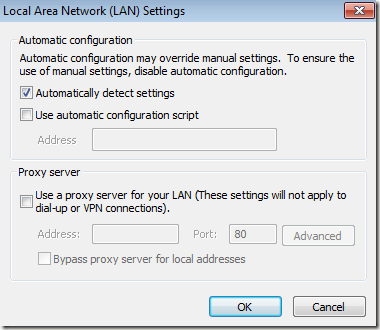
Another thing you can try is to check or uncheck the Automatically Detect Settings option in IE. You can get there by going to Tools, Internet Options, Connections, LAN Settings.
automatically detect settings
If it’s checked, uncheck it and vice versa. See if that solves your problem. Also, make sure that the “Use a proxy server” box is unchecked.

Method 6 – Uninstall Network Card

You can also try to uninstall the network card from Device Manager and let Windows 7 re-install it on reboot.
Go to the Control Panel, click on Hardware and Sound, and then open Device Manager. Right-click on your network card and choose Uninstall. If prompted to remove the driver, click Yes.
Then restart Windows and the default Windows 7 driver will be installed, which might get your connection working again.

Method 7 – Enable/Disable Network Card

A simpler solution before uninstalling the network card might be to simply disable and then re-enable the network card.
Go to the Network and Sharing Center and right-click on your network card and choose Disable. Then simply re-enable it and see if this fixes your problem.
Hopefully, one of these methods will get your Internet connection in Windows 7 working again! If not, post a comment here and we’ll try to help!