Yahoo! Mail getting free IMAP access?
Posted Jun 24th 2006 12:27PM by Chris Price
According to this post on Yahoo! Next, the Yahoo! Mobile folks are testing some new feature that get you directly from your cellphone to some of their services - IM, Mail, Address Book.
Of particular interest is that Mail access is done via IMAP and appears to work on any IMAP email client - including Thunderbird. Non-web client access has been a Plus feature for a long time now - and is arguably why so many people subscribe to the upgrade.
Just plug the following into your client and use your Y! Account \ Password to access it:
* IMAP: imap.next.mail.yahoo.com
* SMTP: smtp.next.mail.yahoo.com
Using these settings, you can access free accounts with a full client (I never upgraded after Yahoo! Plus was discontinued) - does this mean that the feature will become more generally available in the future?
[Update] As JR mentioned in the Comments - don't all go IMAP crazy and crash the servers. He suggests setting your client to poll every hour.
Alternatively - just use the Y! Mail Beta - real-time messages and most of the functionality of a desktop client, but in your browser.
Wednesday, December 30, 2009
Monday, December 28, 2009
OutlookTempCleaner
OutlookTempCleaner
OutlookTempCleaner is a support tool for Microsoft Office Outlook. It gives you easy access to the Temp folder that Outlook uses to open attachments. It further allows you to automate maintenance to it via Windows's Scheduled Tasks.Main Program Features
- Easy access to Outlook's SecureTempFolder used for opening attachments
- Determination of the current size of the folder
- Empty the folder
- Command line options to perform maintenance to the folder via for instance Scheduled Tasks and logon/logoff scripts
Screenshots
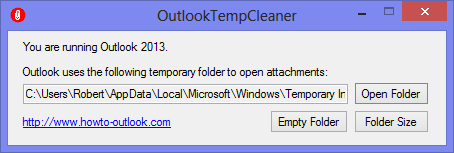
The main application.
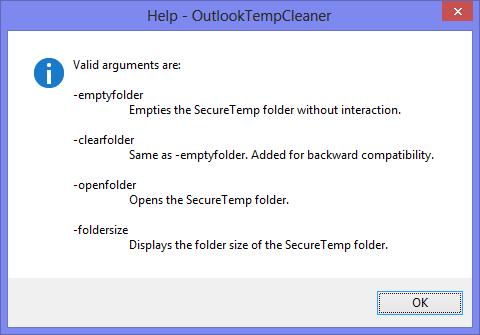
Command line options available.
Examples
Examples for use of the command line functions;-clearfolder
If you want to automatically clean the folder via a logon or logoff script or task, you can use the -clearfolder switch. This is particularly handy for shared domain computers. You can basically set it and forget it and not worry about leaving sensitive files, your hard disk filling up or suddenly running into errors when you often deal with attachments with the same name.
-openfolder
As the OutlookSecureTemp folder location is different for each user there is no way to deploy a single shortcut.
With OutlookTempCleaner you can create a shortcut with the -openfolder startup switch to directly open the OutlookSecureTemp folder. The result is that you can deploy a standardized shortcut and allow users easy access to the folder.
-foldersize
With the -foldersize startup switch you can create a scheduled task (for instance; run once per week) to inform you of the current size of the folder. This way you can easily keep track of its size and empty it when you think it is getting too big.
OutlookTempCleaner can be executed directly from the Run command as well by typing; outlooktempcleaner
There is no need to supply the installation path to the file.
Download
OutlookTempCleaner is a free tool. Commercial companies and users of the command line options available in OutlookTempCleaner are highly encouraged to make a donation to continue to keep it free and support future development.http://www.howto-outlook.com/products/outlooktempcleaner.htm
Thursday, December 24, 2009
How to manually remove Network Connect (juniper vpn client)
Knowledge Base ID: KB9081
Version: 8.0
Published: 08 Oct 2008
Updated: 08 Oct 2008
Categories: . SSL VPN
. SSL_VPN_(IVE_OS)
Summary:
At times, due to a bad or failed installation, it may be necessary to completely remove Network Connect from the client machine.
Problem or Goal:
If there are installation problems or upgrade issues you can completely remove all the files and folder associated with Network Connect before attempting to reinstall the client.
Solution:
For each operating system, the files and folders that need to removed will be different. Once these are removed you can restart the Network Connect client installation.
note: If a folder or file listed below does not exist, move onto the next step.
For Linux:
1. Ensure the Network Connect Service is not running
2. Delete the folder/.juniper_networks/network_connect
3. Delete the following file:/.juniper_networks/ncLinuxApp.jar
4. For 5.2 delete the following folders:
* /usr/sbin/ncui
* /usr/sbin/ncsvc
* /usr/sbin/ncdiag
5. For 5.3 and newer, delete the following folder:
* /usr/local/nc
For Macintosh:
1. Delete the folder /usr//lib/logs/juniper networks
2. Delete the file Network Connect.app from the /apps folder
3. Empty the Trash
For Windows:
1. Remove Juniper Networks Network Connect from Add/Remove Programs, if it exists
2. Delete the following folders:
* C:\Program Files\Juniper Networks\Common Files
* C:\Program Files\Juniper Networks\Network Connect 5.x.x
* C:\Documents and Settings\\Application Data\Juniper Networks\Network Connect 5.x.x
Version: 8.0
Published: 08 Oct 2008
Updated: 08 Oct 2008
Categories: . SSL VPN
. SSL_VPN_(IVE_OS)
Summary:
At times, due to a bad or failed installation, it may be necessary to completely remove Network Connect from the client machine.
Problem or Goal:
If there are installation problems or upgrade issues you can completely remove all the files and folder associated with Network Connect before attempting to reinstall the client.
Solution:
For each operating system, the files and folders that need to removed will be different. Once these are removed you can restart the Network Connect client installation.
note: If a folder or file listed below does not exist, move onto the next step.
For Linux:
1. Ensure the Network Connect Service is not running
2. Delete the folder
3. Delete the following file:
4. For 5.2 delete the following folders:
* /usr/sbin/ncui
* /usr/sbin/ncsvc
* /usr/sbin/ncdiag
5. For 5.3 and newer, delete the following folder:
* /usr/local/nc
For Macintosh:
1. Delete the folder /usr/
2. Delete the file Network Connect.app from the /apps folder
3. Empty the Trash
For Windows:
1. Remove Juniper Networks Network Connect from Add/Remove Programs, if it exists
2. Delete the following folders:
* C:\Program Files\Juniper Networks\Common Files
* C:\Program Files\Juniper Networks\Network Connect 5.x.x
* C:\Documents and Settings\
Tuesday, December 22, 2009
Workaround to Disable and Remove OGA Office Not Genuine Notifications (Uninstall KB949810)
After installing Office Genuine Advantage (OGA) Notifications (KB949810) from Windows Update
, OGA Validation will perform genuine test on installed Microsoft Office XP, Office 2003, Office 2007 and Office 2010 software. If Office product is validated as not genuine, “This copy of Microsoft Office is not genuine” notification message will be displayed on notification area (system tray), at splash screen during Office program (i.e. Word, Excel, PowerPoint, Outlook) startup, and at Office’s toolbar or ribbon with extra “Get Genuine Office” tab or element.
KB949810 OGA Notifications update is designed so that end-user cannot uninstall or removed the update using “Add and Remove Programs” or “Program and Features” in the Control Panel, in a bid to encourage end-users to buy genuine Microsoft products. But, if you’re a legit Office users, and the OGA validation has returned false-positive result, use the one of the following hacks to disable and remove Microsoft Office not genuine notification messages displayed by OGA Notifications.
Note: Hack below simply remove and disable OGA Notifications so that no notification message about Office not genuine is not displayed, and works on most versions of OGA Notifications. It doesn’t crack or patch OGA Validation component, OGACheckControl.dll, which does the validation process to determine if the Office product is genuine or not.
Hack 1: Disable OGAAddin.dll from Loading with Office Applications
OGAAddin.dll (and OGAVerify.exe) is a few files that been installed by OGA Notifications. OGAAddin.dll allowed OGA Notifications to install as an add-in to applications in Office productivity suites to display not genuine reminder message to illegitimate and illegal copy of Office. By stopping the OGAAddin load behavior and preventing OGAAddin.dll from loading, the Office Genuine Advantage Notifications message can be suppressed.
1. Run Registry Editor (RegEdit.exe).
2. Press Ctrl-F to open search box, and search for OGAAddin.connect registry key.
3. In the right pane, right click on Load Behavior and select Modify.
4. Change the value data from 3 to 0.
5. Repeat for each and every OGAAddin.connect found.
With this hack, Windows still treat OGA as installed, and will not prompt user to install again.
Hack 2: Disable and Remove OGAAddin from within Office Applications
1. Run one of the Office app such as Word, Excel, PowerPoint, Outlook, Publisher and etc as administrator.
Note: Open Windows Explorer, go to %SystemDrive%\Program Files\Microsoft Office\Office12 (may be different depends on version of Office installed and x64 OS uses Program Files (x86) folder), and right click on Office app executable, e.g. winword.exe, excel.exe, powerpnt.exe and etc to run as administrator.
2. Go to Options (at the bottom of menu triggered by Office button) -> Add-Ins.
3. Select COM Add-ins under Manage drop menu list, and click Go.
Disable and Remove OGA Addin Add-In
4. Disable or remoev the OGAAdmin.
5. Repeat above steps for each and every Office applications installed.
Hack 3: Delete and Remove (Uninstall) Office Genuine Advantage Notifications Components
Although Microsoft does not allow OGA Notifications to be uninstall, but that does not mean that individual file components of OGA Notifications cannot be deleted, removed or uninstalled manually.
To disable OGA Notifications and uninstall KB949810, close and exit from all Office applications (including Outlook, Word, Excel, PowerPoint, OneNote, Publisher, Visio and etc.), and search for the following files in %SystemDrive%\Wndows\System32 folder and %SystemDrive%\Windows\SysWow64 folder (for 64-bit OS x64 only).
OGAVerify.exe
OGAAddin.dll
Delete the above files. It’s also possible rename the files so that system
cannot find them.
Hack 4: Remove OGAAddin.connect Registry Key in System Registry
Pretty much similar to method 1 and 2, but it’s quicker and will complete remove trace of OGAAddin.connect from registry. Unlike hack 1, Windows Update may prompt you to install again.
1. Run Registry Editor (RegEdit.exe).
2. Go to each and every of the following registry keys, and any other which contains OGAAddin.connect registry value sub-key:
HKEY_LOCAL_MACHINE\SOFTWARE\Microsoft\Office\Word\Addins
HKEY_LOCAL_MACHINE\SOFTWARE\Microsoft\Office\Excel\Addins
HKEY_LOCAL_MACHINE\SOFTWARE\Microsoft\Office\Powerpoint\Addins
HKEY_LOCAL_MACHINE\SOFTWARE\Microsoft\Office\Outlook\Addins
3. Delete the OGAAddin.connect registry value.
Hack 5: Properly Uninstall KB949810 OGA Notification via OGANotifier.msi
Tip by AnonyMouse
Easy to uninstall. Just follow these steps:
1. Go to C:\Windows\SoftwareDistribution\Download\8998da55d52b36c0e98ba016ddd50de0\ folder.
Note: The directory may be different, so if not found search for OGANotifier.cab.
2. Extract OGANotifier.cab with WinRAR (or using the Expand command at command line) to get a file named OGANotifier.msi.
3. Right click on OGANotifier.msi, and select Uninstall.
4. Remember to block the update from been installed again in WU.
There is also an official Windows Installer method of uninstalling OGA, Belt-and-Braces approach submitted by one of the reader, shown below:
1. Remove ‘Office/Windows Genuine Advantage’ from Office Programs:
* Word / Excel / PowerPoint / Access
Quick Access Toolbar – More Commands – Add Ins – Manage ‘Comm Add Ins’ – Go – Remove OGA Add In
* Outlook / Visio
Tools – Trust Centre – Add Ins – Manage ‘Comm Add Ins’ – Manage – Go – Remove OGA Add In
2. Reboot into Windows ‘Safe Mode’
3. Rename in \windows\system32 (by adding .bak to end of file)
* LegitCheckControl.dll (create empty file)
* OGAAddin.dll (create empty file)
* OGACheckControl.dll (create empty file)
* OGAExec.exe (create empty file)
* WgaTray.exe (create empty file)
* WgaLogon.dll (create empty file)
4. Edit Registry (Navigate to WgaLogon folder)
1. HKey Local Machine
2. Software
3. Microsoft
4. Windows NT
5. Current Version
6. Winlogon
7. Notify
8. DELETE Wgalogon folder
5. Disable OGALogon Task
1. \Windows\tasks
2. Select OGALogon and the ‘Properties’
3. On Task Tab
4. Disable as follows (Uncheck):
* Run only if logged on
* Enabled (Scheduled task runs at specified time)
5. On Settings Tab
6. Disable as follows (Check):
Delete the task if it is not scheduled to run again
6. Restart Windows Normally
7. Block Programs in Firewall (Prevents running IF there is an automatic Update)
* OGAExec.exe **create empty file (If not done in 3)
* WgaTray.exe **create empty file (If not done in 3)
With any one of the hacks above, no more Office Genuine Advantage notification message will be displayed and showed on system, regardless of genuine status of the Office software, unless of course, end-user chooses to reinstall KB949810.
Friday, December 18, 2009
The previous and next item buttons are unavailable in Microsoft Outlook when opening Enterprise Vault (EV) archived items.
Document ID: 287116
http://support.veritas.com/docs/287116 E-Mail Colleague IconE-Mail this document to a colleague
DOCUMENTATION: The previous and next item buttons are unavailable in Microsoft Outlook when opening Enterprise Vault (EV) archived items.
Details:
The previous and next arrow item buttons are unavailable in Microsoft Outlook when this issue is being encountered. These buttons will be displayed as grayed out and are not available for selection.
This behavior occurs because when an archived email is opened in Microsoft Outlook, the message is retrieved, stored as a temporary internet file, and displayed by EV through Microsoft Outlook in HTML file format. As the message no longer exists within Microsoft Outlook and Microsoft Exchange, the previous and next items are unavailable.
Figure 1
When the previous or next items are still in a pending archive state, the previous and next button will be available as the item still exists on the Microsoft Exchange server as a safety copy.
Wednesday, December 16, 2009
How To Test SMTP Services Manually in Windows Server 2003
Test the SMTP Service
To test the SMTP service, follow these steps:
1. On a computer running Windows Server 2003, type Telnet at a command prompt, and then press ENTER.
2. At the telnet prompt, type set LocalEcho, press ENTER, and then type open 25, and then press ENTER.
The output resembles the following:
220 computername.microsoft.com ESMTP Server (Microsoft Exchange Internet Mail Service 5.5.2651.58) ready
3. Type helo me, and then press ENTER.
The output resembles the following:
250 OK
4. Type mail from:email@domain.com, and then press ENTER.
The output resembles the following:
250 OK - mail from
5. Type rcpt to:youremail@yourdomain.com, and then press ENTER.
The output resembles the following:
250 OK - Recipient
6. Type Data, and then press ENTER.
The output resembles the following:
354 Send data. End with CRLF.CRLF
7. Type Subject:This is a test, and then press ENTER two times.
8. Type Testing, and then press ENTER.
9. Press ENTER, type a period (.), and then press ENTER.
The output resembles the following:
250 OK
10. Type quit, and then press ENTER.
The output resembles the following:
221 Closing Port / Mail queued for delivery
To test the SMTP service, follow these steps:
1. On a computer running Windows Server 2003, type Telnet at a command prompt, and then press ENTER.
2. At the telnet prompt, type set LocalEcho, press ENTER, and then type open
The output resembles the following:
220 computername.microsoft.com ESMTP Server (Microsoft Exchange Internet Mail Service 5.5.2651.58) ready
3. Type helo me, and then press ENTER.
The output resembles the following:
250 OK
4. Type mail from:email@domain.com, and then press ENTER.
The output resembles the following:
250 OK - mail from
5. Type rcpt to:youremail@yourdomain.com, and then press ENTER.
The output resembles the following:
250 OK - Recipient
6. Type Data, and then press ENTER.
The output resembles the following:
354 Send data. End with CRLF.CRLF
7. Type Subject:This is a test, and then press ENTER two times.
8. Type Testing, and then press ENTER.
9. Press ENTER, type a period (.), and then press ENTER.
The output resembles the following:
250 OK
10. Type quit, and then press ENTER.
The output resembles the following:
221 Closing Port / Mail queued for delivery
550 5.7.1 Unable to relay for smtp server
Open the Exchange System Manager;
Go in Administrative Groups -> Administrative group name -> Server -> Server name -> Protocols -> SMTP;
Right click on Default SMTP Virtual Server -> properties;
Access tab -> Relay buttom;
Select "only the list bellow" and add your domain and\or IPs you do want to allow the relay
and finally check the "Allow all computers witch successfully authenticate to relay, regardless of the list above" checkbox.
Wednesday, December 9, 2009
Optimizing Group Policy Performance
I am frequently asked the question, "From a performance perspective, is it better to have fewer, bigger GPOs or a lot of smaller ones?" That question and others related to Group Policy design and performance are the focus of this article. And, as with most sweeping questions,
I can tell you the answer in advance: "It depends." While this may seem evasive, my goal is to illuminate the mechanisms that underlie Group Policy processing so you can make informed decisions about your Group Policy design, regardless of whether you are just starting out or looking to optimize an environment with hundreds of existing GPOs.
Monolithic vs. Functional GPOs
 Figure 1 Comparing monolithic and functional GPOs
Let's start by describing the different ways you can implement your GPOs. The terms "monolithic" and "functional" refer to how you design them. Monolithic GPOs contain settings from many different areas. For example, a monolithic GPO might contain settings from Administrative Templates, Internet Explorer Maintenance, and Software Installation policies—all within a single GPO. By contrast, functional GPOs typically do one thing. For example, a functional GPO may do only Software Installation or enforce Security settings. I've even seen functional GPOs that contain only one policy setting! But that is probably the extreme. Figure 1 shows some of the advantages and disadvantages of each approach.
Figure 1 Comparing monolithic and functional GPOs
Issue Monolithic GPOs Functional GPOs
Delegation/Isolation Difficult, since each GPO can contain settings from multiple areas, and you can only delegate at the GPO level, not the settings level. Easy, since each GPO contains a single policy area, you can delegate, for example, the software installation GPO to the deployment administrator, the security GPO to the security officer, and so on.
Manageability & Complexity Potentially simpler and easier to manage, because each GPO contains all settings in a single place. Potentially more difficult because more GPOs mean more places to look to track down problems and more complexity determining the resultant set of policy for a given user or computer.
Performance Potentially slower because, for a given client-side extension, if one GPO changes, all extensions would need to run against all GPOs in scope. Depends upon how many GPOs are in use, and how often they change. Performance could be better in dynamic environments compared to monolithic GPOs.
As you can see, there is no cut-and-dried answer to which approach—monolithic or functional—is best in all cases. In your environment, you will likely need both. For example, you might find the functional approach preferable when you are creating security policy for your entire domain. Having a single GPO that contains only security settings makes it easy to delegate control of that GPO to your security administrators where no one else can touch it. By the same token, if you delegate GP administration to OU administrators, then establishing one monolithic GPO for each OU gives those administrators a single place where they can go to manage all of their policy settings. That can reduce complexity for them and allow you to moderate the number of GPOs created for a given OU's users and computers.
How do these high-level design decisions affect the performance of Group Policy processing, and how can you make smart decisions about GP design that minimize performance impacts? The first step in maximizing the performance of your Group Policy infrastructure is understanding how Group Policy processing works under the covers.
Understanding Group Policy Processing
Group Policy processing is a complex set of interactions involving many pieces of your Windows® and Active Directory® infrastructure. At a high level, there are two parts to Group Policy processing. The first is called Core, or Group Policy Infrastructure processing. In this phase, a Windows Group Policy client queries its closest domain controller to determine what the link speed to the DC is, where it lives in the Active Directory hierarchy (that is, which site, domain, and OU the client is a member of), and which GPOs apply to the computer or currently logged-on user. (It's important to note that in this context a client could be a server or workstation participating in an Active Directory domain.) Once the list of GPOs has been created, the next phase kicks in—Client-Side Extension (CSE) processing. During the CSE phase, each registered CSE processes the list of GPOs that have implemented settings in its area. For example, the Registry or Administrative Template CSE runs first in all cases and processes all GPOs that apply to the given computer or user and that have implemented registry policy within them.
The list that follows details the steps the Group Policy processing cycle goes through, including network interactions between the client and domain controller. It's important to remember that Group Policy applies to both computers and users. Therefore, each time policy processes—for example during a background refresh of Group Policy—the cycle I enumerate below will be repeated for both the computer and the currently logged on user account on a given system, since each can have a different set of policies applying to them. When this happens, Windows actually performs the processing cycle simultaneously for both computer and user, with each cycle running on a different thread within the Group Policy engine process. (The Winlogon process for Windows 2000, Windows XP, and Windows Server® 2003, and the Group Policy Client service in Windows Vista® and Windows Server 2008.)
Processing a GP is a six-step procedure:
1. The client performs Internet Control Message Protocol (ICMP) slow-link detection to a domain controller in its site to determine link speed. In Windows Vista, the use of ICMP for slow-link detection is replaced by the Network Location Awareness (NLA) service.
2. The client reads CSE status information from its local registry to determine which GPOs were processed last.
3. The client uses LDAP to search the gpLink attribute in Active Directory on each container object within its location in the Active Directory hierarchy—first at the OU level (including all nested OUs), then at the domain, and finally at the Active Directory site level. From the results of this search, it builds a list of GPOs that must be evaluated for processing.
4. Each GPO is then searched in Active Directory to determine whether the client (user or computer) has the necessary permissions to process it. Its version number, the path to the Group Policy Template (GPT) portion of the GPO in SYSVOL, and what CSEs are implemented in that GPO are also evaluated.
5. The client then uses the Server Message Block (SMB) protocol to read the contents of the GPT and get the GPO's version number from the gpt.ini file. The version numbers in the Group Policy Container (GPC) and GPT are one factor that is used to determine whether a GPO has changed since the last processing cycle.
6. Each CSE runs in the order that is registered under HKLM\Software\Microsoft\Windows NT\CurrentVersion\Winlogon\GPExtensions, and processes the GPOs that implement that CSE if the GPO has changed since last processing cycle (as determined during core processing). Each CSE also logs Resultant Set of User Policy (RSOP) data to Windows Management Instrumentation (WMI) during each refresh, if available.
Let's dissect this process and look at how performance can be impacted. The first thing to realize is that there is a difference between foreground and background processing. Foreground processing occurs for computers during a system restart and for users during a user logon. Background refreshes occur on workstations and member servers by default every 90 minutes plus up to 30 minutes in a randomized value. Background refreshes occur on domain controllers every 5 minutes by default. In Windows Vista, you can also have NLA-based refreshes, which are essentially background refresh events that are triggered by a previous failure of Group Policy processing due to the lack of access to a domain controller (as when the client was offline when a background interval occurred). Why are these distinctions important? Primarily because certain CSEs (for instance, the Software Installation and Folder Redirection CSEs) will not run during a background refresh. Likewise, logon/logoff or startup/shutdown scripts do not run during a background refresh.
Similarly, in Step 1 of this process, I mentioned the slow-link detection process. In pre-Windows Vista systems, this process relies on clients using ICMP to ping the domain controller to determine its availability and link speed. If the calculated link speed falls below a certain threshold value (the default is 500Kb/s) the link is considered to be slow and, again, certain CSEs, such as Software Installation, Folder Redirection, and Internet Explorer Maintenance, will not run. All of these conditions can have an impact on performance as well as on the expected delivery of policy.
Probably the aspect of the policy processing cycle with the greatest impact on performance is the logic that determines whether GPOs applying to a computer or user have changed. The Group Policy engine has a built-in optimization that says that if nothing has changed for a computer or user since the last time GP was processed, then no processing occurs. This can obviously have a tremendous impact on the time it takes your clients to process policy, especially if your GP environment is fairly static. Let's look in more detail at what constitutes a change.
When Group Policy Change Occurs
So, what constitutes a change in terms of Group Policy processing? There are a number of factors but the most obvious is that if you make a change to a GPO, clients processing that GPO will detect the change and reprocess that GPO. How does a client know that a GPO has changed? It relies on version numbers on the GPO and within the client to figure it out.
A GPO is composed of two pieces—the GPC stored in Active Directory under the CN=Policies, CN=System container within each domain, and the GPT stored in SYSVOL under the "Policies" folder. Each piece of the GPO contains a version number. For the GPC, this version number is stored in the versionNumber attribute on the GPC object. For the GPT, it's stored within the gpt.ini file at the root of a given GPT. The client also keeps a record of the version numbers of the GPOs it has processed (both per-computer and per-user) within its registry. This version information is held under HKLM\Software\Microsoft\Windows\Currentversion\Group Policy\History for the computer and HKLM\Software\Microsoft\Windows\Currentversion\Group Policy\ for the user on each client.
When Group Policy processing occurs, one of the parts is to examine the version numbers of all GPOs that the computer or user are subject to and compare them to any processed during the last cycle, as found in the registry. If any of the version numbers of the current GPOs are different (note that they only have to be different—they could be bigger or smaller!), those GPOs will be processed during the current processing cycle. If not, they are not processed unless one of the other change conditions are met. Those other change conditions are as follows:
* A change in the list of GPOs that apply to a user or computer (a GPO has been added or removed)
* A change in the security group membership of a user or computer
* A change in a WMI filter linked to a GPO (a WMI filter has been added or removed)
If any of these change conditions are met, the client will reprocess policy during that cycle. But there are subtleties in this process that you need to be aware of, since they can have a significant impact on performance. For a given CSE, if 1 GPO out of 10 changes, then all GPOs must be processed for that CSE. Remember that processing happens on a per-CSE basis. However, CSEs must process policy in the order of precedence that controls processing (local GPOs first, then site-linked GPOs, then domain-linked GPOs, then OU-linked GPOs). Given this requirement, let's say a user has 10 GPOs that apply, each linked at different levels of the Active Directory hierarchy. And let's say that each of those 10 GPOs implement some Administrative Template policy settings. Now, an administrator comes along and changes a GPO linked to the domain—adding a new Administrative Template policy setting. Then the computer or user goes to process policy and notices that the version number of that changed GPO is greater than the last time it was processed, so the GPO needs to be processed again. But in order to maintain the order of precedence of GP processing, it must process all of the Administrative Template settings that apply to all of the GPOs. So a simple change to one GPO can have a potentially significant performance impact for that client.
Comparing Performance of Monolithic and Functional GPOs
Now that we've looked at the processing cycle and at how changes to your Group Policy environment impacts processing, let's loop back to our discussion of monolithic versus functional GPOs and how each approach impacts performance.
Monolithic GPOs can have a hidden performance penalty due to the way Group Policy versioning works. The reasons for this are not altogether obvious, but they have to do with the fact that there is no concept of per-CSE versioning within Group Policy processing. Let's say a user has three GPOs that apply to him. Each GPO is monolithic in that it implements several policy areas. For example, let's assume that each GPO implements Administrative Template policy, Software Installation policy and Folder Redirection policy. Now let's say that an administrator makes a change to Administrative Template policy in one of these GPOs. Its version number is advanced by that change. Then the user comes along and processes Group Policy. The Administrative Template CSE starts up and sees that one of the GPOs has changed, so it processes those three GPOs again.
When the Software Installation and Folder Redirection CSEs run, they also look at the GPO version numbers and notice the new version number on one of the GPOs. But because that version number doesn't tell them about what policy area was changed in that GPO, they go ahead and process all three GPOs again, just in case. The result is that, in a monolithic GPO implementation, making changes to one area of policy can cause processing activity in another area.
True, in the case of software installation or folder redirection policy, those CSEs may not actually perform any work because, for example, if an application has already been installed it's not going to be installed again. But the point is that this behavior can happen with any CSE and should be taken into account when you are designing monolithic GPOs. If you have a policy area that changes frequently, you might consider keeping GPOs that implement that policy area separate from other policy areas.
From a functional GPO perspective, the performance considerations are more obvious. If you have more GPOs per user or computer (because the functional approach typically involves more GPOs for a given set of policy settings), it means that the Group Policy engine has to spend more time enumerating those GPOs during the core phase of Group Policy processing. However, as we'll see in the next section, this may not necessarily impact performance in a significant way.
Measuring Group Policy Performance
Ultimately, in order to make good decisions about the performance of your Group Policy infrastructure, you need to be able to measure how Group Policy is performing in your real-life environment. Modeling or predicting Group Policy performance is nearly impossible, given the large number of factors that can impact a given processing cycle. For that reason, empirical measurement is your best bet for discovering if GP processing performance is a problem. What constitutes bad performance? Well, bad performance is any situation where Group Policy processing impacts your users' experience on their systems. This may be different for every organization, but the key is knowing you have a problem.
So how do you measure the duration of a given Group Policy processing cycle? Well, again, the answer is not simple. If you are running Windows Vista or Windows Server 2008, you can take advantage of the new Event Viewer Operational Logs. The Group Policy operational log within the Event Viewer, found under Applications and Services Logs\Microsoft\Windows\Group Policy\Operational, provides excellent instrumentation of each step of the Group Policy processing cycle, including time spent during each phase of processing (see Figure 2).
Figure 2 Group Policy Operational Log Event showing policy processing time (Click the image for a larger view)
However, if you are not working in a Windows Vista or Windows Server 2008 environment, the mechanisms for measuring policy processing times are less direct. In that case, your choices are to enable verbose userenv logging (see the Microsoft support article at support.microsoft.com/kb/221833) and view the timestamps within that file for a given processing cycle, or to use the values held in the registry on the client that indicate start and stop times for policy processing. These values are stored in the following for the computer
HKLM\SOFTWARE\Microsoft\Windows\CurrentVersion\
Group Policy\State\Machine\Extension-List\
{00000000-0000-0000-0000-000000000000}
and here for the user:
HKLM\SOFTWARE\Microsoft\Windows\CurrentVersion\
Group Policy\State\\Extension-List\
{00000000-0000-0000-0000-000000000000}
The values are stored in FILETIME format and must be converted to a normal date and time. You can also use the free GPTime.exe utility I wrote (available at gpoguy.com/tools.htm#GP_Time_Utility) to get the same information.
If you don't have a Windows Vista or Windows Server 2008 environment, but do have access to a userenv log, you can still get valuable information about how much time has been spent in each policy processing cycle. For example, Figure 3 displays a snippet of the userenv log showing part of the core phase of Group Policy processing.
Figure 3 A portion of the userenv log (Click the image for a larger view)
Note that each line of the log file includes a timestamp. The core part of the Group Policy processing cycle begins when you see an event that says something like "ProcessGPOs: Starting user Group Policy (Background) processing ..." The CSE part of the processing cycle begins when you see the line "ProcessGPOs: Processing extension Registry." You can use this log and the timestamps within it to determine how long each part of a policy cycle takes.
General Observations on Performance
When you spend enough time looking at userenv log files, you begin to see patterns emerge, and though you can't predict how long policy processing will take, you can start to make some general observations about where time is spent in a given processing cycle. For example, during a policy processing event, when policy changes are being processed and CSEs have work to do because of a change, the time spent in the core part of GP processing is typically much smaller compared to the CSE part.
This is true for most policy areas because most CSEs need to perform tasks that run longer than the core portion of their processing, whose most expensive operations are querying Active Directory and SYSVOL. For example, there's no comparison between time spent in core processing versus the Software Installation CSE running a Microsoft® Office install. However, for a normal background refresh of policy where nothing has changed since the last cycle, the core part of the processing cycle takes roughly the same time as the CSE portion. The exception to this is registry policy processing—which is actually fairly fast unless you have tens or hundreds of registry policy settings in place for a given user or computer.
In addition, disabling the computer or user side of a GPO because it is unused has little effect on policy processing performance. If a policy side is unused, the only overhead will be in querying Active Directory to determine that, and the same query must be performed to view the disable option as the one that occurs to determine whether any CSEs have been implemented for that side of the GPO. The effect of disabling a side is negligible.
Design Recomendations for Optimal GP Performance
Now that we've looked at many aspects of Group Policy processing performance, there are some design recommendations that can directly impact performance. These are summarized in four key points.
1. If you are making frequent changes to your GPOs, keep in mind the effect mentioned earlier, where a change to one CSE can impact the processing of all CSEs. To that end, if you plan to make frequent changes to, for example, registry policy, it makes more sense to put your registry policy into functional GPOs (GPOs that only do registry policy) as that will isolate other CSEs from processing when changes occur.
2. When thinking about how many GPOs are too many, keep in mind that policy processing only occurs during changes, and "expensive" CSEs like Software Installation, Folder Redirection, or handling a large number of registry policies or setting permissions on large file or registry trees take up the most time. The time spent querying Active Directory for the list of GPOs during core processing is often the smallest part of the processing cycle. So, 30 GPOs that apply to a given user but do minimal registry policy changes and don't change frequently could take less time to process than 5 GPOs that are running expensive CSEs on a regular basis because those GPOs are changing frequently.
3. Avoid behaviors that force obvious slowdowns in policy processing performance. For example, you can set policy to force CSEs to process even if a GPO has not changed (under Computer Configuration\Administrative Templates\System\Group Policy). However, if you do this, expect policy processing to take longer during each cycle.
4. Keep in mind the trade-offs of disabling Fast Logon Optimization in Windows XP and Windows Vista (this is done by enabling the policy at Computer Configuration\Administrative Templates\System\Logon\Always wait for the network at computer startup and user logon). When this policy is enabled, foreground processing switches from asynchronous to synchronous. This means that computer and user policy must run to completion before the user gets control of the computer and desktop. However, it can also be beneficial because it gets around the problem of requiring two or more restarts or logons for Software Installation and Folder Redirection policy to take effect.
Wrap-Up
While Group Policy processing performance is not an exact science, there is some insight you can bring to your design process that can mitigate performance issues.
Understanding how the processing cycle works and where time is spent can go a long way toward tracking down performance issues. Use the Windows Vista or Windows Server 2008 Operational logs (or userenv logs in earlier versions of Windows) to get instrumented information about the processing cycle. Keep in mind the vagaries of CSE processing and what constitutes a change in policy from a CSE perspective. And remember that, in dynamic environments with lots of changes, functional GPOs may make more sense than monolithic ones. But the bottom line is that Group Policy is a technology designed to help you better manage your Windows environment. It's very important that your business needs drive your Group Policy design rather than the other way around. Keeping in mind some of the performance behaviors discussed here can help you accomplish that goal.
http://technet.microsoft.com/en-us/magazine/2008.01.gpperf.aspx
I can tell you the answer in advance: "It depends." While this may seem evasive, my goal is to illuminate the mechanisms that underlie Group Policy processing so you can make informed decisions about your Group Policy design, regardless of whether you are just starting out or looking to optimize an environment with hundreds of existing GPOs.
Monolithic vs. Functional GPOs
| Issue | Monolithic GPOs | Functional GPOs |
| Delegation/Isolation | Difficult, since each GPO can contain settings from multiple areas, and you can only delegate at the GPO level, not the settings level. | Easy, since each GPO contains a single policy area, you can delegate, for example, the software installation GPO to the deployment administrator, the security GPO to the security officer, and so on. |
| Manageability & Complexity | Potentially simpler and easier to manage, because each GPO contains all settings in a single place. | Potentially more difficult because more GPOs mean more places to look to track down problems and more complexity determining the resultant set of policy for a given user or computer. |
| Performance | Potentially slower because, for a given client-side extension, if one GPO changes, all extensions would need to run against all GPOs in scope. | Depends upon how many GPOs are in use, and how often they change. Performance could be better in dynamic environments compared to monolithic GPOs. |
Let's start by describing the different ways you can implement your GPOs. The terms "monolithic" and "functional" refer to how you design them. Monolithic GPOs contain settings from many different areas. For example, a monolithic GPO might contain settings from Administrative Templates, Internet Explorer Maintenance, and Software Installation policies—all within a single GPO. By contrast, functional GPOs typically do one thing. For example, a functional GPO may do only Software Installation or enforce Security settings. I've even seen functional GPOs that contain only one policy setting! But that is probably the extreme. Figure 1 shows some of the advantages and disadvantages of each approach.
Figure 1 Comparing monolithic and functional GPOs
Issue Monolithic GPOs Functional GPOs
Delegation/Isolation Difficult, since each GPO can contain settings from multiple areas, and you can only delegate at the GPO level, not the settings level. Easy, since each GPO contains a single policy area, you can delegate, for example, the software installation GPO to the deployment administrator, the security GPO to the security officer, and so on.
Manageability & Complexity Potentially simpler and easier to manage, because each GPO contains all settings in a single place. Potentially more difficult because more GPOs mean more places to look to track down problems and more complexity determining the resultant set of policy for a given user or computer.
Performance Potentially slower because, for a given client-side extension, if one GPO changes, all extensions would need to run against all GPOs in scope. Depends upon how many GPOs are in use, and how often they change. Performance could be better in dynamic environments compared to monolithic GPOs.
As you can see, there is no cut-and-dried answer to which approach—monolithic or functional—is best in all cases. In your environment, you will likely need both. For example, you might find the functional approach preferable when you are creating security policy for your entire domain. Having a single GPO that contains only security settings makes it easy to delegate control of that GPO to your security administrators where no one else can touch it. By the same token, if you delegate GP administration to OU administrators, then establishing one monolithic GPO for each OU gives those administrators a single place where they can go to manage all of their policy settings. That can reduce complexity for them and allow you to moderate the number of GPOs created for a given OU's users and computers.
How do these high-level design decisions affect the performance of Group Policy processing, and how can you make smart decisions about GP design that minimize performance impacts? The first step in maximizing the performance of your Group Policy infrastructure is understanding how Group Policy processing works under the covers.
Understanding Group Policy Processing
Group Policy processing is a complex set of interactions involving many pieces of your Windows® and Active Directory® infrastructure. At a high level, there are two parts to Group Policy processing. The first is called Core, or Group Policy Infrastructure processing. In this phase, a Windows Group Policy client queries its closest domain controller to determine what the link speed to the DC is, where it lives in the Active Directory hierarchy (that is, which site, domain, and OU the client is a member of), and which GPOs apply to the computer or currently logged-on user. (It's important to note that in this context a client could be a server or workstation participating in an Active Directory domain.) Once the list of GPOs has been created, the next phase kicks in—Client-Side Extension (CSE) processing. During the CSE phase, each registered CSE processes the list of GPOs that have implemented settings in its area. For example, the Registry or Administrative Template CSE runs first in all cases and processes all GPOs that apply to the given computer or user and that have implemented registry policy within them.
The list that follows details the steps the Group Policy processing cycle goes through, including network interactions between the client and domain controller. It's important to remember that Group Policy applies to both computers and users. Therefore, each time policy processes—for example during a background refresh of Group Policy—the cycle I enumerate below will be repeated for both the computer and the currently logged on user account on a given system, since each can have a different set of policies applying to them. When this happens, Windows actually performs the processing cycle simultaneously for both computer and user, with each cycle running on a different thread within the Group Policy engine process. (The Winlogon process for Windows 2000, Windows XP, and Windows Server® 2003, and the Group Policy Client service in Windows Vista® and Windows Server 2008.)
Processing a GP is a six-step procedure:
1. The client performs Internet Control Message Protocol (ICMP) slow-link detection to a domain controller in its site to determine link speed. In Windows Vista, the use of ICMP for slow-link detection is replaced by the Network Location Awareness (NLA) service.
2. The client reads CSE status information from its local registry to determine which GPOs were processed last.
3. The client uses LDAP to search the gpLink attribute in Active Directory on each container object within its location in the Active Directory hierarchy—first at the OU level (including all nested OUs), then at the domain, and finally at the Active Directory site level. From the results of this search, it builds a list of GPOs that must be evaluated for processing.
4. Each GPO is then searched in Active Directory to determine whether the client (user or computer) has the necessary permissions to process it. Its version number, the path to the Group Policy Template (GPT) portion of the GPO in SYSVOL, and what CSEs are implemented in that GPO are also evaluated.
5. The client then uses the Server Message Block (SMB) protocol to read the contents of the GPT and get the GPO's version number from the gpt.ini file. The version numbers in the Group Policy Container (GPC) and GPT are one factor that is used to determine whether a GPO has changed since the last processing cycle.
6. Each CSE runs in the order that is registered under HKLM\Software\Microsoft\Windows NT\CurrentVersion\Winlogon\GPExtensions, and processes the GPOs that implement that CSE if the GPO has changed since last processing cycle (as determined during core processing). Each CSE also logs Resultant Set of User Policy (RSOP) data to Windows Management Instrumentation (WMI) during each refresh, if available.
Let's dissect this process and look at how performance can be impacted. The first thing to realize is that there is a difference between foreground and background processing. Foreground processing occurs for computers during a system restart and for users during a user logon. Background refreshes occur on workstations and member servers by default every 90 minutes plus up to 30 minutes in a randomized value. Background refreshes occur on domain controllers every 5 minutes by default. In Windows Vista, you can also have NLA-based refreshes, which are essentially background refresh events that are triggered by a previous failure of Group Policy processing due to the lack of access to a domain controller (as when the client was offline when a background interval occurred). Why are these distinctions important? Primarily because certain CSEs (for instance, the Software Installation and Folder Redirection CSEs) will not run during a background refresh. Likewise, logon/logoff or startup/shutdown scripts do not run during a background refresh.
Similarly, in Step 1 of this process, I mentioned the slow-link detection process. In pre-Windows Vista systems, this process relies on clients using ICMP to ping the domain controller to determine its availability and link speed. If the calculated link speed falls below a certain threshold value (the default is 500Kb/s) the link is considered to be slow and, again, certain CSEs, such as Software Installation, Folder Redirection, and Internet Explorer Maintenance, will not run. All of these conditions can have an impact on performance as well as on the expected delivery of policy.
Probably the aspect of the policy processing cycle with the greatest impact on performance is the logic that determines whether GPOs applying to a computer or user have changed. The Group Policy engine has a built-in optimization that says that if nothing has changed for a computer or user since the last time GP was processed, then no processing occurs. This can obviously have a tremendous impact on the time it takes your clients to process policy, especially if your GP environment is fairly static. Let's look in more detail at what constitutes a change.
When Group Policy Change Occurs
So, what constitutes a change in terms of Group Policy processing? There are a number of factors but the most obvious is that if you make a change to a GPO, clients processing that GPO will detect the change and reprocess that GPO. How does a client know that a GPO has changed? It relies on version numbers on the GPO and within the client to figure it out.
A GPO is composed of two pieces—the GPC stored in Active Directory under the CN=Policies, CN=System container within each domain, and the GPT stored in SYSVOL under the "Policies" folder. Each piece of the GPO contains a version number. For the GPC, this version number is stored in the versionNumber attribute on the GPC object. For the GPT, it's stored within the gpt.ini file at the root of a given GPT. The client also keeps a record of the version numbers of the GPOs it has processed (both per-computer and per-user) within its registry. This version information is held under HKLM\Software\Microsoft\Windows\Currentversion\Group Policy\History for the computer and HKLM\Software\Microsoft\Windows\Currentversion\Group Policy\
When Group Policy processing occurs, one of the parts is to examine the version numbers of all GPOs that the computer or user are subject to and compare them to any processed during the last cycle, as found in the registry. If any of the version numbers of the current GPOs are different (note that they only have to be different—they could be bigger or smaller!), those GPOs will be processed during the current processing cycle. If not, they are not processed unless one of the other change conditions are met. Those other change conditions are as follows:
* A change in the list of GPOs that apply to a user or computer (a GPO has been added or removed)
* A change in the security group membership of a user or computer
* A change in a WMI filter linked to a GPO (a WMI filter has been added or removed)
If any of these change conditions are met, the client will reprocess policy during that cycle. But there are subtleties in this process that you need to be aware of, since they can have a significant impact on performance. For a given CSE, if 1 GPO out of 10 changes, then all GPOs must be processed for that CSE. Remember that processing happens on a per-CSE basis. However, CSEs must process policy in the order of precedence that controls processing (local GPOs first, then site-linked GPOs, then domain-linked GPOs, then OU-linked GPOs). Given this requirement, let's say a user has 10 GPOs that apply, each linked at different levels of the Active Directory hierarchy. And let's say that each of those 10 GPOs implement some Administrative Template policy settings. Now, an administrator comes along and changes a GPO linked to the domain—adding a new Administrative Template policy setting. Then the computer or user goes to process policy and notices that the version number of that changed GPO is greater than the last time it was processed, so the GPO needs to be processed again. But in order to maintain the order of precedence of GP processing, it must process all of the Administrative Template settings that apply to all of the GPOs. So a simple change to one GPO can have a potentially significant performance impact for that client.
Comparing Performance of Monolithic and Functional GPOs
Now that we've looked at the processing cycle and at how changes to your Group Policy environment impacts processing, let's loop back to our discussion of monolithic versus functional GPOs and how each approach impacts performance.
Monolithic GPOs can have a hidden performance penalty due to the way Group Policy versioning works. The reasons for this are not altogether obvious, but they have to do with the fact that there is no concept of per-CSE versioning within Group Policy processing. Let's say a user has three GPOs that apply to him. Each GPO is monolithic in that it implements several policy areas. For example, let's assume that each GPO implements Administrative Template policy, Software Installation policy and Folder Redirection policy. Now let's say that an administrator makes a change to Administrative Template policy in one of these GPOs. Its version number is advanced by that change. Then the user comes along and processes Group Policy. The Administrative Template CSE starts up and sees that one of the GPOs has changed, so it processes those three GPOs again.
When the Software Installation and Folder Redirection CSEs run, they also look at the GPO version numbers and notice the new version number on one of the GPOs. But because that version number doesn't tell them about what policy area was changed in that GPO, they go ahead and process all three GPOs again, just in case. The result is that, in a monolithic GPO implementation, making changes to one area of policy can cause processing activity in another area.
True, in the case of software installation or folder redirection policy, those CSEs may not actually perform any work because, for example, if an application has already been installed it's not going to be installed again. But the point is that this behavior can happen with any CSE and should be taken into account when you are designing monolithic GPOs. If you have a policy area that changes frequently, you might consider keeping GPOs that implement that policy area separate from other policy areas.
From a functional GPO perspective, the performance considerations are more obvious. If you have more GPOs per user or computer (because the functional approach typically involves more GPOs for a given set of policy settings), it means that the Group Policy engine has to spend more time enumerating those GPOs during the core phase of Group Policy processing. However, as we'll see in the next section, this may not necessarily impact performance in a significant way.
Measuring Group Policy Performance
Ultimately, in order to make good decisions about the performance of your Group Policy infrastructure, you need to be able to measure how Group Policy is performing in your real-life environment. Modeling or predicting Group Policy performance is nearly impossible, given the large number of factors that can impact a given processing cycle. For that reason, empirical measurement is your best bet for discovering if GP processing performance is a problem. What constitutes bad performance? Well, bad performance is any situation where Group Policy processing impacts your users' experience on their systems. This may be different for every organization, but the key is knowing you have a problem.
So how do you measure the duration of a given Group Policy processing cycle? Well, again, the answer is not simple. If you are running Windows Vista or Windows Server 2008, you can take advantage of the new Event Viewer Operational Logs. The Group Policy operational log within the Event Viewer, found under Applications and Services Logs\Microsoft\Windows\Group Policy\Operational, provides excellent instrumentation of each step of the Group Policy processing cycle, including time spent during each phase of processing (see Figure 2).
Figure 2 Group Policy Operational Log Event showing policy processing time (Click the image for a larger view)
However, if you are not working in a Windows Vista or Windows Server 2008 environment, the mechanisms for measuring policy processing times are less direct. In that case, your choices are to enable verbose userenv logging (see the Microsoft support article at support.microsoft.com/kb/221833) and view the timestamps within that file for a given processing cycle, or to use the values held in the registry on the client that indicate start and stop times for policy processing. These values are stored in the following for the computer
HKLM\SOFTWARE\Microsoft\Windows\CurrentVersion\
Group Policy\State\Machine\Extension-List\
{00000000-0000-0000-0000-000000000000}
and here for the user:
HKLM\SOFTWARE\Microsoft\Windows\CurrentVersion\
Group Policy\State\
{00000000-0000-0000-0000-000000000000}
The values are stored in FILETIME format and must be converted to a normal date and time. You can also use the free GPTime.exe utility I wrote (available at gpoguy.com/tools.htm#GP_Time_Utility) to get the same information.
If you don't have a Windows Vista or Windows Server 2008 environment, but do have access to a userenv log, you can still get valuable information about how much time has been spent in each policy processing cycle. For example, Figure 3 displays a snippet of the userenv log showing part of the core phase of Group Policy processing.
Figure 3 A portion of the userenv log (Click the image for a larger view)
Note that each line of the log file includes a timestamp. The core part of the Group Policy processing cycle begins when you see an event that says something like "ProcessGPOs: Starting user Group Policy (Background) processing ..." The CSE part of the processing cycle begins when you see the line "ProcessGPOs: Processing extension Registry." You can use this log and the timestamps within it to determine how long each part of a policy cycle takes.
General Observations on Performance
When you spend enough time looking at userenv log files, you begin to see patterns emerge, and though you can't predict how long policy processing will take, you can start to make some general observations about where time is spent in a given processing cycle. For example, during a policy processing event, when policy changes are being processed and CSEs have work to do because of a change, the time spent in the core part of GP processing is typically much smaller compared to the CSE part.
This is true for most policy areas because most CSEs need to perform tasks that run longer than the core portion of their processing, whose most expensive operations are querying Active Directory and SYSVOL. For example, there's no comparison between time spent in core processing versus the Software Installation CSE running a Microsoft® Office install. However, for a normal background refresh of policy where nothing has changed since the last cycle, the core part of the processing cycle takes roughly the same time as the CSE portion. The exception to this is registry policy processing—which is actually fairly fast unless you have tens or hundreds of registry policy settings in place for a given user or computer.
In addition, disabling the computer or user side of a GPO because it is unused has little effect on policy processing performance. If a policy side is unused, the only overhead will be in querying Active Directory to determine that, and the same query must be performed to view the disable option as the one that occurs to determine whether any CSEs have been implemented for that side of the GPO. The effect of disabling a side is negligible.
Design Recomendations for Optimal GP Performance
Now that we've looked at many aspects of Group Policy processing performance, there are some design recommendations that can directly impact performance. These are summarized in four key points.
1. If you are making frequent changes to your GPOs, keep in mind the effect mentioned earlier, where a change to one CSE can impact the processing of all CSEs. To that end, if you plan to make frequent changes to, for example, registry policy, it makes more sense to put your registry policy into functional GPOs (GPOs that only do registry policy) as that will isolate other CSEs from processing when changes occur.
2. When thinking about how many GPOs are too many, keep in mind that policy processing only occurs during changes, and "expensive" CSEs like Software Installation, Folder Redirection, or handling a large number of registry policies or setting permissions on large file or registry trees take up the most time. The time spent querying Active Directory for the list of GPOs during core processing is often the smallest part of the processing cycle. So, 30 GPOs that apply to a given user but do minimal registry policy changes and don't change frequently could take less time to process than 5 GPOs that are running expensive CSEs on a regular basis because those GPOs are changing frequently.
3. Avoid behaviors that force obvious slowdowns in policy processing performance. For example, you can set policy to force CSEs to process even if a GPO has not changed (under Computer Configuration\Administrative Templates\System\Group Policy). However, if you do this, expect policy processing to take longer during each cycle.
4. Keep in mind the trade-offs of disabling Fast Logon Optimization in Windows XP and Windows Vista (this is done by enabling the policy at Computer Configuration\Administrative Templates\System\Logon\Always wait for the network at computer startup and user logon). When this policy is enabled, foreground processing switches from asynchronous to synchronous. This means that computer and user policy must run to completion before the user gets control of the computer and desktop. However, it can also be beneficial because it gets around the problem of requiring two or more restarts or logons for Software Installation and Folder Redirection policy to take effect.
Wrap-Up
While Group Policy processing performance is not an exact science, there is some insight you can bring to your design process that can mitigate performance issues.
Understanding how the processing cycle works and where time is spent can go a long way toward tracking down performance issues. Use the Windows Vista or Windows Server 2008 Operational logs (or userenv logs in earlier versions of Windows) to get instrumented information about the processing cycle. Keep in mind the vagaries of CSE processing and what constitutes a change in policy from a CSE perspective. And remember that, in dynamic environments with lots of changes, functional GPOs may make more sense than monolithic ones. But the bottom line is that Group Policy is a technology designed to help you better manage your Windows environment. It's very important that your business needs drive your Group Policy design rather than the other way around. Keeping in mind some of the performance behaviors discussed here can help you accomplish that goal.
http://technet.microsoft.com/en-us/magazine/2008.01.gpperf.aspx
RPC server unavailable
just go to Start, Run. Type sevices.msc
Wait till a new windows comes up. from the list choose tcp/ip net bios helper and start it. THat should fix
Wait till a new windows comes up. from the list choose tcp/ip net bios helper and start it. THat should fix
Tuesday, December 8, 2009
Outlook 2007 Client - "The item could not be downloaded." 80070005
Exact Error Message
"The item could not be downloaded." 80070005
Details:
When using Outlook 2007 to open archived items, the message "there was an error loading this item -- some functionality may not be available " and the pop box "The item could not be download" is returned (see Figure 1).
Figure 1
A client trace will show the line
CShortcutItem::Display...Return Last Failed error: 0x80070005
However if the client is changed to Outlook 2003 the item can be viewed as expected.
Resolution:
The issue could be due to a restriction in the environment that prevents the use of PST files. Changing the Download Format of an item from a DVS file to an MSG file can resolve the issue (see Figure 2).
1. Log onto the Enterprise Vault (EV) server and open the Vault Administration Console (VAC)
2. Browse to the Exchange Mailbox Policy (EV 2007 and earlier) or Exchange Desktop Policy (EV 8.0 or higher) and select the properties of the Policy
3. On the Advanced Tab, select Desktop (EV 6.0 and 7.0) or Outlook (EV 2007 and 8.0) from the "List Settings from" drop down box.
4. Change the Download Format from DVS to MSG and synchronize all mailboxes to have the change take effect.
Figure 2
How to Change Volume License Product Key on Windows XP System
Deactivate Windows
1. At first click Start then click” Run“.
2. Type “Regedit” in the run box and click “Ok“.
3. Then your “Registry Editor” box open on your screen.
4. In Registry Editor box just find “HKEY_LOCAL_MACHINE\Software\Microsoft\WindowsNT\Current Version\WPAEvents“.
5. From the right pane, right-click on OOBETimer and select Modify.
6. Change any one digit of this value and Widows will get deactivated.
Reactivate Windows and change product key
1. At first click “Strat” and click “Run“.
2. In run box type – “%systemroot%\system32\oobe\msoobe.exe /a” and click ok.
3. Then click yes “I want to telephone a customer service representative to activate Windows” and then click “Next“.
4. Then click on Change product key.
5. Then just enter new product key in the box and then click on Update. If the previous window appears again, click on “Remind me Later” and restart your computer.
After the computer has restarted, repeat the same step to see the Windows activation confirmation.A message will shown : Windows is already activated. Click OK to exit.
Thursday, December 3, 2009
network connections disappered
network connection service, netowork service disappered after removing viruses from the system.
solution:
reinstall OS and start firewall from services.
solution:
reinstall OS and start firewall from services.
Tuesday, December 1, 2009
Users migrated from OCS 2007 RTM version to R2 version will get an error that all contact’s presence is “Unknown”
Cause:
—–
Local cache of MOC client problem. MOC failed to update current status of
contact.
Solution:
—–
Delete local cache.
Location is
(Vista/2008)
“%userprofile%\AppData\Local\Microsoft\Communicator”
(XP/2003)
“%userprofile%\local settings\application data\Microsoft\Communicator”.
—–
Local cache of MOC client problem. MOC failed to update current status of
contact.
Solution:
—–
Delete local cache.
Location is
(Vista/2008)
“%userprofile%\AppData\Local\Microsoft\Communicator”
(XP/2003)
“%userprofile%\local settings\application data\Microsoft\Communicator”.
Unmountable Boot Volume
When booting up to Win XP you may get a error that reads "Unmountable Boot Volume".
Back to the top
CAUSE
1.The file system is damaged and cannot be mounted. 2.You use a standard 40-wir...
1.The file system is damaged and cannot be mounted.
2.You use a standard 40-wire connector cable to connect the UDMA drive to the controller instead of the required 80-wire, 40-pin cable.
3.The basic input/output system (BIOS) settings are configured to force the faster UDMA modes.
Back to the top
RESOLUTION
If it be the connector cable problem then replace the 40-wire cable with an 80-w...
If it be the connector cable problem then replace the 40-wire cable with an 80-wire UDMA cable.
If it's a BIOS settings problem then load the 'Fail-Safe' default settings, and then reactivate the most frequently used options such as USB Support.
If it's a damaged file system case then:-
1.Insert the Windows XP CD-ROM into the CD-ROM drive, and then restart the computer.
Click to select any options that are required to start the computer from the CD-ROM drive if you are prompted.
2.When the "Welcome to Setup" screen appears, press R to start the Recovery Console.
3.If you have a dual-boot or multiple-boot computer, select the installation that you must access from the Recovery Console.
4.When you are prompted, type the Administrator password. If the administrator password is blank, just press ENTER.
5.At the command prompt, type chkdsk /r , and then press ENTER.
6.At the command prompt, type exit , and then press ENTER to restart your computer.
This takes a bit longer, but the system should boot back into Windows.
Back to the top
MORE INFORMATION
"STOP 0x000000ED UNMOUNTABLE_BOOT_VOLUME" Error Message When You Restart Your Co...
"STOP 0x000000ED UNMOUNTABLE_BOOT_VOLUME" Error Message When You Restart Your Computer or Upgrade to Windows XP
http://support.microsoft.com/?kbid=297185
Description of the Windows XP Recovery Console
http://support.microsoft.com/default.aspx?scid=kb;en-us;Q314058
If the above process fails to restore the system then in the number#5 step use fixboot command instead of the chkdsk /r command.
http://support.microsoft.com/kb/555302
Back to the top
CAUSE
1.The file system is damaged and cannot be mounted. 2.You use a standard 40-wir...
1.The file system is damaged and cannot be mounted.
2.You use a standard 40-wire connector cable to connect the UDMA drive to the controller instead of the required 80-wire, 40-pin cable.
3.The basic input/output system (BIOS) settings are configured to force the faster UDMA modes.
Back to the top
RESOLUTION
If it be the connector cable problem then replace the 40-wire cable with an 80-w...
If it be the connector cable problem then replace the 40-wire cable with an 80-wire UDMA cable.
If it's a BIOS settings problem then load the 'Fail-Safe' default settings, and then reactivate the most frequently used options such as USB Support.
If it's a damaged file system case then:-
1.Insert the Windows XP CD-ROM into the CD-ROM drive, and then restart the computer.
Click to select any options that are required to start the computer from the CD-ROM drive if you are prompted.
2.When the "Welcome to Setup" screen appears, press R to start the Recovery Console.
3.If you have a dual-boot or multiple-boot computer, select the installation that you must access from the Recovery Console.
4.When you are prompted, type the Administrator password. If the administrator password is blank, just press ENTER.
5.At the command prompt, type chkdsk /r , and then press ENTER.
6.At the command prompt, type exit , and then press ENTER to restart your computer.
This takes a bit longer, but the system should boot back into Windows.
Back to the top
MORE INFORMATION
"STOP 0x000000ED UNMOUNTABLE_BOOT_VOLUME" Error Message When You Restart Your Co...
"STOP 0x000000ED UNMOUNTABLE_BOOT_VOLUME" Error Message When You Restart Your Computer or Upgrade to Windows XP
http://support.microsoft.com/?kbid=297185
Description of the Windows XP Recovery Console
http://support.microsoft.com/default.aspx?scid=kb;en-us;Q314058
If the above process fails to restore the system then in the number#5 step use fixboot command instead of the chkdsk /r command.
http://support.microsoft.com/kb/555302
Monday, November 30, 2009
OC error when connecting to OCS server, Cannot sign in because the server is temporarily unavailable.
Yep, the SRV record thing is tricky because you can't create two srv records in the same domain for _sipinternatls. There are a few ways to deal with it, though.
I think the easiest way is to just manually configure your OCS clients for ocspool.company.com:5061. This will keep you from needing a separate SRV record.
However, the best long-term solution is this: If you are using an LCS access proxy, you can replace it with an OCS edge server. Then you can configure your internal SRV records to point to the outside interface of the Edge server (sip.company.com) on port 443. This way LCS clients all point to the Edge & then the edge distributes the request to the LCS front end. The OCS clients also point at the edge & it distributes the requests to the OCS front end. This is the way I have things woking in our environment and it has been working very well.
And I also agree with your strategy on the user migration, that's probably the best way to do it.
How to troubleshoot missing network connections icons in Windows Server 2003 and in Windows XP
This article describes general step-by-step methods and advanced troubleshooting methods that you can use to restore missing network and dial-up connections icons on a computer that runs Windows XP or Windows Server 2003. However, despite the missing icons, networking continues to function correctly. Because missing network icons can be a symptom of several issues, it is difficult to say what is causing your particular problem until you examine it a bit. We'll ask you some questions. Then, based on your answers, we'll determine which of these methods that you should try first.
This article provides self-help steps for a beginning to intermediate computer user.
The "Advanced troubleshooting" section is designed for the advanced computer user.
You may find it easier to follow the steps if you print this article first.
Back to the top
SYMPTOMS
When you click Start, point to and click Control Panel, and then double-click Ne...
When you click Start, point to and click Control Panel, and then double-click Network Connections, or if you right-click My Network Places on the desktop and then click Properties, you do not see all network icons. Or, you may experience problems with the Network Connections window.
To know which method you should try first to resolve your problem, review the following four cases to determine which symptoms match your situation.
Back to the top
Case 1: All or some of the network icons are missing.
* The LAN or High-Speed Internet connection icon is missing.
* The Dial-up Connection icons are missing.
* The New Connection Wizard icon is missing.
* Only the New Connection Wizard icon appears. Or, one or more dial-up connections also appear.
* If you click the Advanced menu and then click Advanced Settings, only the [Remote Access connections] entry appears in the Connections list.
If this case describes your situation, you should first try Method 1 in the "General troubleshooting" section to let Windows automatically detect and install network adapters.
Back to the top
Case 2: Only the "Dial-up Connection" icons are missing.
If this case describes your situation, you should first try Method 5 in the "General troubleshooting methods" section to add a generic standard modem.
Back to the top
Case 3: The Network Connections window stops responding (hangs) or closes immediately after you select a network connection and then click "Properties"
If this case describes your situation, try Method 4 in the "Advanced troubleshooting" section to reconstruct the Config entry of the Network subkey. If you do not feel comfortable performing advanced troubleshooting, you may want to ask someone for help or contact support.
Case 4: The network icon disappears only after you manually connect to the network.
If this describes your situation, try Method 3 in the "Advanced troubleshooting" section to use the Group Policy Results tool or the Group Policy Management Console to diagnose and resolve the problem. If you do not feel comfortable performing advanced troubleshooting, you may want to ask someone for help or contact support.
Back to the top
General troubleshooting
Method 1: Let Windows automatically detect and install network adapters Windows...
Method 1: Let Windows automatically detect and install network adapters
Windows can automatically detect and install the correct network adapters for you. It will also correct any corrupted registry entries on the network adapter.
To direct Windows to automatically detect and install network adapters for you, follow these steps:
1. Right-click My Computer, and then click Properties.
2. Click the Hardware tab, and then click Device Manager.
3. To see a list of installed network adapters, expand Network adapter(s). Click to locate the network adapter, and then click Uninstall.
4. Restart the computer, and then let the system automatically detect and install the network adapter drivers.
Check to see whether your networking icons appear. If this method worked for you, you are finished with this article. However, you might want to read the "Prevention tips" section to learn how you can avoid this problem in the future.
If this method did not work for you, try Method 2.
Back to the top
Method 2: Verify network settings and services
Network settings such as adapter settings, services settings, the logon setting, the desktop interaction setting, and networking services settings enable you to use your computer to connect to a network. If these settings are incorrect, network connectivity issues can occur.
To verify network settings and services, follow these steps:
1. Verify that the correct network adapter is selected. A network adapter is a device that enables you to connect a computer to a network. It is also known as a network interface card (NIC).
1. Right-click My Computer, click Properties, click the Hardware tab, and then click Device Manager.
2. Double-click Network adapters, and then verify that the correct network adapter name is selected. If you do not know the name of your network adapter, don't worry. For now, just make sure that an adapter is selected.
3. Double-click the network adapter, and then verify that the "This device is working properly" message appears in the Device status box on the General tab. If you do not see this message, click Troubleshoot, and follow the directions.
4. After you confirm that the correct network adapter is selected and is working properly, you can close all the open dialog boxes.
2. Verify that the necessary services are started. The Services settings simply direct the system to stop, start, and administer system services.
1. Right-click My Computer, and then click Manage.
2. Double-click Services and Applications, and then click Services.
3. In the right pane, look at the Status column. You may need to expand the box so that you can see all the columns. Make sure that the following services are started:
* Remote procedure call (RPC)
(This service must be started before other services can take effect.).
* Network Connections
(This service can only start if the RPC service is active.)
* Plug and Play
* COM+ Event System
(This service can only start if the RPC service is active.)
* Remote Access Connection Manager
(This service can only start if Telephony service is active.)
* Telephony
(This service can only start if the RPC service and the PnP Service are active.)
4. To start a service, right-click the service name, and then click Start.
5. Do not close the Computer Management box because you will need to check additional settings in the remaining steps.
3. Verify the logon setting.
1. In the right pane, double-click COM+ Event System service.
2. Click the Log On tab.
3. Under Log on as, verify that the Local System account is selected.
4. Verify the desktop interaction setting.
1. Double-click the Network Connections service.
2. Click the Log On tab.
3. Under Log on as, verify that the Local System Account option is selected.
4. Verify that the Allow service to interact with desktop check box is selected, and then click OK.
5. Close the Computer Management box.
5. Verify the network services setting.
1. Click Start, and then click Control Panel.
2. Double-click Add or Remove Programs.
3. Click Add/Remove Windows Components.
4. Scroll down and then click Networking Services, and then click Details. Verify that Simple TCP/IP Services is turned on, and then click OK.
5. Close all the open dialog boxes.
6. Verify that the network DLL files are registered correctly. DLL files are small files that include a library of functions and data that can be shared across multiple applications.
1. Click Start, and then click Run.
2. In the Run box, type cmd.exe, and then click OK.
3. Type the following lines. Press ENTER after you type each line. This command text is difficult to type. Be sure that you type it exactly as it appears below. Or you may find it easier to copy and paste the text instead. Click OK when the RegSvr32 dialog box appears for each command.
regsvr32 netshell.dll
regsvr32 netcfgx.dll
regsvr32 netman.dll
4. Restart the computer. Check to see whether your networking icons appear. If this method worked for you, you are finished with this article. However, you might want to read the "Prevention tips" section to avoid this problem in the future.
If this method did not work for you, try Method 3.
Back to the top
Method 3: Determine if a third-party driver is incompatible with the latest Windows Service Pack
A driver is software that allows your computer to communicate with hardware or devices. If you have an out-of-date driver installed, it may not be compatible with the latest Windows Service Pack. You can correct this incompatibility by checking to see if a driver update is available.
To check to see if a new network adapter driver is available, follow these steps:
1. Click Start, point to All Programs, and then click Windows Update.
2. Click Custom Install, and then click Select optional hardware update.
3. Look for the network adapter name, and then install any available hardware updates. If you do not find the driver listed, you may want to check the manufacturer's Web site for more information.
4. Restart the computer if you were prompted to install hardware updates.
Check to see whether your networking icons appear. If this method worked for you, you are finished with this article. However, you might want to read the "Prevention tips" section to avoid this problem in the future.
If this method did not work for you, you can try Method 4.
Back to the top
Method 4: Use the Dcomcnfg.exe utility to reset the "Default Impersonation Level" setting
This setting tells the computer how you want it to authenticate who can connect to a network. This method sounds more intimidating than what it really is. The DCOM Config utility has a point-and-click interface, and you just need to follow the steps, and it will do the "dirty" work for you.
Before you get started, you will need to make sure that you are logged on to the computer by using an administrator account. With an administrator account, you can make changes to your computer that you cannot make with any other account, such as a standard account. If you are using your own computer, chances are that you are logged on with an administrator account.
If you are unsure whether you have administrative user rights, follow these steps. Otherwise, go to step 1.
1. Open the Date and Time Properties dialog box.
1. Click Start, and then click Run.
2. In the Open box, type timedate.cpl, and then press ENTER.
2. Now determine whether you are logged on with an administrator account.
* If the Date and Time Properties dialog box opened after you performed step 1, you are logged on as a computer administrator. Close the Date and Time Properties dialog box, and then continue with this method.
* If you received the following message, you are not logged on as an administrator:
You do not have the proper privilege level to change the system time.
To continue with this task, you must first log off, and then log back on to Windows by using a computer administrator account. If you do not know how to log back on to Windows by using a computer administrator account, you might have to ask someone for help. If this computer is part of a network at work, you can ask the system administrator for help. However, if you have to perform this task on a home computer that is not part of a network, you must know the password for an administrator account on your computer.
Unfortunately, if you do not know the password for any administrator account on your computer, this content is unable to help you any further. You may want to contact support. See "Next steps" for information about how to contact support.
To run the Dcomcnfg.exe utility to rest the Default Impersonation Level setting, follow these steps:
1. Click Start, and then click Run.
2. Type dcomcnfg, and then click OK.
3. In Component Services, click Computers, right-click the computer whose machine-wide impersonation level that you want to modify (for example, My Computer), and then click Properties.
4. Click the Default Properties tab, and then click to select the Enable Distributed COM on this computer check box for this computer.
5. Click the down arrow in the Default Impersonation Level box, and then click any setting other than Anonymous, and then click OK.
The new machine-wide impersonation level is available the next time that you start a program. Programs that are currently running are not affected until you restart them.
Check to see whether your networking icons appear. If this method worked for you, you are finished with this article.
If this method did not work for you, you can try Method 5.
Back to the top
Method 5: If only the Dial-up Connection icons are missing, temporarily add a new modem
Try adding a standard modem. Often, just the process of adding a new modem causes the connection icons to reappear. To add a standard modem, complete these steps:
1. Click Start, and then click Control Panel.
2. If it is not already selected, click Switch to Classic View. This option appears on the left side of Control Panel.
3. Double-click Phone and Modem Options.
4. Click Modems, and then click Add. The Add Hardware Wizard starts.
5. Click to select the Don't detect my modem I will select it from a list check box, and then click Next.
6. Select a standard modem from the list on the left, and then click Next. When the icons reappear, you can safely delete the modem that you added in this procedure.
Back to the top
Advanced troubleshooting
If you are still experiencing the missing icons problem, you can try the advanc...
If you are still experiencing the missing icons problem, you can try the advanced methods. If you are not comfortable with advanced troubleshooting, you might want to contact Support. For information about how to contact support, see the "Next steps" section.
We recommend the following advanced troubleshooting methods for advanced users:
* Method 1: Verify that all Windows Protected Files in the System 32 folder are intact
* Method 2: Remove third-party network adapter management software
* Method 3: Use the Group Policy Results tool to see which Group Policy objects are applied
* Method 4: Reset the network connections
* Method 5: Verify that the registry keys are intact and correct
* Method 6: Check for nonpresent, ghosted, or hidden network adapters
* Method 7: Remove all the AutoDiscovery/AutoPurge (ADAP) information from the registry and reset the state of each performance library
Back to the top
Method 1: Verify that all Windows Protected Files in the System 32 folder are intact
System File Checker enables an administrator to scan all protected files to verify their versions. If System File Checker discovers that a protected file has been overwritten, it retrieves the correct version of the file from the cache folder (%Systemroot%\System32\Dllcache) or from the Windows installation source files, and then it replaces the incorrect file. System File Checker also checks and repopulates the cache folder. You must be logged on as an administrator or as a member of the Administrators group to run System File Checker.
To run System File Checker, open a command prompt, type sfc /purgecache, and then press ENTER. The Window File Checker starts.
For more information about how to use the Windows File Protection feature, review the following Microsoft Knowledge Base article:
222193 (http://support.microsoft.com/kb/222193/ ) Description of the Windows File Protection feature
Back to the top
Method 2: Remove third-party network adapter management software
The third-party products that this article discusses are manufactured by companies that are independent of Microsoft. Microsoft makes no warranty, implied or otherwise, about the performance or reliability of these products.
Temporarily remove any teaming software. The following combination is known to be incompatible:
Dual-Port Intel Pro 100+ Server Adapter with Intel Teaming Software running an SNMP component.
For an updated version of the Intel SNMP agent (Ilansnmp.dll) and for more information, contact the network adapter manufacturer or the third-party software vendor. For more information, click the following article numbers to view the articles in the Microsoft Knowledge Base:
811876 (http://support.microsoft.com/kb/811876/ ) Network adapters disappear from the network adapters list and cluster server stops responding with the Intel SNMP agent installed
278431 (http://support.microsoft.com/kb/278431/ ) Using teaming adapters with network load balancing may cause network problems
Back to the top
Method 3: Use the Group Policy Results tool to see which Group Policy objects are applied
If the icon is being deleted only after you manually connect to the network, follow these steps:
1. Restart the computer while it is not connected to the network to see whether a Group Policy object (GPO) is being downloaded.
2. Start the Group Policy Results tool to find out which GPOs are applied. For more information about how to use the Group Policy Results tool, click the following article number to view the article in the Microsoft Knowledge Base:
321709 (http://support.microsoft.com/kb/321709/ ) How to use the Group Policy Results tool in Windows 2000
3. Click Start, click Run, type gpedit.msc, and press ENTER.
4. Locate and open Group policy/User Configuration/Windows Settings/Internet Explorer Maintenance/Connection/Connection Settings/.
Back to the top
Method 4: Reset the network connections
Important This section, method, or task contains steps that tell you how to modify the registry. However, serious problems might occur if you modify the registry incorrectly. Therefore, make sure that you follow these steps carefully. For added protection, back up the registry before you modify it. Then, you can restore the registry if a problem occurs. For more information about how to back up and restore the registry, click the following article number to view the article in the Microsoft Knowledge Base:
322756 (http://support.microsoft.com/kb/322756/ ) How to back up and restore the registry in Windows
If the Network Connections window starts to open, but then closes immediately or "hangs," complete these steps:
1. Click Start, click Run, type regedit, and then press ENTER.
2. Locate and then click the following registry subkey:
HKEY_LOCAL-MACHINE\SYSTEM\CurrentControlSet\Control\Network
3. Right-click this subkey, click Export, and then save the selected branch in a file.
4. Click the Network subkey again, and then delete the Config entry. Do not delete the Network subkey. The Config entry will be reconstructed when you restart the computer.
5. Restart the computer. You may have to manually turn off the computer.
Back to the top
Method 5: Verify that the registry keys are intact and correct
To verify that the registry keys are intact and correct, complete these steps:
1. Click Start, click Run, type regedit, and then press ENTER.
2. Locate and then click the following registry subkey:
HKEY_CLASSES_ROOT\Interface\{0000010C-0000-0000-C000-00000000046}
Verify that the subkeys NumMethods and ProxyStubClsid32 exist and that their values are correct. If these registry subkeys do not exist, create them. For more information about how to create these registry subkeys, click the following article number to view the article in the Microsoft Knowledge Base:
269019 (http://support.microsoft.com/kb/269019/ ) Network and dial-up connections folder icons missing
Back to the top
Method 6: Check for nonpresent, ghosted, or hidden network adapters
To uninstall the ghosted network adapter from the registry, complete these steps:
1. Click Start, click Run, type cmd.exe, and then press ENTER.
2. Type set devmgr_show_nonpresent_devices=1, and then press ENTER.
3. Type Start DEVMGMT.MSC, and then press ENTER.
4. Click View, and then click Show Hidden Devices.
5. Expand the Network adapters tree.
6. Right-click the dimmed network adapter, and then click Uninstall.
Back to the top
Method 7: Remove all the AutoDiscovery/AutoPurge (ADAP) information from the registry and reset the state of each performance library
To do this, open a command prompt, type winmgmt / clearadap, and then press ENTER.
For more information, click the following article number to view the article in the Microsoft Knowledge Base:
266416 (http://support.microsoft.com/kb/266416/ ) How to troubleshoot WinMgmt-based performance counter errors
Back to the top
Next steps
If you were unable to complete the steps in this article to restore your network...
If you were unable to complete the steps in this article to restore your network icons, you might have to ask someone for help or contact support.
To view Microsoft support options, visit the following Microsoft Web site:
http://support.microsoft.com/contactus (http://support.microsoft.com/contactus)
Back to the top
Prevention tips
To prevent these problems in the future, try to keep your computer up-to-date....
To prevent these problems in the future, try to keep your computer up-to-date. Always make sure that you have the most recent drivers installed on the computer. To do this, you can use Windows Update to install the latest drivers. For more information, visit the following Microsoft Web site:
http://windowsupdate.microsoft.com (http://windowsupdate.microsoft.com)
Back to the top
REFERENCES
For more information, click the following article numbers to view the articles...
For more information, click the following article numbers to view the articles in the Microsoft Knowledge Base:
811876 (http://support.microsoft.com/kb/811876/ ) Network adapters disappear from network adapters list and cluster server stops responding with the Intel SNMP agent installed
254631 (http://support.microsoft.com/kb/254631/ ) Some network and dial-up connections icons may be missing
273461 (http://support.microsoft.com/kb/273461/ ) Network and dial-up connection icons disappear when you use Dcomcnfg.exe to set the default impersonation level to anonymous
269019 (http://support.microsoft.com/kb/269019/ ) "Network and dial-up connections" folder icons missing
329634 (http://support.microsoft.com/kb/329634/ ) Dial-up connections do not appear with Cluster services installed
Thursday, November 26, 2009
Subject: Low memory on HP Laserjet 3055
Perform the following to clear the fax memory:
Press the menu/enter button on the control panel.
Press the > button once to select Fax functions , and then press menu/enter .
Press < or > to select Clear saved faxes , and then press menu/enter .
Press menu/enter to confirm deletion.
Press the menu/enter button on the control panel.
Press the > button once to select Fax functions , and then press menu/enter .
Press < or > to select Clear saved faxes , and then press menu/enter .
Press menu/enter to confirm deletion.
Wednesday, November 25, 2009
win xp sp3 setup error
When you try to install Windows XP Service Pack, you receive the error message "Access is denied" or "Service Pack installation did not complete"
View products that this article applies to.
On This Page
* SYMPTOMS
* CAUSE
* RESOLUTION
o Method 1: Restart the computer, and then try to download and install Windows XP SP3 from the Microsoft Download Center
o Method 2: Restart the computer, and then close or disable any antivirus or antispyware program that may be running
* ADVANCED TROUBLESHOOTING
o Method 1: Reset the registry and the file permissions
* MORE INFORMATION
o How to determine whether the registry update has failed
o Antivirus software
* NEXT STEPS
Expand all | Collapse all
SYMPTOMS
When you install Windows XP Service Pack 2 (SP2) or Service Pack 3 (SP3), you ma...
When you install Windows XP Service Pack 2 (SP2) or Service Pack 3 (SP3), you may receive an error message similar to one of the following:
Service Pack 3 setup error. Access is denied.
Service Pack 3 setup error. Service Pack installation did not complete
Or, the Svcpack.log file may contain the following error message:
DoRegistryUpdates failed
Back to the top
CAUSE
These errors can occur if permissions for one or more registry keys are restrict...
These errors can occur if permissions for one or more registry keys are restricted in a way that prevents the service pack from updating the keys. Registry keys can become restricted by certain programs that change the system access control lists (SACL) in the Registry so that administrator accounts cannot alter them. The service pack installer runs under an administrator account (User), and therefore cannot access restricted registry keys. If Windows XP Service Pack cannot update a registry key because it is restricted by another program, the service pack installation fails.
To determine whether an update to the registry has failed, go to the "More Information" section.
Back to the top
RESOLUTION
Use the following troubleshooting methods in the order in which they are present...
Use the following troubleshooting methods in the order in which they are presented to resolve the issue. These methods are intended for intermediate to advanced users.
Note You must be logged on to Windows with a user account that is a computer administrator to complete these methods. If this is your personal computer, you are likely already logged on with an administrator account. If this is a computer that is part of a network at work, you might have to ask the system administrator for help. To verify that you are logged on to Windows with a user account that is a computer administrator, visit the following Microsoft Web site:
http://support.microsoft.com/gp/admin (http://support.microsoft.com/gp/admin)
Back to the top
Method 1: Restart the computer, and then try to download and install Windows XP SP3 from the Microsoft Download Center
If a program is running with a locked file, restarting the computer may unlock the file. To try to unlock the file, exit all programs and restart the computer. Then try again to download and install the service pack.
If you originally tried to install Windows XP SP3 through Windows Update and it failed, download the full Windows XP SP3 download package from the Microsoft Download Center. After you download the service pack, try to install it. For more information about how to download Windows XP Service Pack 3, click the following article number to view the article in the Microsoft Knowledge Base:
322389 (http://support.microsoft.com/kb/322389/ ) How to obtain the latest Windows XP service pack
If this method resolved the error message and if you successfully installed Windows XP SP3, you are finished.
For more information about restoring the default security settings for Windows XP, , click the following article number to view the article in the Microsoft Knowledge Base:
313222 (http://support.microsoft.com/kb/313222/ ) How do I restore security settings to the default settings?
If this method did not resolve the issue, go to method 2.
Back to the top
Method 2: Restart the computer, and then close or disable any antivirus or antispyware program that may be running
Warning This workaround may make a computer or a network more vulnerable to attack by malicious users or by malicious software such as viruses. We do not recommend this workaround but are providing this information so that you can implement this workaround at your own discretion. Use this workaround at your own risk.
You can reduce the risk of attack by malicious users or malicious software by not visiting other Web sites or downloading files while your antivirus and antispyware program is closed or disabled.
One of the most common causes of installation failure is when a third-party program, such as an antivirus program, holds a file open or locks a file that the service-pack installer needs. To prevent this issue, follow these steps before you install Windows XP SP3:
1. Exit all programs, and then restart the computer.
2. After you restart the computer, close or disable any antivirus or antispyware programs that may be running.
Note You can disable the programs from the notification area. To do this, right-click the third-party program icon, and then click an option to close or to disable the application. If this option is not available, see the program documentation, or contact the program's manufacturer for instructions.
3. After you close the antivirus program or the antispyware program, install Windows XP SP3 from the full download package that you downloaded in method 1.
4. After Windows XP SP3 installation is complete, restart the antivirus program or the antispyware program that you disabled in step 2.
If this method resolved the error message and if you successfully installed Windows XP SP3, you are finished.
If this method did not resolve the issue, and if you are comfortable trying advanced troubleshooting steps, go to the "Advanced troubleshooting” section. If you are not comfortable with advanced troubleshooting steps, go to the "Next Steps” section.
Back to the top
ADVANCED TROUBLESHOOTING
This section includes an advanced troubleshooting method to try if the steps in...
This section includes an advanced troubleshooting method to try if the steps in the "Resolution” section do not work. This method is intended for advanced users only.
Back to the top
Method 1: Reset the registry and the file permissions
Important This section, method, or task contains steps that tell you how to modify the registry. However, serious problems might occur if you modify the registry incorrectly. Therefore, make sure that you follow these steps carefully. For added protection, back up the registry before you modify it. Then, you can restore the registry if a problem occurs. For more information about how to back up and restore the registry, click the following article number to view the article in the Microsoft Knowledge Base:
322756 (http://support.microsoft.com/kb/322756/ ) How to back up and restore the registry in Windows
To reset the registry and file permissions, follow these steps:
1. Download and then install the Subinacl.exe file. To do this, visit the following Microsoft Web site:
http://www.microsoft.com/downloads/details.aspx?FamilyID=e8ba3e56-d8fe-4a91-93cf-ed6985e3927b&displaylang=en (http://www.microsoft.com/downloads/details.aspx?FamilyID=e8ba3e56-d8fe-4a91-93cf-ed6985e3927b&displaylang=en)
2. Start Notepad.
3. Copy and then paste the following text into Notepad.
cd /d "%ProgramFiles%\Windows Resource Kits\Tools"
subinacl /subkeyreg HKEY_LOCAL_MACHINE /grant=administrators=f /grant=system=f
subinacl /subkeyreg HKEY_CURRENT_USER /grant=administrators=f /grant=system=f
subinacl /subkeyreg HKEY_CLASSES_ROOT /grant=administrators=f /grant=system=f
subinacl /subdirectories %SystemDrive% /grant=administrators=f /grant=system=f
subinacl /subdirectories %windir%\*.* /grant=administrators=f /grant=system=f
secedit /configure /cfg %windir%\repair\secsetup.inf /db secsetup.sdb /verbose
Microsoft provides programming examples for illustration only, without warranty either expressed or implied. This includes, but is not limited to, the implied warranties of merchantability or fitness for a particular purpose. This article assumes that you are familiar with the programming language that is being demonstrated and with the tools that are used to create and to debug procedures. Microsoft support engineers can help explain the functionality of a particular procedure. However, they will not modify these examples to provide added functionality or construct procedures to meet your specific requirements.
4. Save this Notepad file as Reset.cmd.
5. Double-click the Reset.cmd file to run the script.
Note This script file may take a long time to run. You must run this script as an administrator.
6. Install Windows XP SP3.
If this method resolved the error message and if you successfully installed Windows XP SP3, you are finished.
If this method did not resolve the issue, go to the "Next Steps” section.
Back to the top
MORE INFORMATION
How to determine whether the registry update has failed Click Start, click Run,...
How to determine whether the registry update has failed
1. Click Start, click Run, type %windir%\svcpack.log, and then click OK. The Svcpack.log file opens.
2. On the Edit menu, click Find.
3. In the Find what box, type DoRegistryUpdates failed, and then click Find Next.
If there was a registry update failure, a "DoRegistryUpdates failed" error message is displayed in the file. This indicates that an issue is preventing the registry update. This error message resembles the following:
xxxx.xxx: DoInstallation:DoRegistryUpdates failed.
xxxx.xxx: Access is denied.
xxxx.xxx: Message displayed to the user: Access is denied.
Note In this message, xxxx.xxx represents the time stamp of each entry.
Back to the top
Antivirus software
An antivirus program is designed to help protect your computer from viruses. You must not download or open files from sources that you do not trust, visit Web sites that you do not trust, or open e-mail attachments when your antivirus program is disabled. For more information about computer viruses, click the following article number to view the article in the Microsoft Knowledge Base:
129972 (http://support.microsoft.com/kb/129972/ ) Computer viruses: description, prevention, and recovery
Back to the top
NEXT STEPS
If these methods did not work for you, you can use the Microsoft Customer Suppor...
If these methods did not work for you, you can use the Microsoft Customer Support Services Web site to find other solutions to your problem. Some services that the Microsoft Customer Support Services Web sites provide include the following:
* Searchable Knowledge Base (http://support.microsoft.com/search/?adv=1) : Search technical support information and self-help tools for Microsoft products.
* Solution Centers (http://support.microsoft.com/select/?target=hub) : View product-specific frequently asked questions and support highlights.
* Microsoft Customer Support Newsgroups (http://www.microsoft.com/communities/newsgroups/default.mspx) : Contact counterparts, peers, and Microsoft Most Valuable Professionals (MVPs).
* Other Support Options (http://support.microsoft.com/default.aspx?pr=csshome) : Use the Web to ask a question, contact Microsoft Customer Support Services, or provide feedback.
If you continue to have problems, you might want to contact Support:
http://support.microsoft.com/contactus (http://support.microsoft.com/contactus)
http://support.microsoft.com/kb/949377
Thursday, November 12, 2009
vm ware client login problem
* When accessing VirtualCenter from VMware Infrastructure (VI) Client, you see the error:
Configuration system failed to initialize
* This error occurs after applying Windows updates
Solution
This error may occur if you applied a Windows Update that included ASP.NET 3.5.
You must remove the update.
To remove the update:
1. From the Control Panel, open Add/Remove Programs.
2. Ensure Show updates is selected.
3. Click ASP.Net 3.5 and click Remove.
4. Click VMware Infrastructure Client and click Change.
5. In the wizard, click Next.
6. Click Remove.
7. Re-install VI Client from the source CD or by browsing to VirtualCenter and downloading from there.
Monday, November 9, 2009
Generic BackDoor!by virus problem
Recently I faced lot of problem with Generic BackDoor!by . this virus is changing net man.dll file in registry to tabcteng.dll . first check for virus with Mcafee and then follow the below procedure. After changing the name in registry restart the system.
Check the registry key:
HKLM\System\CurrentControlSet\Services\%ServiceName%\Parameters
2. Check the associated DLL file name value for ServiceDLL.
3. Physically check the location mentioned in the key ServiceDLL and make sure that the file is there.
4. If you do not find the file at the location mentioned in the key HKLM\System\CurrentControlSet\Services\%ServiceName%\Parameters\serviceDLL then copy the file from a working Server with the same OS and Service Pack Level.
5. Now try to start the service and the service should now start otherwise restart the system.
Subscribe to:
Posts (Atom)