Tuesday, December 13, 2011

Exchange 2007 to enable Outlook Anywhere


  1. In the console tree, expand Server Configuration, and then click Client Access.
  2. In the action pane, click Enable Outlook Anywhere.
  3. In the Enable Outlook Anywhere Wizard, type the external host name for your organization in the box under External host name.
  4. Select an available external authentication method. You can select Basic authentication or NTLM authentication.
  5. If you are using an SSL accelerator and if you want to do SSL offloading, select the check box next to Allow secure channel (SSL) offloading.
    Bb123889.note(en-us,EXCHG.80).gifNote:
    Do not use this option unless you are sure that you have an SSL accelerator that can handle SSL offloading. If you do not have an SSL accelerator that can handle SSL offloading, and you select this option, Outlook Anywhere will not function correctly.
  6. Click Enable to apply these settings and enable Outlook Anywhere.
  7. Click Finish to close the Enable Outlook Anywhere Wizard.

Thursday, November 24, 2011

How to enable ping response in windows 7

Control Panel --> System and security --> Windows Firewall --> Advanced settings --> Inbound rules --> New rule --> custom rule

in Protocol and ports: Protocol: ICMPv4
on the same panel go to customize, choose "Specific ICMP types", check the box "echo request"

Wednesday, November 23, 2011

Microsoft Word/Unwanted P Marks

The answer is closer than you might think.

You have turned on the formatting marks and the backward P is the paragraph symbol.

Formatting Marks Enable or Disable

From the Menu Bar select Tools, Options, View Tab if not already selected.

Look under Formatting marks and remove or add check marks by clicking in the box next to the choice you want such as Tab characters or Hidden text.

Select OK.

The keyboard shortcut is:

Ctrl + *

You must use the * located above the number 8 which requires you to press

Ctrl + Shift + *

There is also a Show/Hide Formatting Marks Icon that looks like a backward P with an extra vertical line on it left of the Zoom Icon on the Standard Toolbar.

Wednesday, November 16, 2011

Office 2010 features

Microsoft is leaving no stone unturned to promote its new Office suite. Recently Microsoft announced a “technology guarantee” program that read “Sell Office 2007 today and your customer can download Office 2010 free”. The customers purchasing and activating Office Home and Student 2007, Office Standard 2007, Office Small Business 2007 and Microsoft Publisher 2007 between March 5 and September 30, 2010 will be eligible for free upgrade to a comparable version of Office 2010. However, before moving to an upgraded Microsoft Office version you would always look for advantages of installing it over the previous version. Microsoft ensures that those looking to go for an upgraded version of Office 2007 have enough reasons to support . We draw a comparison to elucidate how MS Office 2007 better’s Office 2010.
Updated Ribbon
Office 2007 made headlines with innovative ribbon menu system Office 2010 takes it to the next level with a more intuitive ribbon. It provides a new home menu system. Instead of opening up a dropdown the entire window changes color and provides the save, open, close preview and other options. The enhanced Ribbon across Office 2010 applications allows users to access commands quickly and customize tabs to personalize the experience in your working style.
The home menu system offers detailed information on modifications, authors, file size, and permission. The new print and print preview menu that definitely changes the layout most PC users are used to. The new menu by simply cleaner than that of Office 2007.
Better multimedia Editing
The clear that Microsoft upped the multimedia editing options form the last iteration. Image editing has been improved in office 2010. There are new tools for screen capture in Word 2010 and PowerPoint 2010. You can even remove the backgrounds with the new Office. Now Microsoft PowerPoint has in-video editing. You might even remove backgrounds with the new Office. All this implies you can do so much more without even using Photoshop.
This features takes Office 14 to a new level. Suppose you wanna trim some parts of a video clip before presentation or you might be looking to apply professional styles to a video like reflection coupled with 3D rotation. PowerPoint 2010 now includes some powerful video editing features.
Broadcast Slideshows within PowerPoint
This is one of the most exciting new features of PowerPoint 2010. Now you can deliver live PowerPoint presentations over the web and anyone sitting in any part of the world can get connected to the web browser.
Distribute the slides as video
In PowerPoint 2010 you can convert your presentation into a video file that can be uploaded on YouTube or distributed on a portable media player such as the iPod. Moreover, the video conversion runs in the background that allows you to use PowerPoint while creating the video.
More visually enhancing
Office 2010 comes with an array of design options to help you generate better ideas. It includes new and improved picture formatting tools such as color saturation and artistic effects that allow you transform your document visuals into a work of art. Office 2010 offers new SmartArt® graphic layouts and a wide range of new pre-built Office themes to create fantabulous designs in Word.
Real time collaboration and communication
Not just the web version, the desktop version of Office 14 also sports a real time buddy list of sorts that shows what individuals are currently editing within a document. Now you can see who is online and who is working on what. This is a great revamp when compared to Office 2010.
Stronger Security Settings
Office 2010 improves upon Office 2007 with respect to author settings, restricted editing and protect mode. This stops you from accidentally editing a file you download until it is enabled.
Embed Web Videos in the Presentation
Office 2010 provides a significant advantage over Office 2007 by allowing users to embed video clips from the Internet into PowerPoint presentation. Now users can just copy and embed code from YouTube or any other video sharing site. The video can be pasted anywhere on a slide.
Quick Steps in Outlook
Microsoft Outlook includes a new Quick Steps feature in the Outlook. With Quick Steps you can create a sequence of commands and apply them to the Outlook item with just a click. For an example, you can use quick step for Send and Delete that will delete the email from your inbox after replying.
Now users can compress the long e-mail threads into a few conversations that can be categorized, filed, ignored, or cleaned up.
Built-in PDF Writer
The Office 2010 programs include a built-in PDF writer that helps you to save documents into PDF format with a click. In 2007 you had to use add-on separately but now you will have native PDF support.
Simpler Document Printing
Microsoft Word 2010 has completely revamped the print dialog. Take an instance, you can tweak printer settings like margins and preview the changes side-by-side.
Creating better data insights and visuals
Excel 2010 introduces a Sparkline feature that tracks and highlights important trends with new data analysis and visualization. The Sparklines feature allows clear and compact visual representation of data with small charts within worksheet cells. Filter and segment into PivotTable data in multiple layers using Slicers to spend more time analyzing and less time formatting.

Wednesday, October 5, 2011

Test Mode Windows 7 Build 7601

If your Windows 7 is displaying “Test Mode Windows 7 Build 7601” or “Test Mode Windows 7 Build 7600” watermark at the lower-right corner of your Windows 7 desktop, it’s because your Windows 7 OS is running in Test Mode.
Remove Test Mode Watermark From Windows 7 Desktop
According to Microsoft, Test Mode may occur in Windows if an application whose drivers are not digitally signed by Microsoft is installed and still in the test phase.

Microsoft is providing a Fix It solution to automatically remove the Test Mode watermark from the Windows 7 desktop. But if you want to remove it manually without using Fix It solution, here is how to do it:

Method 1:
Step 1: Run the Command Prompt with administrative rights. To do this, type CMD in Start menu search box, and then press Ctrl + Shift + Enter keys simultaneously. Or, navigate to Start menu, All Programs, Accessories, right-click on Command Prompt entry and select Run as administrator option.
Remove Test Mode Watermark From Windows 7 Desktop Step 01
Step 2: In the Command Prompt type bcdedit /set TESTSIGNING OFF and hit enter key. Wait till you see successfully completed message.
Remove Test Mode Watermark From Windows 7 Desktop Step 1
Remove Test Mode Watermark From Windows 7 Desktop Step 2
Step 3: Reboot your computer to remove the watermark.

aero peek disabled in win 7

Wednesday, September 28, 2011

windows found software is harmful


Anything you download from the internet is automatically marked as such by windows.    they'll make security decisions for you, so if you attempt to extract a zip containing a .exe file in it, it will tell you that it has been blocked. To get round this, right click on the zip, click "Properties", then click "Unblock", and it will forget it came from the internet and let you extract the file

OpenSSH client and server Installation

Installation of the OpenSSH client and server applications is simple. To install the OpenSSH client applications on your Ubuntu system, use this command at a terminal prompt:
sudo apt-get install openssh-client
To install the OpenSSH server application, and related support files, use this command at a terminal prompt:
sudo apt-get install openssh-server
The openssh-server package can also be selected to install during the Server Edition installation process.

Thursday, September 22, 2011

No VLAN” shown while using Broadcom NetXtreme Gigabit NIC


No VLAN” shown while using Broadcom NetXtreme Gigabit NIC
Symptoms: “No VLAN” is displayed in VLAN Statistics and/or no 802.1Q tag information is shown in your decode. The network adapter you use to capture traffic is also a Broadcom NetXtreme Gigabit NIC.
Causes: Observer is not seeing the 802.1Q tag on packets being captured. This is sometimes caused by your switch not sending tagged packets to Observer. See VLAN Statistics tool is not working for explanation/resolution before proceeding.
Solutions: If you are using a Broadcom NetXtreme Gigabit NIC to capture the traffic and you have checked the switch configuration. Then try using the fix below. For BCM5751M NetXtreme Gigabit chips found in in IBM T43, HP laptops, and Dell Latitude laptops; there is a registry key under HKEY_LOCAL_MACHINE\SYSTEM\CurrentControlSet that can be set to cause the driver and chip not to strip the 802.1Q headers. To set that key, you must find the correct instance of the driver in Windows registry and change it.
1 Open the Windows registry editor. Start Run Command and type regedit.
2 Search for “TxCoalescingTicks” and ensure this is the only instance that you have.
3 Right-click the instance number (e.g., 0008) and add a new string value.
4 Type PreserveVlanInfoInRxPacket and give it the value 1.
5 Restart the computer.
The Broadcom NetXtreme Gigabit NIC no longer strips VLAN tags, so the symptom in Observer is resolved

Thursday, September 8, 2011

How to download your offline Address Book in Outlook 2010 (Exchange 2007)

  • Synopsis

    This guide will show you how to download your Offline Address Book (OAB) if you have recently added new distribution lists, or new members to your Global Address Book, and you wish to see them immediately.
  • Applicable to

    All SherWeb hosted Exchange 2007 accounts.
  • Prerequisite

    • Outlook 2010
    • a SherWeb hosted Exchange 2007 account


  • How to

    1. Go to Send / Receive - Send/receive Groups - Download Address Book.
    2. In the new window, click on OK.
    3. When the Outlook Send/Receive Progress window disappears, the address book will be done downloading.

Thursday, June 9, 2011

how to recall mail in outlook 2010

What if you sent an email without attaching some necessary document or you just mistakenly put the wrong information in the email? Outlook 2010 provides a feature to recall a sent message and is the first desktop email client that provides such an option.

Go to the Sent Items and open the Message that you wish to resend, then hit the Office button(File Menu), go to the Info tab and head over to the Message Resend and Recall option.
Message Resend Outlook
Click the drop down button located with the Resend or Recall option and choose the Recall This Message option.
Recall Outlook 2010 You will be prompted regarding, what to do while performing the recall. You can either Delete unread copies of the message or Delete unread copies and replace with a new message. Also make sure that the Tell me if recall succeeds or fails for each recipient option is checked, if you wish to be informed, if not then just uncheck this checkbox.
Recall Outlook 2010 Delete
So what does Recall option actually do? You can use it to delete the copy of your email from the recipients inbox or use it to delete a copy and replace it with a new message. The first option can be used if you send an email to a recipient by mistake, while the second option can be used if you forgot to include an attachment or any additional information.
Please note that it can only delete/replace emails that are unread, if the recipient have read the email then Outlook 2010 cannot delete/replace the email. Also note that this option will work in corporate environment only, if you send an email to GMail, Hotmail, Yahoo, etc address then this option will not work.

Friday, June 3, 2011

registry editing has been disabled by administrator

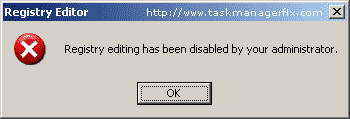
Registry editing has been disabled by your administrator” - Error you get when you try to open the Registry Editor in Windows XP, Windows 2000, Windows Vista and prevents access to registry editing.
Registry editing has been disabled by your administrator
If you are unable to access your regitry editor by typing REGEDIT.exe in Run Dialog then read following tips to quickly access disabled registry access.
Tip 1
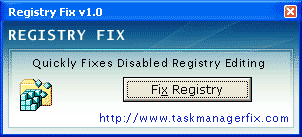
Download Registry Fix tool to enable disabled registry access. Click Fix Registry and your registry access is enabled immediately.
Registry Fix
Tip 2
Following tip is extremely helpful, and usually necessary in helping to rid your computer of a viral infection, which has disabled your registry access.  Many virus programs will intercept registry access, based on its original file name (regedit.exe), and prevent them from running.  The alternate copies of theis file will not encounter this problem.
Simply navigate to the C:\Windows and locate regedit.exe Registry Editor.
Once located rename regedit.exe to some other name (e.g. new_reg.exe) and double click the file to run.

registry editing has been disabled by administrator


khatrta.exe virus removal

Procedure to remove Khatra.exe virus manually
1)Go to task manager and select regsvr.exe(if found), gHost.exe , khatra.exe , Xplorer.exe rt click and select end process tree.
press WIN+r or start>RUN
2)type cmd and hit enter
3)GO to the the drive where your OS is installed
4)In the command prompt make sure you get the command line as c:\ or d:\ (this can be achieved by the command "cd .." without quotes)
5)Type attrib -s -h -r khatra.exe
Repeat the same process for the location c:\windows\system32
6)type del khatra.exe
7)Follow the same process for gHost.exe & Xplorer.exe as they are also part of the virus.
To make sure that the virus is out of you pc , check your registry
1)win+R type regedit
2)ctrl+F type in search one by 1 the names of the 3 processes i.e khatra,gHost,Xplorer
3)search the entire registry n go-on deleting the values you find.
Is your registry blocked by viruses?
Do you get the message "registry editing has been disabled by your admin"? then follow the instructions below
Enable Registry Editor
1:Extract the file
2:Right click on the file unhook.inf and select install
Download Registry Editor below
http://sites.google.com/site/a.....edirects=0
Afterward download Malwarebytes Anti-Malware install then update then run program. You may need to reinstall your Anti-Virus program and do a update the run and remove any found virus.

Wednesday, May 25, 2011

password change win7

you can’t remember your Windows 7 password, you can reset it using Windows 7 installation DVD or Ubuntu Live CD with very little effort.
1, Boot up your computer from the Windows 7 installation DVD or USB flash drive.
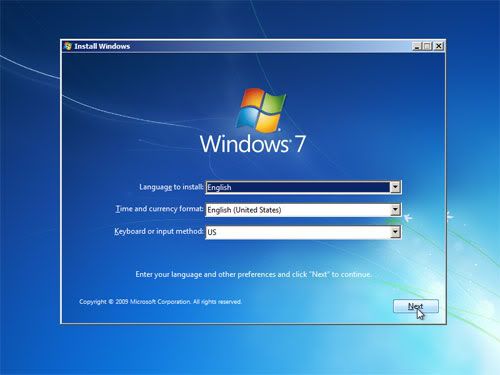
2, Just hit the “Next” button when it lets you to choose your language and keyboard layout, etc.
Reset Windows 7 Password Step by Step
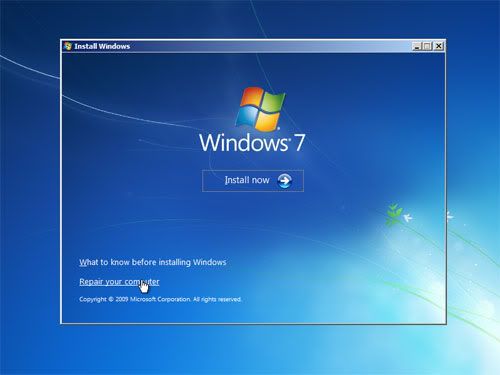
3, Click “Repair your computer” in the next window.
Reset Windows 7 Password Step by Step
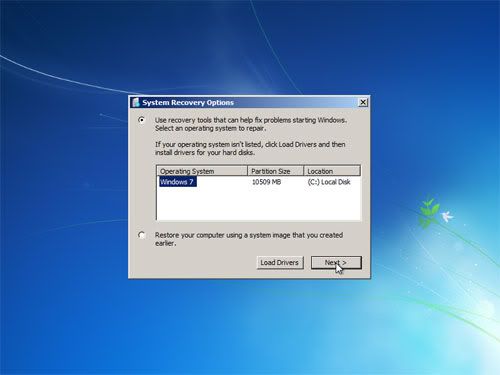
4, Click “Next” to fix problems with recovery tools.
Reset Windows 7 Password Step by Step
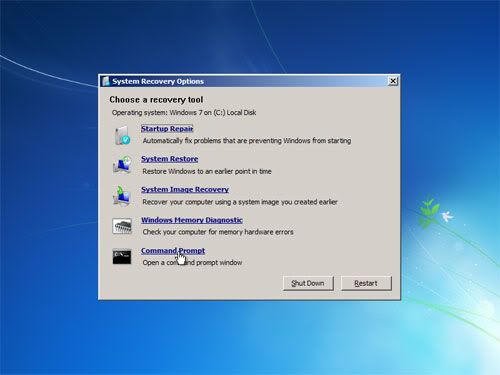
5, Click “Command prompt” to open a command prompt window.
Reset Windows 7 Password Step by Step
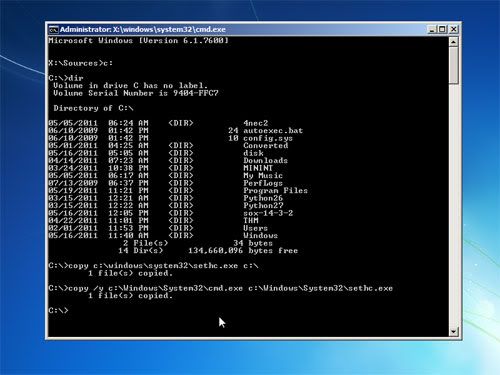
6, Backup the file named “sethc.exe” and replace it with “cmd.exe”, type the following commands respectively.


Reset Windows 7 Password Step by Step
7, Remove the DVD disc from the optical drive and reboot your computer.
Reset Windows 7 Password Step by Step
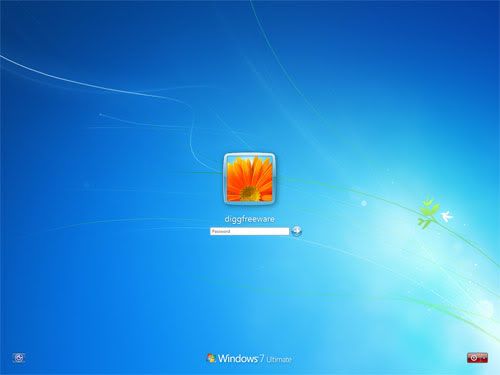
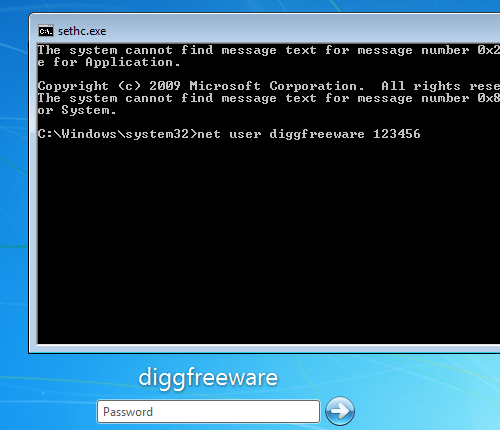
8, When the logon screen appears, press the “Shift” key 5 times, this will open the command prompt window.
Reset Windows 7 Password Step by Step
Suppose that your user name is “diggfreeware”, and you want to reset its password to “123456″, just type the command below:

Now you can close the command prompt window, log in Windows with your new password instantly.

Friday, May 6, 2011

Files on external drive changed to shortcuts

Check whether the files are not in hidden mode. Follow the following steps.

Step 1:

Click on the below link and download the file "AutorunExterminator"

http://en.kioskea.net/download/download-11613-autorun-exterminator

Extract it --> Double-click on "AutorunExterminator" --> Plug your External

hard drive now.

This will remove the autorun.inf files from your External hard drive and also from

the drives.

Step 2:

Click on "Start" -->Run --> type cmd and click on OK.

Here I assume your External hard drive as G:

Enter this command.

attrib -h -r -s /s /d g:\*.*

You can copy the above command --> Right-click in the Command Prompt and

paste it.

Note : Replace the letter g with your External hard drive letter.

Now check for your files in External Drive.

Step 3:

After that, download the Malwarebytes' Anti-Malware from the below link

http://en.kioskea.net/download/download-105-malwarebytes-anti-malware

Update it --> Perform "Full Scan"

Note : Default selected option is "Quick Scan".

Monday, April 11, 2011

step by step installation of exchange 2010 on win 2008 r2

Prerequisites

Before installing Exchange Server 2010, here are the prerequisites to be installed in all the servers

1. Net Framework 3.5
2. Powershell 2.0 CTP 3
3. Windows Remote Management

The above three components must be installed regardless of which role you wish to install.
Step by Step
1. Prepare your forest and organization in Active Directory

First you need to do the Schema preparation. Since this is a fresh new setup in the lab, I will perform the preparation on domain controller
2.JPG
Run Setup from the directory where your Exchange 2010 installation files are located. Here is the cmdlets
Setup /PrepareSchema or Setup /ps
*If you are running the prep process on the computer which is member of the forest or domain, and the OS is Windows Server 2008, you need to install the following component before executing the prep.
ServerManagerCmd -i RSAT-ADDS
Below screen capture shows that its completed.
3.JPG
Next, you will need to prep the domain and organization. Here is the cmdlet
Setup /p /on:SG or Setup /PrepareAD /OrganizationName:SG (where SG is my organization name in the Lab)
4.JPG
5.JPG
Now we have done the initial preparation. The forest and domain are ready to have the first Exchange 2010 server installed.
2. Install first Exchange 2010 server
We will do that on server "Bugis" which will have Client Access Role, Transport Role and Mailbox Role. But we will eventually remove the Mailbox role and deploy DAG on server "Outram", "Redhill" and "Dover". There is a reason behind why I choose to have 3 mailbox servers to form a DAG. That will be discussed in my future articles soon.
There are additional components needed before Exchange installation.,
As my first Exchange server is a combination all the 3 roles mentione above, I used the following command (refer the below screen capture)
ServerManagerCmd -i Web-Server Web-Metabase Web-Lgcy-Mgmt-Console Web-Basic-Auth Web-Windows-Auth Web-Net-Ext Web-Digest-Auth Web-Dyn-Compression NET-HTTP-Activation Web-ISAPI-Ext RPC-over-HTTP-proxy RSAT-ADDS


6.JPG
Here is the break down of what you will need to install in role level.
Client Access Role
ServerManagerCmd -i Web-Server Web-Metabase Web-Lgcy-Mgmt-Console Web-Basic-Auth Web-Windows-Auth Web-Net-Ext Web-Digest-Auth Web-Dyn-Compression NET-HTTP-Activation Web-ISAPI-Ext RPC-over-HTTP-proxy RSAT-ADDS
Transport Role
ServerManagerCmd -i Web-Server Web-Metabase Web-Lgcy-Mgmt-Console Web-Basic-Auth Web-Windows-Auth Web-Net-Ext RSAT-ADDS
Mailbox Role
ServerManagerCmd -i Web-Server Web-Metabase Web-Lgcy-Mgmt-Console Web-Basic-Auth Web-Windows-Auth Web-Net-Ext RSAT-ADDS
*For Mailbox Role, you have to install another component call "MSFilter Pack"
After the installation, you are required to perform restart server.
7.JPG
There are some updates & fixes need to be applied in specific.
Client Access Role
KB951725, KB950888, KB952664, KB953290
Transport Role
KB951725, KB950888, KB952664
Mailbox Role
KB951725, KB950888, KB952664
Now we are truly ready for the installation. I will not talk about installation using UI, because I prefer using command line.
Execute the command as shown in the screen capture below.

8.JPG

Here are the definitions of the parameters

/m = /mode

/r = /role, /roles
H = Transport or you can use HT
C = Client Access or you can use CA
M = Mailbox or you can use MB
Just hit "Enter" and sit back enjoy your coffee or newspaper. :-)
9.JPG
Voila, you have now completed the installation and enjoy. (below are the two screenshots of new Exchange Management Console and OWA after installation)
EMC 2010.JPG
OWA 2010.JPG