It is recommended that you create a restore point before installing new software or making any major changes to your computer. Often times when you install new software you’re given the choice to create a point but if not you can do one manually as well.
Right-click on My Computer and go to Properties.
Next click on the System Protection link.
The System Properties dialog screen opens up and you will want to click on Create.
Type in a description for the restore point which will help you remember the point at which is was created.
The time it takes to create the restore point will depend on the amount of data, computer speed etc.
All done! Now if something goes wrong you have the satisfaction knowing that you can go back in time to the point before the changes were made.
Wednesday, January 19, 2011
It is recommended that you create a restore point before installing new software or making any major changes to your computer. Often times when you install new software you’re given the choice to create a point but if not you can do one manually as well. Right-click on My Computer and go to Properties. 1 Next click on the System Protection link. 2 The System Properties dialog screen opens up and you will want to click on Create. 1 Type in a description for the restore point which will help you remember the point at which is was created. 1 The time it takes to create the restore point will depend on the amount of data, computer speed etc. 1 2 All done! Now if something goes wrong you have the satisfaction knowing that you can go back in time to the point before the changes were made.
Monday, January 17, 2011
How to Fix Vrlogon.dll Failed to Load Error
rlogon.dll is a dynamic link library file that belongs to IBM Fingerprint Software from UPEK Inc. Error Message:
An error message related to vrlogon.dll may be found among users of IBM Lenovo products. You may receive an error message like the ones posted below:
The Logon User Interface DLL vrlogon.dll failed to load. Contact your system administrator to replace the DLL, or restore the original DLL.
Cause
This error will appear if the option to Replace Windows logon with fingerprint-protected logon is checked in the ThinkPad fingerprint software. Clicking on Change the way users log on or off will produce the error message stated above.
The following ThinkPad products running Windows XP may be affected by this error:
ThinkPad T42
ThinkPad T42p
ThinkPad Z60m
ThinkPad Z60t
Resolution
This error may be resolved without uninstalling the ThinkPad fingerprint software. Uninstalling the software is not recommended.
The instructions that follow will apply to ThinkPad Fingerprint software v5.6.1.
Method 2
Another method that may work for you requires you to download a certain file from off of the internet.
Downloading files can pose some risk as you can never be 100% sure of what the file you’re downloading it is opened.
So, be sure to keep your system safe from harmful viruses and other malware by using an antivirus program like Antivirus Plus. Also, make sure that you only use recommended and trusted programs.
You should also pair your antivirus program with a good anti-spyware program such as StopZilla. This will offer you added protection and keep you safe from identity theft.
An error message related to vrlogon.dll may be found among users of IBM Lenovo products. You may receive an error message like the ones posted below:
A recently installed program has disabled the Welcome screen and Fast User Switching. To restore these features, you must uninstall the program. The following file name might help you identify the program that made the change:vrlogon.dll.
The Logon User Interface DLL vrlogon.dll failed to load. Contact your system administrator to replace the DLL, or restore the original DLL.
Cause
This error will appear if the option to Replace Windows logon with fingerprint-protected logon is checked in the ThinkPad fingerprint software. Clicking on Change the way users log on or off will produce the error message stated above.
The following ThinkPad products running Windows XP may be affected by this error:
ThinkPad T42
ThinkPad T42p
ThinkPad Z60m
ThinkPad Z60t
Resolution
This error may be resolved without uninstalling the ThinkPad fingerprint software. Uninstalling the software is not recommended.
The instructions that follow will apply to ThinkPad Fingerprint software v5.6.1.
- Go to Start.
- Select All Programs.
- Select ThinkVantage.
- Select ThinkVantage Fingerprint Software.
- Click on Control Center.
- Click Settings.
- Click on System Settings next.
- Select the Logon tab.
- Disable Allow to bypass logon using Windows password.
- Shutdown your system completely.
- This will allow the changes to take place.
Method 2
Another method that may work for you requires you to download a certain file from off of the internet.
Downloading files can pose some risk as you can never be 100% sure of what the file you’re downloading it is opened.
So, be sure to keep your system safe from harmful viruses and other malware by using an antivirus program like Antivirus Plus. Also, make sure that you only use recommended and trusted programs.
You should also pair your antivirus program with a good anti-spyware program such as StopZilla. This will offer you added protection and keep you safe from identity theft.
How to Fix Vrlogon.dll Failed to Load Error
rlogon.dll is a dynamic link library file that belongs to IBM Fingerprint Software from UPEK Inc.
Error Message:
An error message related to vrlogon.dll may be found among users of IBM Lenovo products. You may receive an error message like the ones posted below:
The Logon User Interface DLL vrlogon.dll failed to load. Contact your system administrator to replace the DLL, or restore the original DLL.
Cause
This error will appear if the option to Replace Windows logon with fingerprint-protected logon is checked in the ThinkPad fingerprint software. Clicking on Change the way users log on or off will produce the error message stated above.
The following ThinkPad products running Windows XP may be affected by this error:
ThinkPad T42
ThinkPad T42p
ThinkPad Z60m
ThinkPad Z60t
Resolution
This error may be resolved without uninstalling the ThinkPad fingerprint software. Uninstalling the software is not recommended.
The instructions that follow will apply to ThinkPad Fingerprint software v5.6.1.
Method 2
Another method that may work for you requires you to download a certain file from off of the internet.
Downloading files can pose some risk as you can never be 100% sure of what the file you’re downloading it is opened.
So, be sure to keep your system safe from harmful viruses and other malware by using an antivirus program like Antivirus Plus. Also, make sure that you only use recommended and trusted programs.
You should also pair your antivirus program with a good anti-spyware program such as StopZilla. This will offer you added protection and keep you safe from identity theft.
Error Message:
An error message related to vrlogon.dll may be found among users of IBM Lenovo products. You may receive an error message like the ones posted below:
A recently installed program has disabled the Welcome screen and Fast User Switching. To restore these features, you must uninstall the program. The following file name might help you identify the program that made the change:vrlogon.dll.
The Logon User Interface DLL vrlogon.dll failed to load. Contact your system administrator to replace the DLL, or restore the original DLL.
Cause
This error will appear if the option to Replace Windows logon with fingerprint-protected logon is checked in the ThinkPad fingerprint software. Clicking on Change the way users log on or off will produce the error message stated above.
The following ThinkPad products running Windows XP may be affected by this error:
ThinkPad T42
ThinkPad T42p
ThinkPad Z60m
ThinkPad Z60t
Resolution
This error may be resolved without uninstalling the ThinkPad fingerprint software. Uninstalling the software is not recommended.
The instructions that follow will apply to ThinkPad Fingerprint software v5.6.1.
- Go to Start.
- Select All Programs.
- Select ThinkVantage.
- Select ThinkVantage Fingerprint Software.
- Click on Control Center.
- Click Settings.
- Click on System Settings next.
- Select the Logon tab.
- Disable Allow to bypass logon using Windows password.
- Shutdown your system completely.
- This will allow the changes to take place.
Method 2
Another method that may work for you requires you to download a certain file from off of the internet.
Downloading files can pose some risk as you can never be 100% sure of what the file you’re downloading it is opened.
So, be sure to keep your system safe from harmful viruses and other malware by using an antivirus program like Antivirus Plus. Also, make sure that you only use recommended and trusted programs.
You should also pair your antivirus program with a good anti-spyware program such as StopZilla. This will offer you added protection and keep you safe from identity theft.
Thursday, January 6, 2011
How to remove nickname cache entries, one at a time
Outlook 2010
- Open a new email message.
- Type the first few characters of the nickname cache entry that you want to remove from the cache.
- When the entry appears in the "suggested names" list, move your mouse pointer over the name until it becomes highlighted. (But do not click the name).
- When the “X” icon appears next to the highlighted name, click X to remove the name from the list.
Outlook 2007 or Outlook 2003
- Open a new email message.
- Type the first few characters of the nickname cache entry that you want to remove from the cache.
- When the entry appears in the "suggested names" list, use the UP and DOWN arrow keys on your keyboard to select the entry, and then press DELETE on your keyboard.
How to clear the whole nickname cache
Outlook 2010
Use one of the following methods to reset the whole Outlook nickname cache for Microsoft Outlook 2010.Method 1
- With Outlook 2010 open, click File (BackStage), and then click Options.
- Click the Mail tab.
- Under Send Messages, click Empty Auto-Complete List.
Method 2
- Click Start, and then click Run.
- Start Outlook by using the /CleanAutoCompleteCache switch.
For example: Outlook.exe /CleanAutoCompleteCache
Note If Outlook is not installed in the default location, you must point to the path of Outlook.exe.
Outlook 2002 through Outlook 2007
Windows 7 or Windows Vista: Use the following steps to reset the whole Outlook nickname cache.- Exit Outlook.
- Click Start, and then click click Computer.
- Click Organize, and then click Folder and search options.
- On the View tab, click to enable the Show hidden files, folders, and drives option.
- Click OK.
- On the Start menu, click All Programs, click Accessories, and then click Run.
- In the Run dialog box, type the following command (including the quotation marks), and then click OK:
“C:\ Users\UserName\AppData\Roaming\Microsoft\Outlook”
Note Username in this path is the name of the currently logged on Windows user. - Right-click the .NK2 file that has name of the profile that you want to reset, and then click Rename.
- Rename the file as profilename.bak, and then press ENTER.
- Start Outlook.
- Quit Outlook.
- Click Start, and then click Search.
- In the Search Companion left-side panel, click All files or folders.
- In the All or part of the file name: box, type *.NK2.
- In the Look In box, click to select your local hard disk.
- Click More advanced options, click to select Search hidden files and folders check box.
- Click Search.
- Right-click the .NK2 file with the name of the profile that you want to reset, and then click Rename.
- Rename the file to profilename.bak, and then press ENTER.
- Quit Windows Explorer.
- Restart Outlook.
Use the steps in the following section to reset the Outlook nickname cache for both Microsoft Windows 2000 and Microsoft Windows Millennium Edition (Me).
- Quit Outlook.
- Start Windows Explorer.
- On the Tools menu, click Folder Options, and then click the View tab.
- Under Advanced Settings, click to select the Show hidden files and folders check box.
- Click OK.
- Click Start, point to Search, and then click For Files or Folders.
- In the Search for Files and Folders box, type *.NK2 in the Search for files or folders named box.
- In the Look In box, click to select your local hard disk.
- Click Search Now.
- Right-click the .NK2 file with the name of the profile that you want to reset, and then click Rename.
- Rename the file to profilename.bak, and then press ENTER.
- Quit Windows Explorer.
- Restart Outlook.
Use the steps in the following section to reset the Outlook nickname cache for both Microsoft Windows NT 4.0 and Microsoft Windows 98:
- Quit Outlook.
- Start Windows Explorer.
- On the Tools menu, click Folder Options, and then click the View tab.
- Under Advanced Settings, click to select the Show all files check box.
- Click OK.
- Click Start, point to Search, and then click For Files or Folders.
- In the Named box, type *.NK2.
- In the Look In box, click to select your local hard disk.
- Click Find Now.
- Right-click the .NK2 file with the name of the profile that you want to reset, and then click Rename.
- Rename the file to profilename.bak, and then press ENTER.
- Quit Windows Explorer.
- Restart Outlook.
http://support.microsoft.com/kb/287623
Tuesday, January 4, 2011
win xp installation
1. | Insert the Windows XP CD into your computer and restart your computer. | ||||
2. | If prompted to start from the CD, press SPACEBAR. If you miss the prompt (it only appears for a few seconds), restart your computer to try again. | ||||
3. | Windows XP Setup begins. During this portion of setup, your mouse will not work, so you must use the keyboard. On the Welcome to Setup page, press ENTER. | ||||
4. | On the Windows XP Licensing Agreement page, read the licensing agreement. Press the PAGE DOWN key to scroll to the bottom of the agreement. Then press F8. | ||||
5. | This page enables you to select the hard disk drive on which Windows XP will be installed. Once you complete this step, all data on your hard disk drive will be removed and cannot be recovered. It is extremely important that you have a recent backup copy of your files before continuing. When you have a backup copy, press D, and then press L when prompted. This deletes your existing data. | ||||
6. | Press ENTER to select Unpartitioned space, which appears by default. | ||||
7. | Press ENTER again to select Format the partition using the NTFS file system, which appears by default. | ||||
8. | Windows XP erases your hard disk drive using a process called formatting and then copies the setup files. You can leave your computer and return in 20 to 30 minutes. Part 2: Continue the installation | ||||
9. | Windows XP restarts and then continues with the installation process. From this point forward, you can use your mouse. Eventually, the Regional and Language Options page appears. Click Next to accept the default settings. If you are multilingual or prefer a language other than English, you can change language settings after setup is complete. | ||||
10. | On the Personalize Your Software page, type your name and your organization name. Some programs use this information to automatically fill in your name when required. Then, click Next. | ||||
11. | On the Your Product Key page, type your product key as it appears on your Windows XP CD case. The product key is unique for every Windows XP installation. Then, click Next. | ||||
12. | On the Computer Name and Administrator Password page, in the Computer name box, type a name that uniquely identifies your computer in your house, such as FAMILYROOM or TOMS. You cannot use spaces or punctuation. If you connect your computer to a network, you will use this computer name to find shared files and printers. Type a strong password that you can remember in the Administrator password box, and then retype it in the Confirm password box. Write the password down and store it in a secure place. Click Next. | ||||
13. | On the Date and Time Settings page, set your computer’s clock. Then, click the Time Zone down arrow, and select your time zone. Click Next. | ||||
14. | Windows XP will spend about a minute configuring your computer. On the Networking Settings page, click Next. | ||||
15. | On the Workgroup or Computer Domain page, click Next. Part 3: Complete the installation | ||||
16. | Windows XP will spend 20 or 30 minutes configuring your computer and will automatically restart when finished. When the Display Settings dialog appears, click OK. | ||||
17. | When the Monitor Settings dialog box appears, click OK. | ||||
18. | The final stage of setup begins. On the Welcome to Microsoft Windows page, click Next. | ||||
19. | On the Help protect your PC page, click Help protect my PC by turning on Automatic Updates now. Then, click Next. | ||||
20. | Windows XP will then check if you are connected to the Internet:
| ||||
21. | Windows XP Setup displays the Ready to activate Windows? page. If you are connected to the Internet, click Yes, and then click Next. If you are not yet connected to the Internet, click No, click Next, and then skip to step 24. After setup is complete, Windows XP will automatically remind you to activate and register your copy of Windows XP. | ||||
22. | On the Ready to register with Microsoft? page, click Yes, and then click Next. | ||||
23. | On the Collecting Registration Information page, complete the form. Then, click Next. | ||||
24. | On the Who will use this computer? page, type the name of each person who will use the computer. You can use first names only, nicknames, or full names. Then click Next. To add users after setup is complete or to specify a password to keep your account private, read Create and customize user accounts. | ||||
25. | On the Thank you! page, click Finish. |
transfer putty settings
PuTTY is tops on the short list of applications I install first on any Windows machine. Over the years I've used PuTTY, I've installed it on a huge number of computers but I've always had one complaint; There isn't a configuration file I can backup or move to a new machine.
Getting all the little comfort settings correct for each SSH connection can be a pain. The third time you set emulation, keys, encryption type, etc. for each machine you regularly access, you lose patience. The fifth time you find yourself re-entering settings you might do what I did, find a better way.
Moving PuTTy settings between computers is an easy task once you know what's involved. We'll find the registry keys where PuTTy stores its configuration information and export them to a file. We'll then use that file we've made to import our configuration on the target machine.
Exporting Your PuTTy Configuration
Putty stores its settings in the Windows registry. To save a backup of your Putty settings, you'll need to export this registry key to a file.
HKEY_CURRENT_USER\Software\SimonTatham
(Simon Tatham is the original developer responsible for PuTTy)
1. Click Start->Run and type "RegEdt32" in the "Open" dialog. Click "Ok"
2. One RegEdt32 starts, you'll be presented with an application which looks something like:
3. Press "Ctrl+F" to bring up the Find dialog. Enter the name of the key, "SimonTratham" in the "Find What" field, and make sure only "Keys" is checked in the "Look At" section of the dialog. Finally, click "Find Next"
4. The search may take a while, reminding us that the Windows Registry is a large and mysterious place where dragons be. Let's use these few seconds to reflect on the fact that you should never, ever, never change things in the registry unless you are absolutely, positively, totally, completely, 100% dead sure that you know exactly what you're doing. When the search completes we'll see the key name for which we're looking.
5. Click File->Export. Give your file an appropriate name like, "putty.reg" and click "Save"
6. We're done! Save the putty.reg file somewhere safe. The file doesn't contain any passwords or actual SSH key values so, it's relatively safe from prying eyes. Still, it does contain your configuration and that kind of data is a private matter.
Importing Your PuTTy Configuration
To import your saved PuTTy configuration on any other Windows computer simply copy your exported registry key, right click on the file and click "Merge"
Windows will ask you for confirmation that you want to import this set of registry values. We know this file is safe, because we created it but, you should never import registry information from an unknown source.
That's all you need to know about moving your PuTTy configuration from one machine to another. This can be really useful information when upgrading to a new PC or, if you're an office IT guy where your users all have a standard list of servers they need to connect via SSH, you can create a reference configuration on once machine and "share" it between every computer in the office.
view hidden folders in windows 7
Windows 7 hides certain files so that they are not able to be seen when you exploring the files on your computer. The files it hides are typically Windows 7 System files that if tampered with could cause problems with the proper operation of the computer. It is possible, though, for a user or piece of software to set make a file hidden by enabling the hidden attribute in a particular file or folder's properties. Due to this it can be beneficial at times to be able to see any hidden files that may be on your computer. This tutorial will explain how to show all hidden files in Windows 7.
To enable the viewing of hidden and protected system files in Windows 7 please follow these steps:
- Close all programs so that you are at your desktop.
- Click on the Start button. This is the small round button () in the lower left corner of your screen that has a Windows flag on it.
- Click on the Control Panel menu option.
- When the control panel opens you will see a screen similar to Figure 1 below.
Figure 1. Windows 7 Control Panel
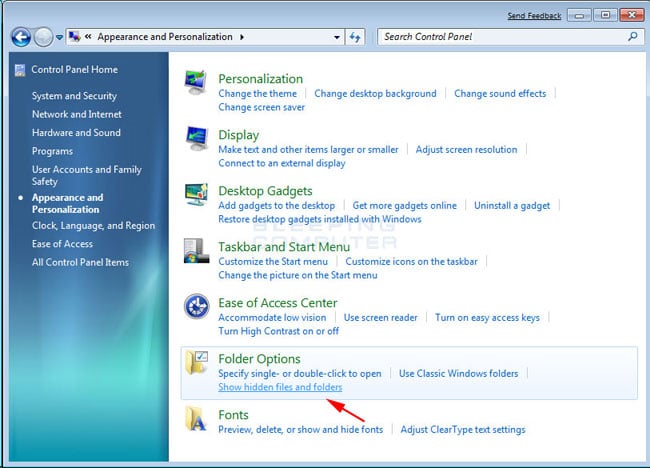
- Click on the Appearance and Personalization link.
- You will now be in the Appearance and Personalization control panel as shown in Figure 2 below.
Figure 2. Windows 7 Appearance and Personalization screen
Now click on the Show hidden files and folders option as shown by the red arrow in Figure 2 above.
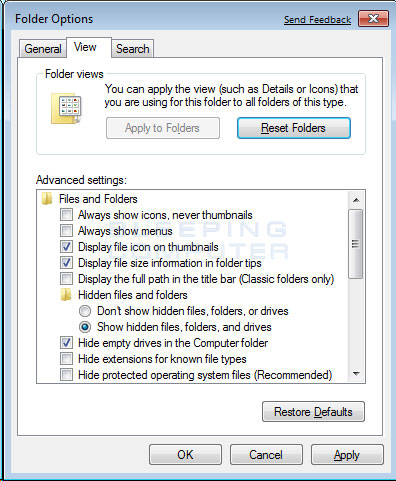
- Under the Hidden files and folders section select the radio button labeled Show hidden files, folders, and drives.
- Remove the checkmark from the checkbox labeled Hide extensions for known file types.
- Remove the checkmark from the checkbox labeled Hide protected operating system files (Recommended).
Once this is done, your Folder Options screen should look similar to the following image.
Figure 3. Folder Options screen
- Press the Apply button and then the OK button.
Subscribe to:
Posts (Atom)